A Production-Ready, Secure, and Scalable Server Architecture on Hetzner Cloud

The Big Picture: What We’re Building
Before diving into the step-by-step implementation, let’s understand the complete architecture we’ll be creating. This is a fortress-like, security-first infrastructure that provides enterprise-grade capabilities at a fraction of traditional cloud costs.
graph TD
    subgraph "Public Zone"
        User["<br><b>User</b><br>"]
        Admin["<br><b>Developer / Admin</b><br>Kamal Deploy"]
        CF["<b>Cloudflare</b><br>DNS, SSL/TLS, Caching"]
    end
    subgraph "Hetzner Cloud"
        LB["<b>Hetzner Load Balancer</b><br>Public IP<br>Terminates SSL"]
        subgraph "Production Private Network"
            Bastion["<b>Bastion Host / NAT Gateway</b><br>Public IP (SSH Port 22 Only)<br>Private IP"]
            subgraph "Application"
                App1["<b>App Server 1</b><br>(Private IP)<br>Docker: Rails App"]
                App2["<b>App Server 2</b><br>(Private IP)<br>Docker: Rails App"]
            end
            subgraph "Background Jobs"
                Jobs["<b>Jobs Server</b><br>(Private IP)<br>Docker: Rails + Solid Queue"]
            end
            subgraph "Database Cluster"
                DB_Primary["<b>PostgreSQL Primary</b><br>(Private IP)<br>Hetzner Volume"]
                DB_Replica["<b>PostgreSQL Replica</b><br>(Private IP)<br>Hetzner Volume"]
            end
            subgraph "Monitoring"
                Monitor["<b>Monitoring Server</b><br>(Private IP)<br>Prometheus + Grafana"]
            end
        end
        subgraph "External Hetzner Services"
            Storage["<b>Hetzner Object Storage</b><br>(S3 Compatible)"]
        end
    end
    %% Connections
    User -- "HTTPS (Port 443)" --> CF
    CF -- "HTTPS (Port 443)" --> LB
    Admin -- "SSH (Port 22)" --> Bastion
    LB -- "HTTP Traffic<br>(Private Network)" --> App1
    LB -- "HTTP Traffic<br>(Private Network)" --> App2
    LB -- "Health Check (/up)" --> App1
    LB -- "Health Check (/up)" --> App2
    Bastion -- "SSH via Proxy<br>(Kamal Deployment)" --> App1
    Bastion -- "SSH via Proxy<br>(Kamal Deployment)" --> App2
    Bastion -- "SSH via Proxy<br>(Kamal Deployment)" --> Jobs
    Bastion -- "SSH via Proxy<br>(Kamal Deployment)" --> DB_Primary
    Bastion -- "SSH via Proxy<br>(Kamal Deployment)" --> DB_Replica
    Bastion -- "SSH Access" --> Monitor
    App1 -- "PostgreSQL (Port 5432)" --> DB_Primary
    App2 -- "PostgreSQL (Port 5432)" --> DB_Primary
    Jobs -- "PostgreSQL (Port 5432)" --> DB_Primary
    DB_Primary -- "Streaming Replication" --> DB_Replica
    Monitor -- "Metrics Collection" --> App1
    Monitor -- "Metrics Collection" --> App2
    Monitor -- "Metrics Collection" --> Jobs
    Monitor -- "Metrics Collection" --> DB_Primary
    %% Outbound connections via NAT Gateway
    App1 -- "Outbound S3 API Call<br>(via NAT on Bastion)" --> Storage
    App2 -- "Outbound S3 API Call<br>(via NAT on Bastion)" --> Storage
    Jobs -- "Outbound S3 API Call<br>(via NAT on Bastion)" --> Storage
    %% Styling
    classDef default fill:#f9f9f9,stroke:#333,stroke-width:2px;
    classDef public fill:#e6f7ff,stroke:#006080,stroke-width:2px;
    classDef private fill:#fff5e6,stroke:#8D6E63,stroke-width:2px;
    classDef db fill:#f0f4c3,stroke:#558B2F,stroke-width:2px;
    classDef storage fill:#e1e1e1,stroke:#555,stroke-width:2px;
    classDef monitor fill:#f3e5f5,stroke:#7B1FA2,stroke-width:2px;
    class User,Admin,CF public;
    class Bastion,LB,App1,App2,Jobs private;
    class DB_Primary,DB_Replica db;
    class Storage storage;
    class Monitor monitor;
Architecture Overview
This infrastructure creates a security-first, highly available Rails application with the following key characteristics:
🔒 Security Layers
- Private Network Isolation: All application servers live in a private network with zero public internet access
- Single Entry Point: Only the bastion host has SSH access (port 22) from the outside world
- Zero-Trust Internal Network: Each server has granular firewall rules allowing only necessary connections
- End-to-End Encryption: CloudFlare → Hetzner LB → App Servers all use SSL/TLS
🚀 High Availability
- Load-Balanced Applications: Two Rails app servers behind a Hetzner Load Balancer
- Database Replication: PostgreSQL primary with streaming replica for failover
- Solid Queue Jobs: Dedicated server for background job processing using Rails’ built-in solution
- Health Monitoring: Automatic health checks remove failed servers from rotation
- Persistent Storage: Database files stored on Hetzner Volumes (network-attached storage)
📊 Modern Rails Stack
- Solid Queue: Rails 8’s built-in job queue (replaces Sidekiq/Redis)
- Solid Cache: Database-backed caching solution
- Solid Cable: Database-backed Action Cable for WebSockets
- No External Dependencies: Everything runs on PostgreSQL, reducing complexity
📈 Observability
- Dedicated Monitoring: Prometheus + Grafana on separate server
- Application Metrics: Rails performance and business metrics
- Infrastructure Metrics: Server health, database performance
- Centralized Logging: Log aggregation across all services
💰 Cost Efficiency
- Total Monthly Cost: ~80 for complete production setup with monitoring
- Staging Environment: Single €11.99 server for development/testing
- No External Services: Solid Queue eliminates Redis costs and complexity
- Hetzner Pricing: 50-70% cheaper than AWS/GCP for equivalent resources
Key Components Explained
| Component | Purpose | Access | Monthly Cost |
|---|---|---|---|
| CloudFlare | DNS, SSL termination, DDoS protection, CDN | Public | Free |
| Hetzner Load Balancer | Distributes traffic, SSL termination, health checks | Public IP | €5.39 |
| Bastion/NAT Gateway | Single SSH entry point, internet gateway for private servers | Public + Private IP | €3.92 |
| App Servers (2x) | Rails application containers with Solid Cache/Cable | Private IP only | €23.98 |
| Jobs Server | Background job processing with Solid Queue | Private IP only | €11.99 |
| PostgreSQL Primary | Main database with persistent storage | Private IP only | €11.99 |
| PostgreSQL Replica | Read replica for failover and read scaling | Private IP only | €11.99 |
| Monitoring Server | Prometheus + Grafana for observability | Private IP only | €5.99 |
| Hetzner Object Storage | File uploads, backups (S3-compatible) | API access via NAT | ~€2/month |
Traffic Flow
- User Request: User → CloudFlare → Hetzner Load Balancer → App Server
- Admin Access: Developer → Bastion (SSH) → Private Servers (via ProxyJump)
- Database Access: App Servers → PostgreSQL Primary → Replica (replication)
- Background Jobs: Jobs Server → PostgreSQL (Solid Queue tables)
- File Storage: App Servers → Hetzner Object Storage (via NAT Gateway)
- Monitoring: Prometheus → All servers → Grafana dashboards
Security Zones
- 🌐 Public Zone: CloudFlare, Load Balancer (public access)
- 🔐 DMZ: Bastion Host (controlled SSH access)
- 🏰 Private Zone: All application and database servers (no public access)
- 📊 Monitoring Zone: Observability stack (private access)
- 📦 Storage Zone: Object storage (API access only)
Ready to Build?
This architecture provides enterprise-grade security, availability, and performance while maintaining operational simplicity and cost efficiency. The complete setup takes about 3-4 hours following this guide.
What you’ll need:
- Hetzner Cloud account
- Domain name (for CloudFlare)
- Local machine with SSH and Docker
- Basic understanding of Rails deployment
Let’s get started with the step-by-step implementation guide below!
Implementation Guide: Building Component by Component
We’ll build this infrastructure step by step, following the logical order of dependencies. Each section explains why we need the component and how to implement it.
Step 1: Production Private Network
Why We Need a Private Network
Before creating any servers, we need to establish the network foundation. A private network provides:
- Security Isolation: Servers can communicate privately without internet exposure
- Performance: Internal traffic doesn’t go through public internet
- Cost Efficiency: No bandwidth charges for internal communication
- Network Control: We define IP ranges and routing rules
Think of this as creating the “internal wiring” of our data center before plugging in any devices.
How to Create the Private Network
Creating the Hetzner Cloud Private Network
Navigate to the Hetzner Cloud Console: Log in to your Hetzner Cloud project.
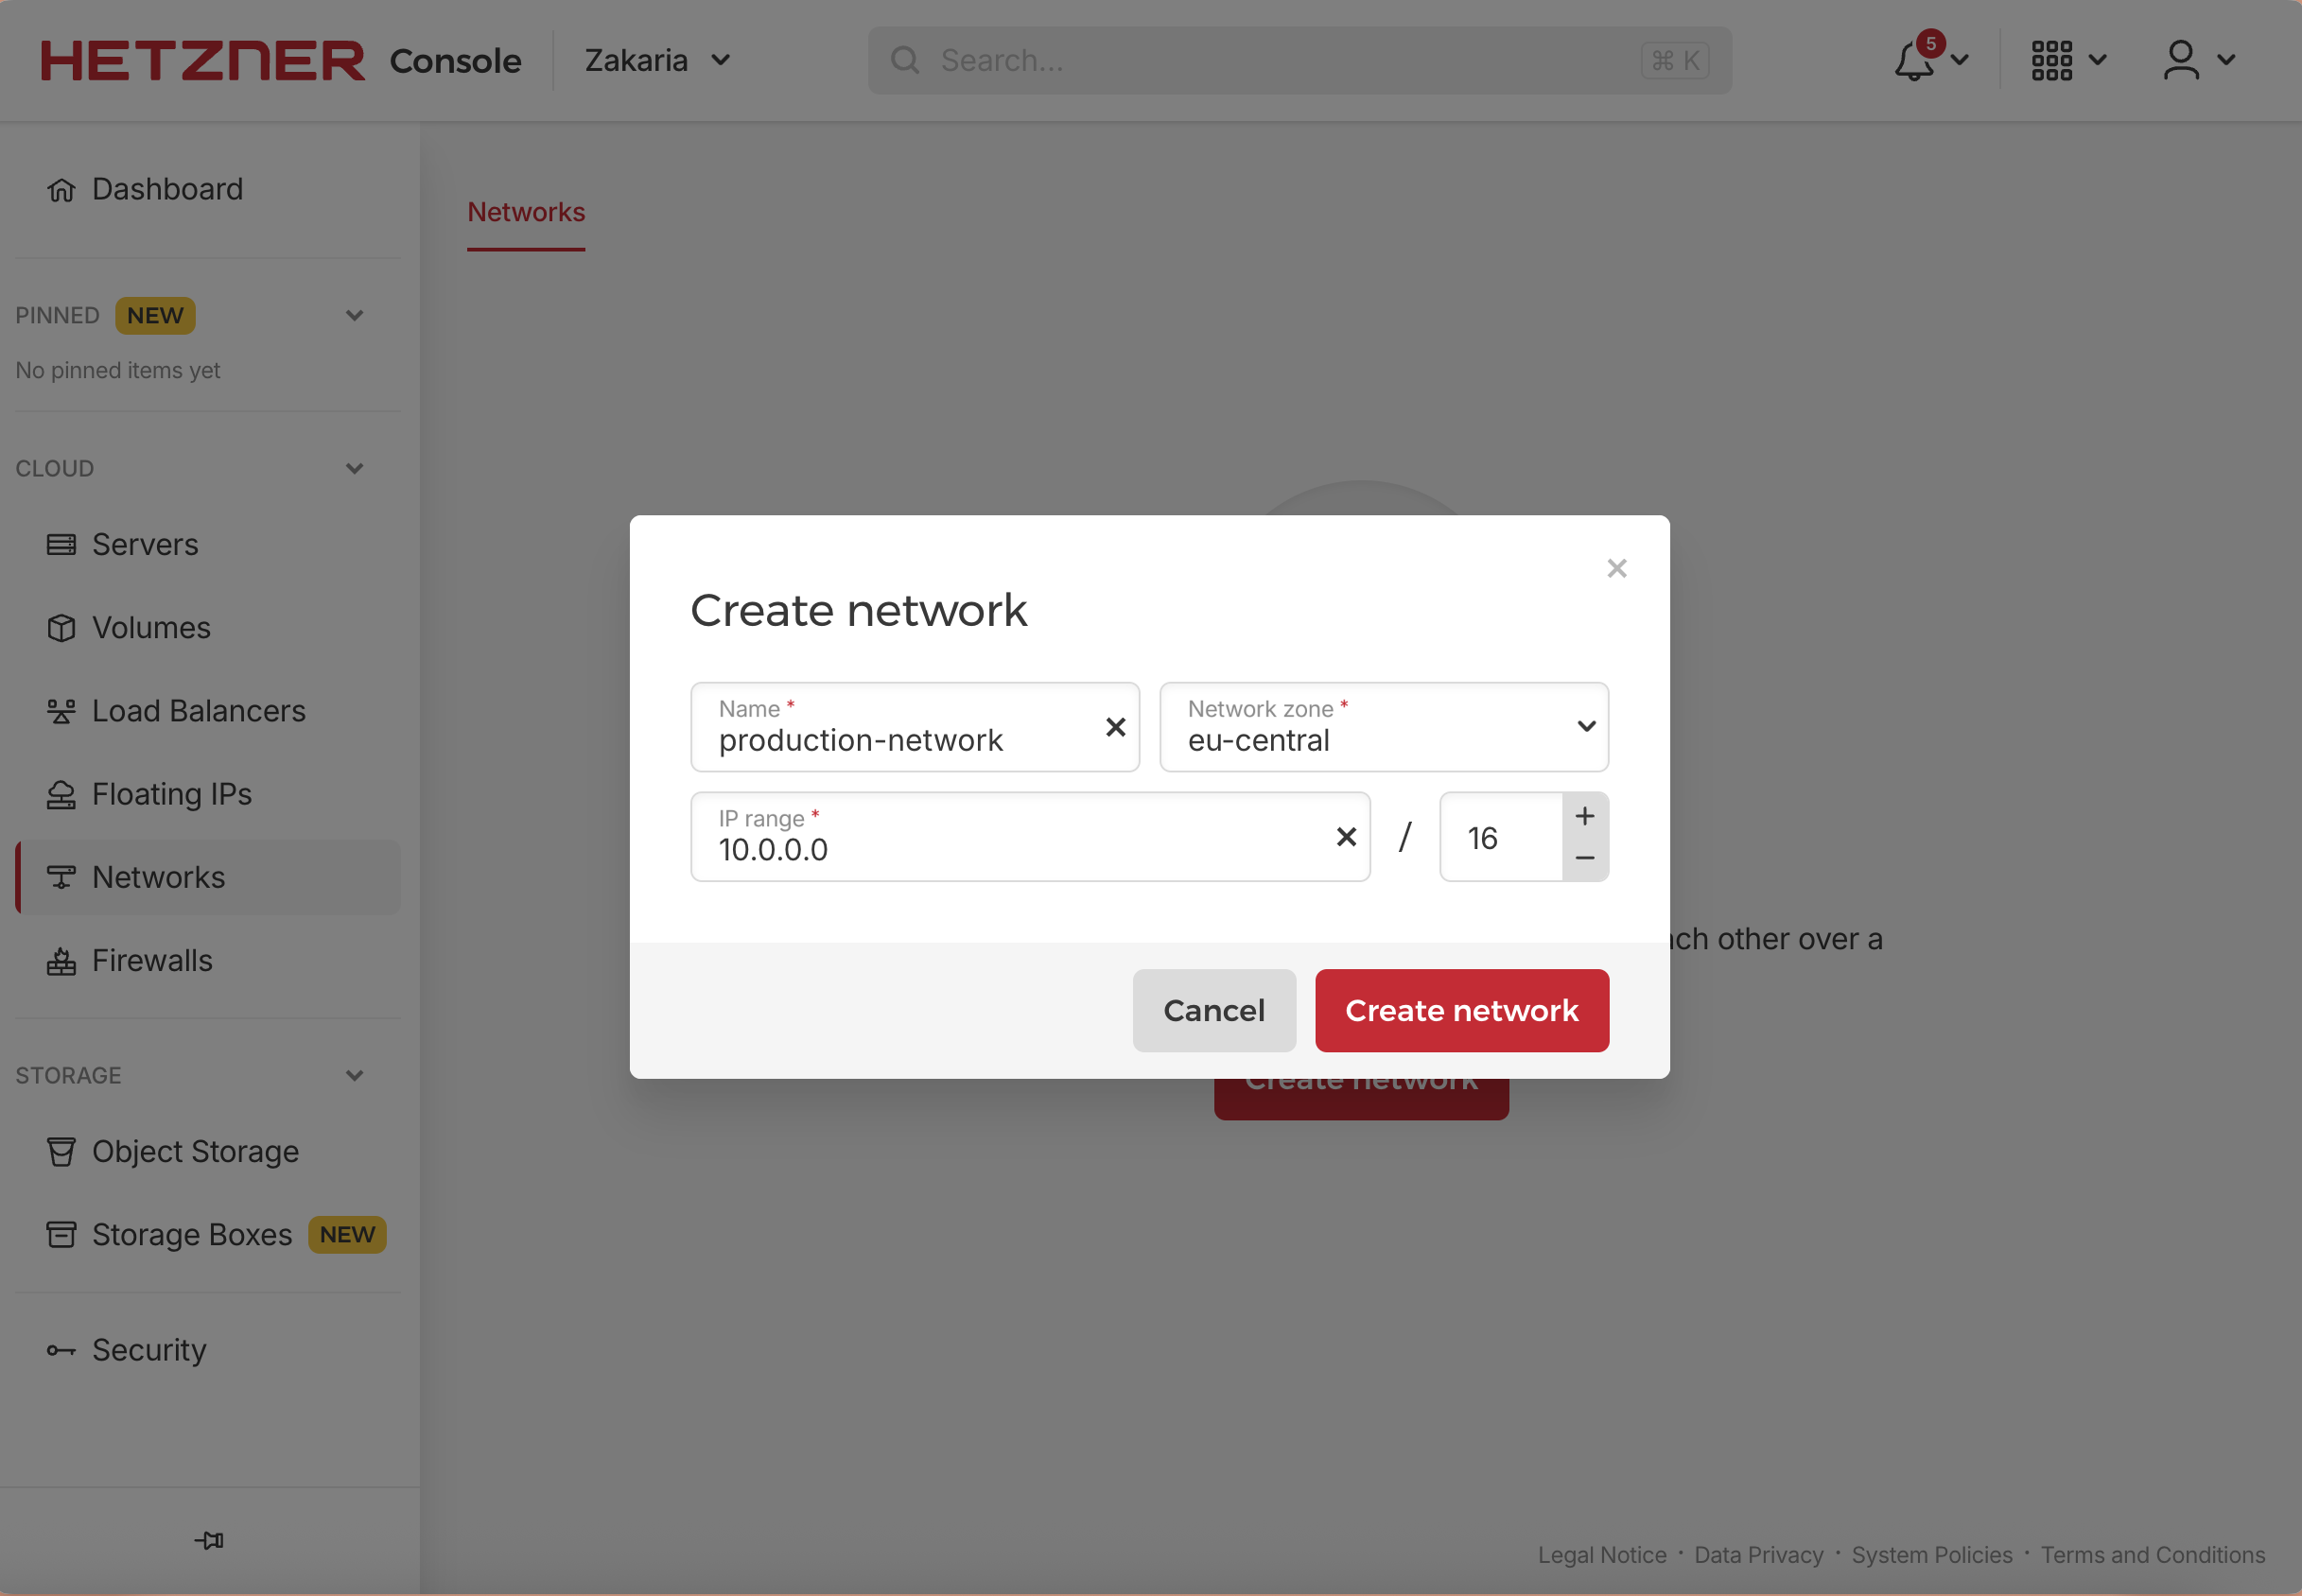
Create the Network: In the left menu, select “Networks” and then click “Create network”.
Define Network Parameters:
- Name:
production-network - IP Range:
10.0.0.0/16(provides 65,534 available IP addresses for future expansion)
- Name:
This creates the virtual network fabric that all our private servers will use to communicate securely.
Network IP Planning
We’ll use this IP allocation strategy:
1
2
3
4
5
6
7
10.0.0.2  - Bastion/NAT Gateway
10.0.0.3  - App Server 1
10.0.0.4  - App Server 2
10.0.0.5  - Jobs Server (Solid Queue)
10.0.0.6  - PostgreSQL Primary
10.0.0.7  - PostgreSQL Replica
10.0.0.8  - Monitoring Server
Step 2: Bastion Host / NAT Gateway
Why We Need a Bastion Host
The bastion host is the cornerstone of our security model. It serves three critical functions:
- Single Entry Point: Only one server has public SSH access, dramatically reducing attack surface
- Jump Host: Provides secure access to all private servers via SSH tunneling
- NAT Gateway: Allows private servers to access the internet for updates and dependencies
Without a bastion host, you’d either need:
- Public IPs on all servers (insecure and expensive)
- Complex VPN setup (operational overhead)
- No internet access for private servers (can’t update packages)
The bastion is like having a single, heavily guarded gate to your digital fortress.
How to Create and Configure the Bastion Host
Provisioning the Bastion Server
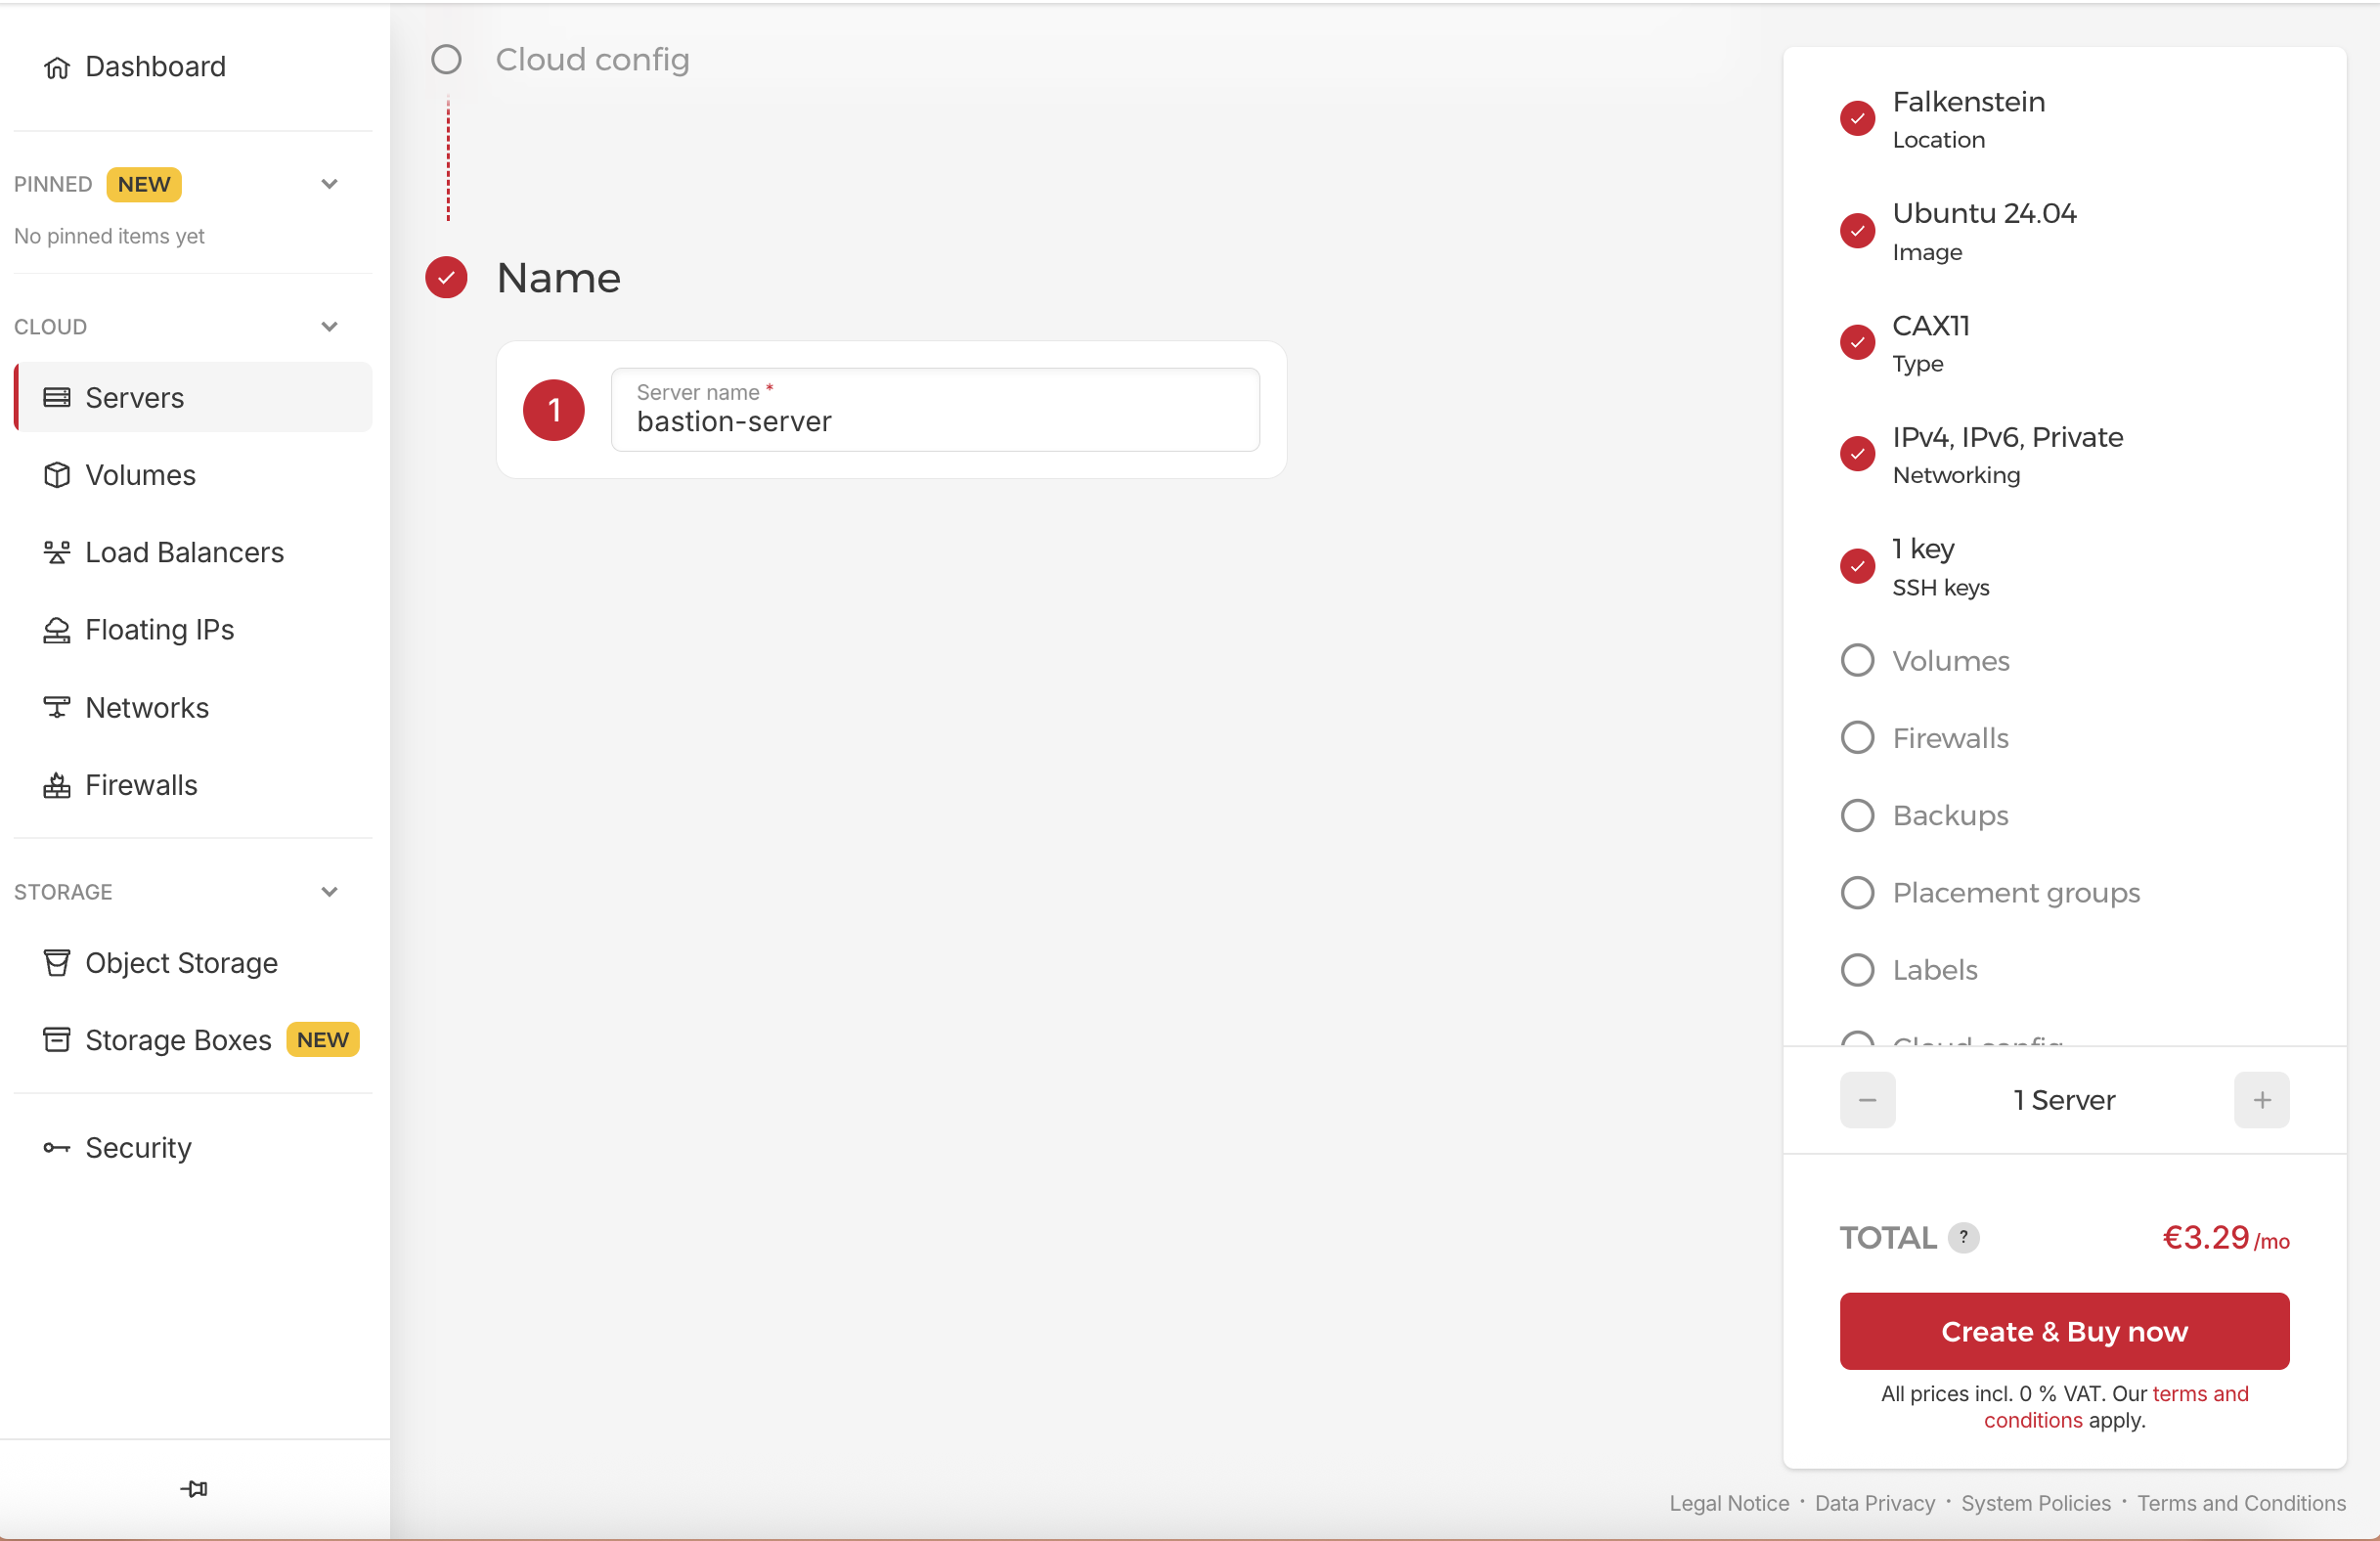
- Create the Server: In the left menu, select “Servers” and then click “Add Server”.
- Define Server Parameters:
- Name:
bastion-server - Server Type: CX22 or CAX11 (sufficient for this role)
- Location: Choose your preferred region (e.g.,
Falkenstein) - Image: Ubuntu 24.04
- Networking:
- ✅ Assign public IPv4 (critical - this is our only public server)
- ✅ Attach to our Private Network: production-network
- SSH Key: Add your public SSH key
- Name:
- a small server type is sufficient for this role. it’s just for SSH access and NAT functionality
- You don’t need to select Firewall, backups, volumes, and all other things in this step.
Initial Server Hardening
Connect to your new bastion server and start securing it:
1
ssh root@YOUR_BASTION_PUBLIC_IP
Then we need to update the system packages first
1
sudo apt update && sudo apt upgrade -y
Create Non-Root User with Sudo Privileges
It’s critical to disable direct root login and use a non-root user with sudo privileges
Follow these steps to create a non-root user:
1
2
3
4
5
6
7
8
9
10
11
12
13
14
15
16
17
# Create new user (replace 'deployer' with your preferred username)
adduser deployer
# It will prompt you to set a password and fill in user details

# Add user to sudo group
usermod -aG sudo deployer

# Create SSH directory for new user
mkdir -p /home/deployer/.ssh

# Copy authorized keys from root
cp /root/.ssh/authorized_keys /home/deployer/.ssh/authorized_keys

# Set proper ownership and permissions
chown -R deployer:deployer /home/deployer/.ssh
chmod 700 /home/deployer/.ssh
chmod 600 /home/deployer/.ssh/authorized_keys
Configure SSH Security
Edit the SSH daemon configuration to enhance security:
1
sudo nano /etc/ssh/sshd_config
Make these critical changes:
PasswordAuthentication no(disable password authentication)PermitRootLogin no(disable root login)
Restart SSH service:
1
sudo systemctl restart ssh
Test your non-root access before continuing! Open a new terminal and verify you can SSH as the deployer user:
1
ssh deployer@YOUR_BASTION_PUBLIC_IP
if you close your root terminal, and try to login with root user (ssh root@YOUR_BASTION_PUBLIC_IP), you will get an error like this:
1
Permission denied (publickey)
This is expected since we disabled root login.
From now we close the root terminal and continue with the deployer user.
Configure NAT Gateway Functionality
The bastion needs to act as a NAT gateway so private servers can access the internet:
1
2
3
4
5
6
7
8
9
10
11
12
13
14
15
16
17
18
19
20
21
22
23
24
25
26
27
28
29
30
31
32
33
34
35
36
37
38
39
40
41
42
43
44
45
46
47
48
49
50
51
52
53
54
55
56
57
58
59
60
61
62
63
64
65
66
67
68
69
70
71
72
73
74
75
76
77
78
79
80
81
82
83
# ------------------------------
# 1. Enable IP Forwarding
# ------------------------------

# Enable IP forwarding immediately (in-memory)
sudo sysctl -w net.ipv4.ip_forward=1

# Make IP forwarding persistent across reboots
# Remove existing entries to avoid duplicates
sudo sed -i '/^net.ipv4.ip_forward/d' /etc/sysctl.conf
echo 'net.ipv4.ip_forward=1' | sudo tee -a /etc/sysctl.conf

# ------------------------------
# 2. Set Up NAT (iptables)
# ------------------------------

# Configure iptables for Network Address Translation(NAT)

# Detect the primary public interface (alternative to hardcoding eth0)
PUBLIC_INTERFACE=$(ip route | grep default | awk '{print $5}' | head -n1)
echo "Detected public interface: $PUBLIC_INTERFACE"

# This rule translates private IPs to the bastion's public IP
sudo iptables -t nat -A POSTROUTING -s '10.0.0.0/16' -o $PUBLIC_INTERFACE -j MASQUERADE

# ------------------------------
# 3. Save iptables Rules
# ------------------------------

# Install iptables-persistent to save rules permanently
sudo apt install iptables-persistent -y

# Save current iptables rules
sudo netfilter-persistent save
# Output:
# run-parts: executing /usr/share/netfilter-persistent/plugins.d/15-ip4tables save
# run-parts: executing /usr/share/netfilter-persistent/plugins.d/25-ip6tables save

# ------------------------------
# 4. (Optional) Verify Configuration
# ------------------------------

# Check that IP forwarding is enabled
sudo sysctl net.ipv4.ip_forward
# Output should be: net.ipv4.ip_forward = 1

# List NAT rules to confirm MASQUERADE is set
sudo iptables -t nat -L -n -v
# Output should show a rule like:
# Chain PREROUTING (policy ACCEPT 0 packets, 0 bytes)
#  pkts bytes target     prot opt in     out     source               destination

# Chain INPUT (policy ACCEPT 0 packets, 0 bytes)
#  pkts bytes target     prot opt in     out     source               destination

# Chain OUTPUT (policy ACCEPT 0 packets, 0 bytes)
#  pkts bytes target     prot opt in     out     source               destination

# Chain POSTROUTING (policy ACCEPT 2 packets, 162 bytes)
#  pkts bytes target     prot opt in     out     source               destination
#     0     0 MASQUERADE  0    --  *      eth0    10.0.0.0/16          0.0.0.0/0

# Show routing table
ip route
# Output should show:
# default via 172.31.1.1 dev eth0 proto dhcp src 128.140.86.71 metric 100
# 10.0.0.0/16 via 10.0.0.1 dev enp7s0 proto dhcp src 10.0.0.2 metric 1003 mtu 1450
# 10.0.0.1 dev enp7s0 proto dhcp scope link src 10.0.0.2 metric 1003 mtu 1450
# 172.31.1.1 dev eth0 proto dhcp scope link src 128.140.86.71 metric 100
# 185.12.64.1 via 172.31.1.1 dev eth0 proto dhcp src 128.140.86.71 metric 100
# 185.12.64.2 via 172.31.1.1 dev eth0 proto dhcp src 128.140.86.71 metric 100

# ------------------------------
# 5. Test NAT Functionality
# ------------------------------

# Test from bastion itself - get public IPv4 address
curl -4 -s https://ifconfig.me
# Should return your bastion's public IPv4

# Alternative services for IPv4
# curl -s https://checkip.amazonaws.com
# curl -s https://ipinfo.io/ip
Configure Hetzner Cloud Routing
Tell Hetzner Cloud to route internet traffic through our bastion:
- Navigate to Networks in Hetzner Cloud Console
- Select your production-network
- Open the Routes tab and click Add route
- Configure the route as follows:
- Destination:
0.0.0.0/0(all internet traffic) - Gateway:
10.0.0.2(your bastion’s internal IP)
- Destination:
This ensures all internet-bound traffic from private servers is routed through the bastion, which handles NAT translation.
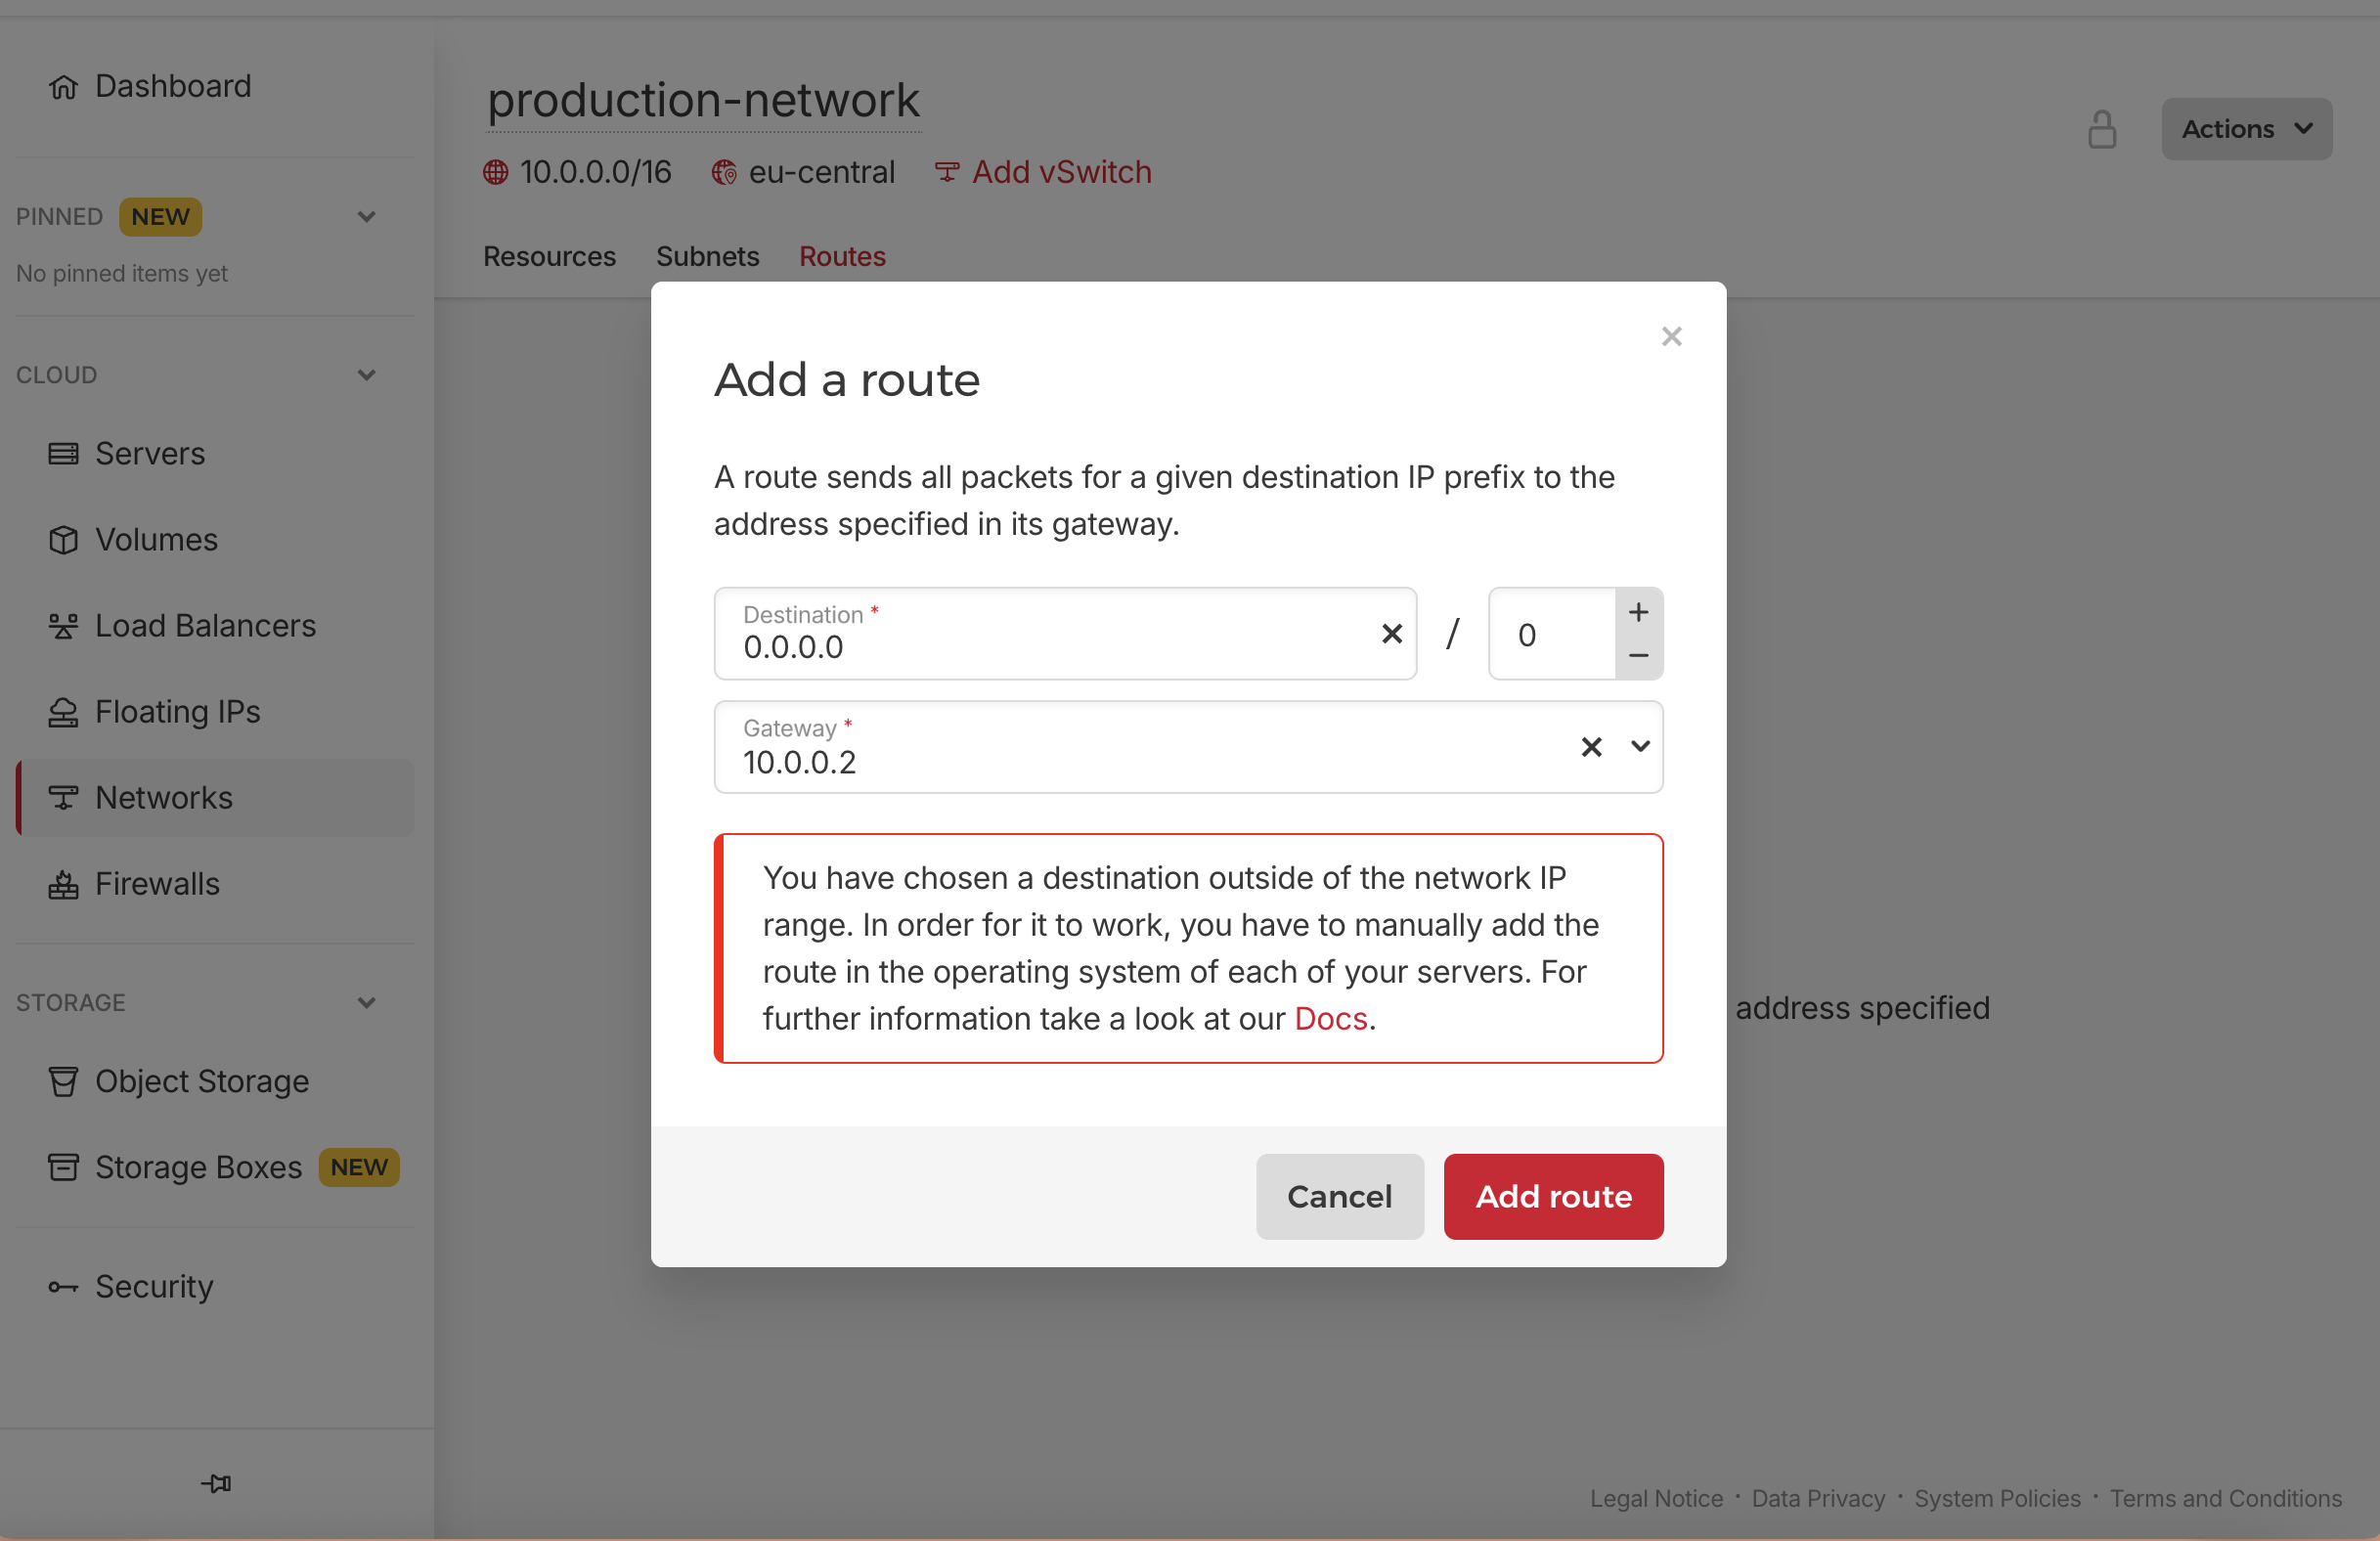
For the NAT routing to work as intended, we must manually configure the default gateway inside each private VM (server) to point to the bastion’s IP, and the warning you see is about that, but we will do the configuration while creating the application servers in the next step.
Step 3: Application Servers
Why We Need Multiple Application Servers
Multiple application servers provide:
- High Availability: If one server fails, the other continues serving traffic
- Load Distribution: Requests are spread across multiple servers
- Zero-Downtime Deployments: Deploy to servers one at a time
- Horizontal Scalability: Easy to add more servers when traffic grows
This is the difference between a hobby project and a production system that can handle real user load.
How to Create the Application Servers
Create Application Servers
Create two application servers for high availability:
In the left menu, select “Servers” and then click “Add Server”.
App Server 1:
- Name:
app-01 - Location: Same as your bastion region (e.g.,
Falkenstein) - Server Type: CPX41 or CAX31 (8 vCPU, 16GB RAM) - I pick CAX31 as it’s cheaper
- Image: Ubuntu 24.04
- Networking:
- ❌ No public IPv4 (private only)
- ❌ No public IPv6 (private only)
- ✅ Attach to production-network
- Tags (optional but recommended):
- role=app
- env=production
- SSH Key: Add your SSH key
App Server 2:
- Name:
app-02 - Same configuration as App Server 1
These servers will run our Rails application

Step 4: Jobs Server
Why We Need a Dedicated Jobs Server
Using a dedicated server for background jobs ensures:
- Resource Isolation: Background jobs don’t compete with web requests for CPU/memory
- Scaling Independence: Scale job processing separately from web serving
- Fault Isolation: Job failures don’t affect web server performance
- Specialized Tuning: You can optimize CPU, memory, and threads for job workloads
🚀 With Rails 8’s Solid Queue, we get Redis-like capabilities without the operational complexity of managing Redis.
How to Create the Jobs Server
Create Jobs Server
In the left menu, select “Servers” and then click “Add Server”.
Jobs Server:
- Name:
jobs-01 - Server Type: CX32 (4 vCPU, 8GB RAM)
- Location: Same as your bastion region (e.g.,
Falkenstein) - Image: Ubuntu 24.04
- Networking:
- ❌ No public IPv4 (private only)
- ❌ No public IPv6 (private only)
- ✅ Attach to production-network
- Tags (optional but recommended):
- role=jobs
- env=production
- Cloud Config: Paste the cloud-init configuration we created above
- SSH Key: Add your SSH key
This server will run Rails with Solid Queue for background job processing.
This is what we have so far:
Step 5: Provision PostgreSQL Database Servers
Create Database Servers
We start by provisioning two private servers that will host our Database cluster — one primary and one replica.
Primary Database
- Name:
db-primary - Type: CAX31 (8 vCPU, 16 GB RAM)
- Image: Ubuntu 24.04
- Networking:
- ❌ No public IPv4 (private only)
- ❌ No public IPv6 (private only)
- ✅ Attach to production-network
- Tags (optional but recommended):
- role=db
- env=production
- Cloud Config: Paste the cloud-init configuration we created above
- SSH Key: Add your SSH key
🔷 db-replica (Hot Standby)
- Name:
db-replica - Same configuration as Primary Database
Replica has lighter workload, it handles only read queries and replication, not write load, so we can use a smaller server type (e.g. 2 vCPU, 8 GB RAM)
Why We Use Separate Volumes for PostgreSQL
Even though each server comes with its own local SSD, we intentionally use network-attached volumes for PostgreSQL data.
⚠️ Reasons to Use Volumes (Not the Local SSD):
| Reason | Description |
|---|---|
| Data Persistence | If the server crashes, is deleted, or rebuilt, your database survives — volumes are independent of the VM. |
| Disaster Recovery | Volumes can be snapshotted and re-attached to new servers for fast recovery. |
| Modular Scaling | Need more storage? Resize or swap the volume without touching the base system. |
| Separation of Concerns | Keeps your app, OS, and logs separate from mission-critical data — clean architecture. |
| Docker Compatibility | Dockerized PostgreSQL expects persistent mounts for durability — volumes meet that need. |
✅ Using volumes is a standard best practice in any production-grade setup. It ensures data resilience, maintainability, and scalability.
Create and Attach Persistent Storage Volumes
Now that the servers are running, let’s create the volumes and attach them to the respective machines.
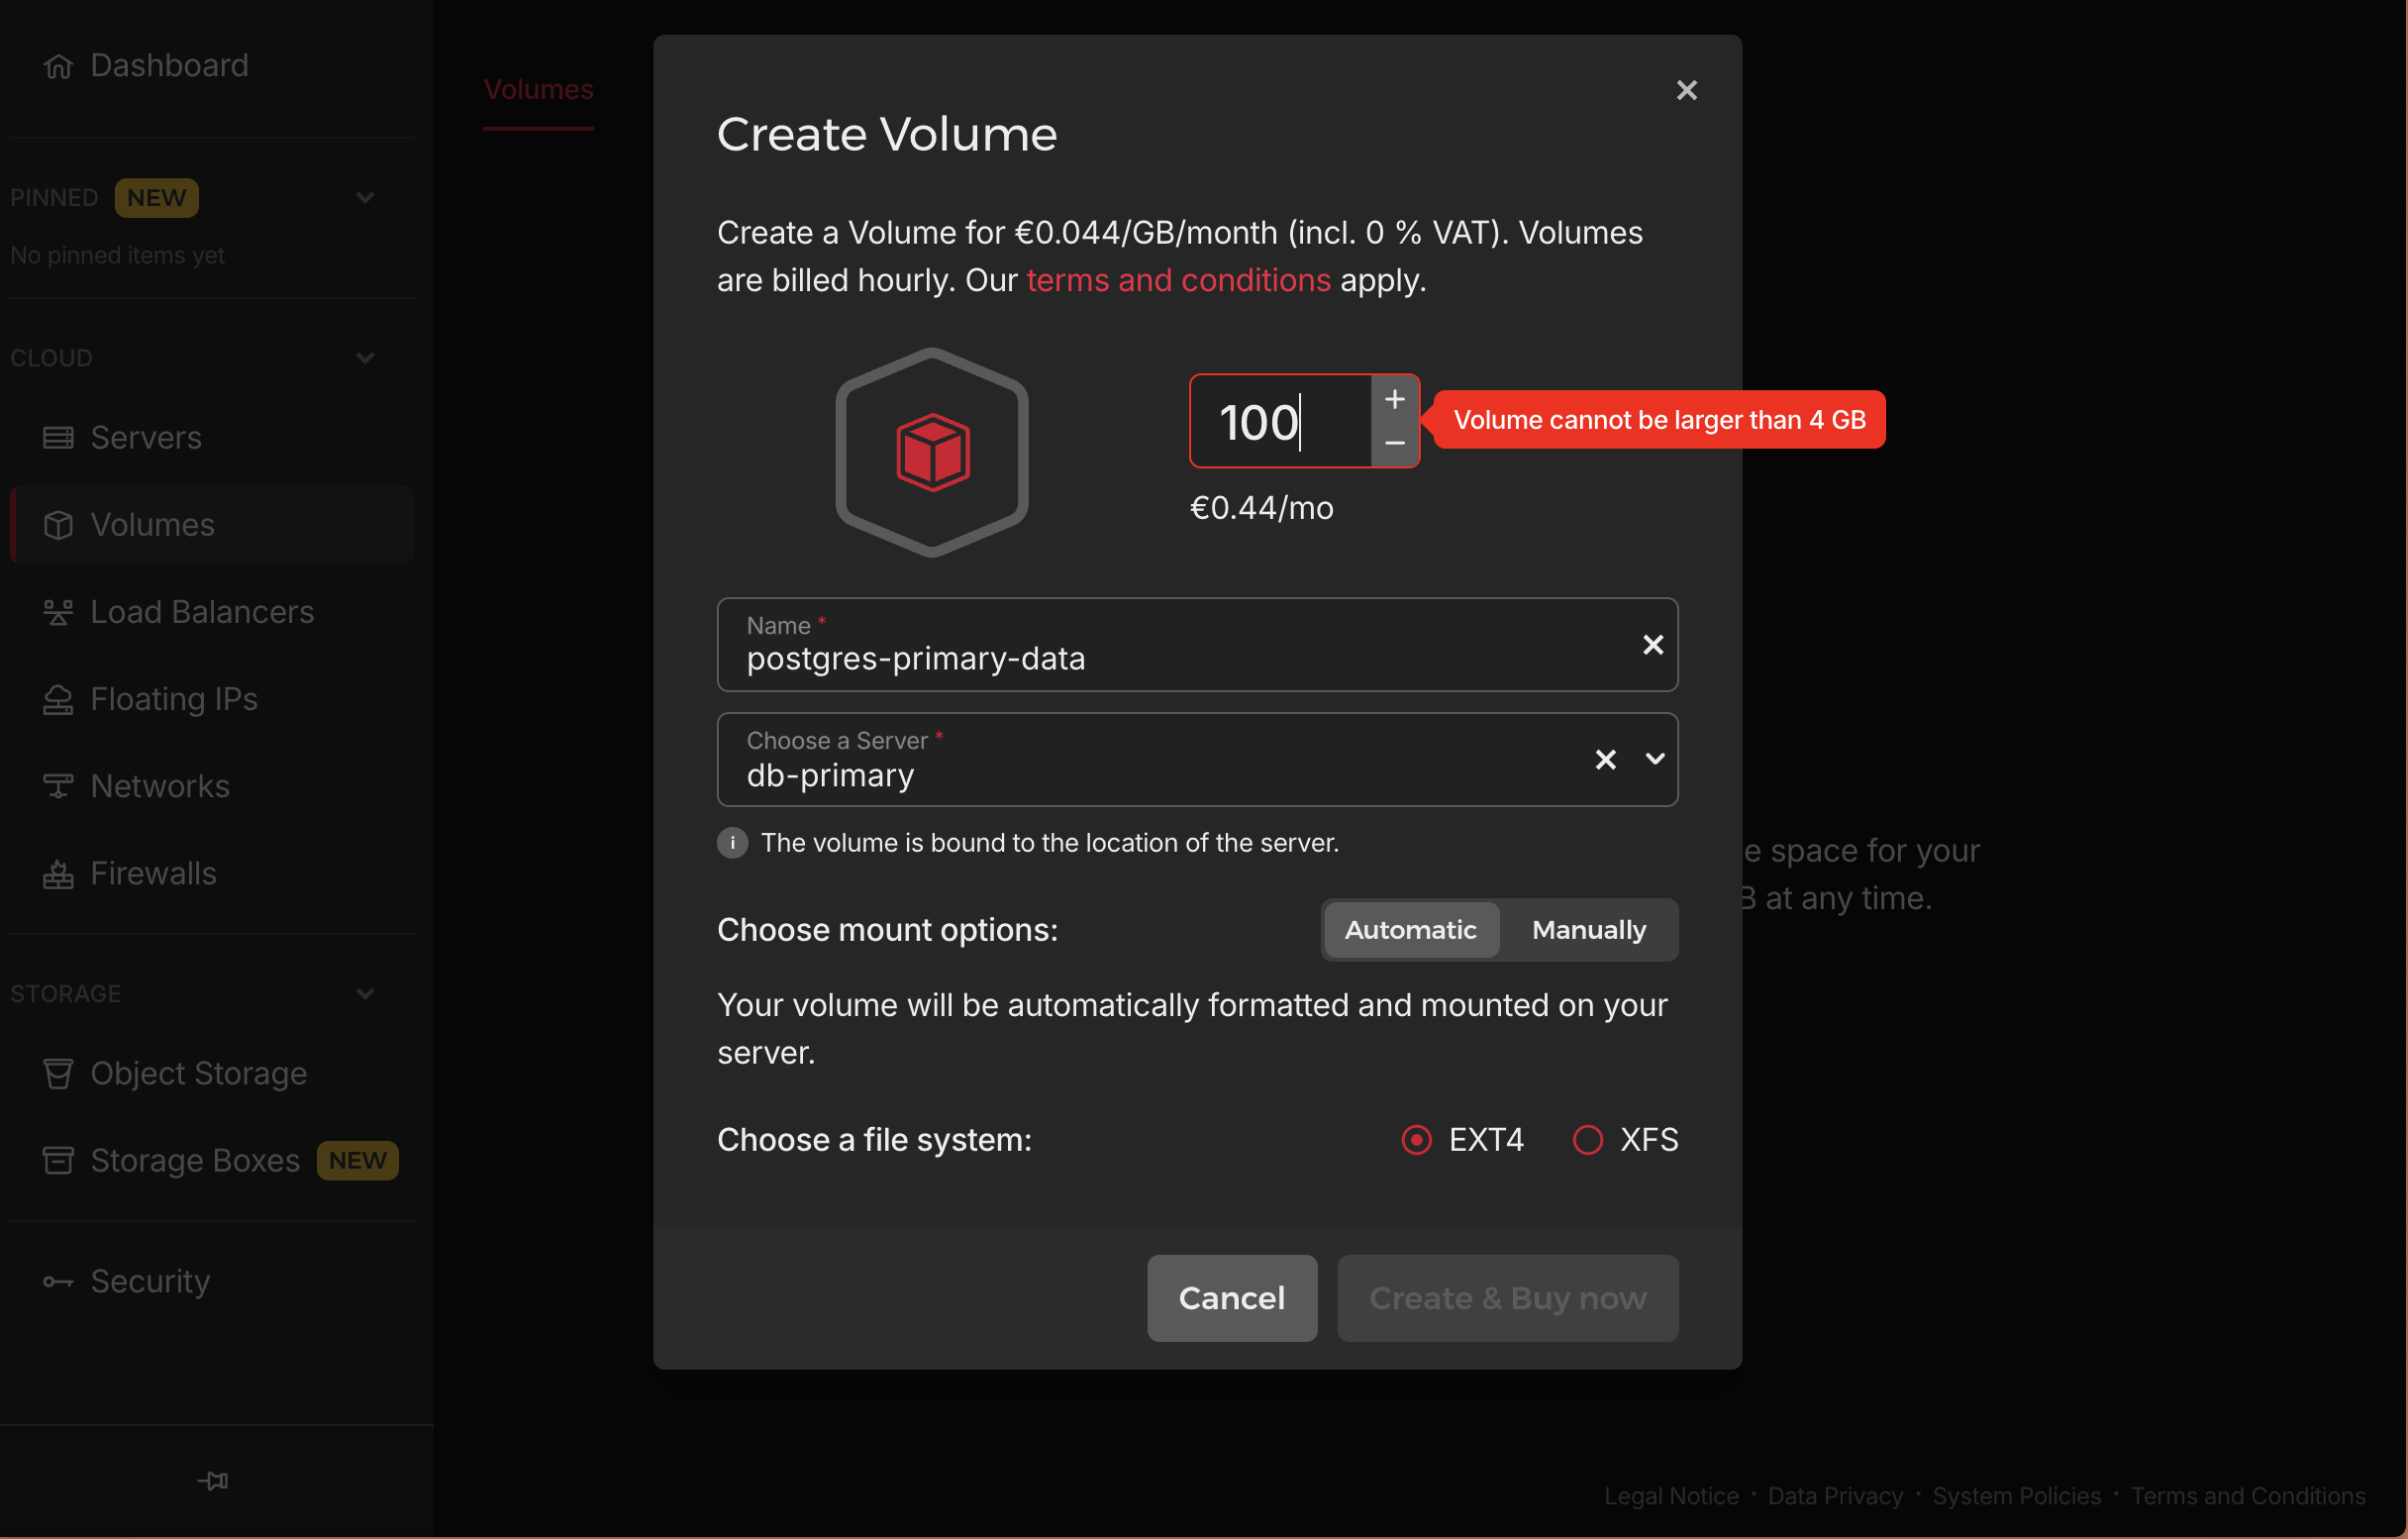
In the left menu, select “Volumes” and then click “Create Volume”.
⚠️ Temporary Issue with Hetzner Volumes As of June 2025, unfortunately, in the Hetzner UI, I cannot create a volume at the moment because of a bug there, when I try to create a volume with 100GB it says volumen cannot be larger than 4GB, and when I try to create a volume with 4GB it says volume cannot be smaller than 10GB. But I’ll update this section when the bug is fixed.
UPDATED: It’s not a bug, Hetzner only makes a certain amount of resources available to each customer. And if I want more resources I have to send them a limit request. which I’ll do later, but for now, I will continue with the tutorial without volumes, and I will update this section when I get the volumes.
Step 6: Monitoring Server
Why We Need Dedicated Monitoring
A monitoring server provides:
- System Visibility: Track performance, errors, and resource usage
- Proactive Alerts: Know about problems before users do
- Historical Data: Analyze trends and plan capacity
- Troubleshooting: Quickly identify root causes of issues
Without monitoring, you’re flying blind in production.
How to Create the Monitoring Server
Create Monitoring Server
Monitoring Server:
- Name:
monitor-01 - Server Type: CAX21 (4 vCPU, 8GB RAM)
- Image: Ubuntu 24.04
- Networking:
- ❌ No public IPv4 (private only)
- ❌ No public IPv6 (private only)
- ✅ Attach to production-network
- Tags (optional but recommended):
- role=monitoring
- env=production
- Cloud Config: Paste the cloud-init configuration we created above
- SSH Key: Add your SSH key
This server will run Prometheus for metrics collection and Grafana for dashboards.
Step 7: Configure Private Server Internet Access
After creating each private server, we need to configure them to access the internet through our bastion NAT gateway.
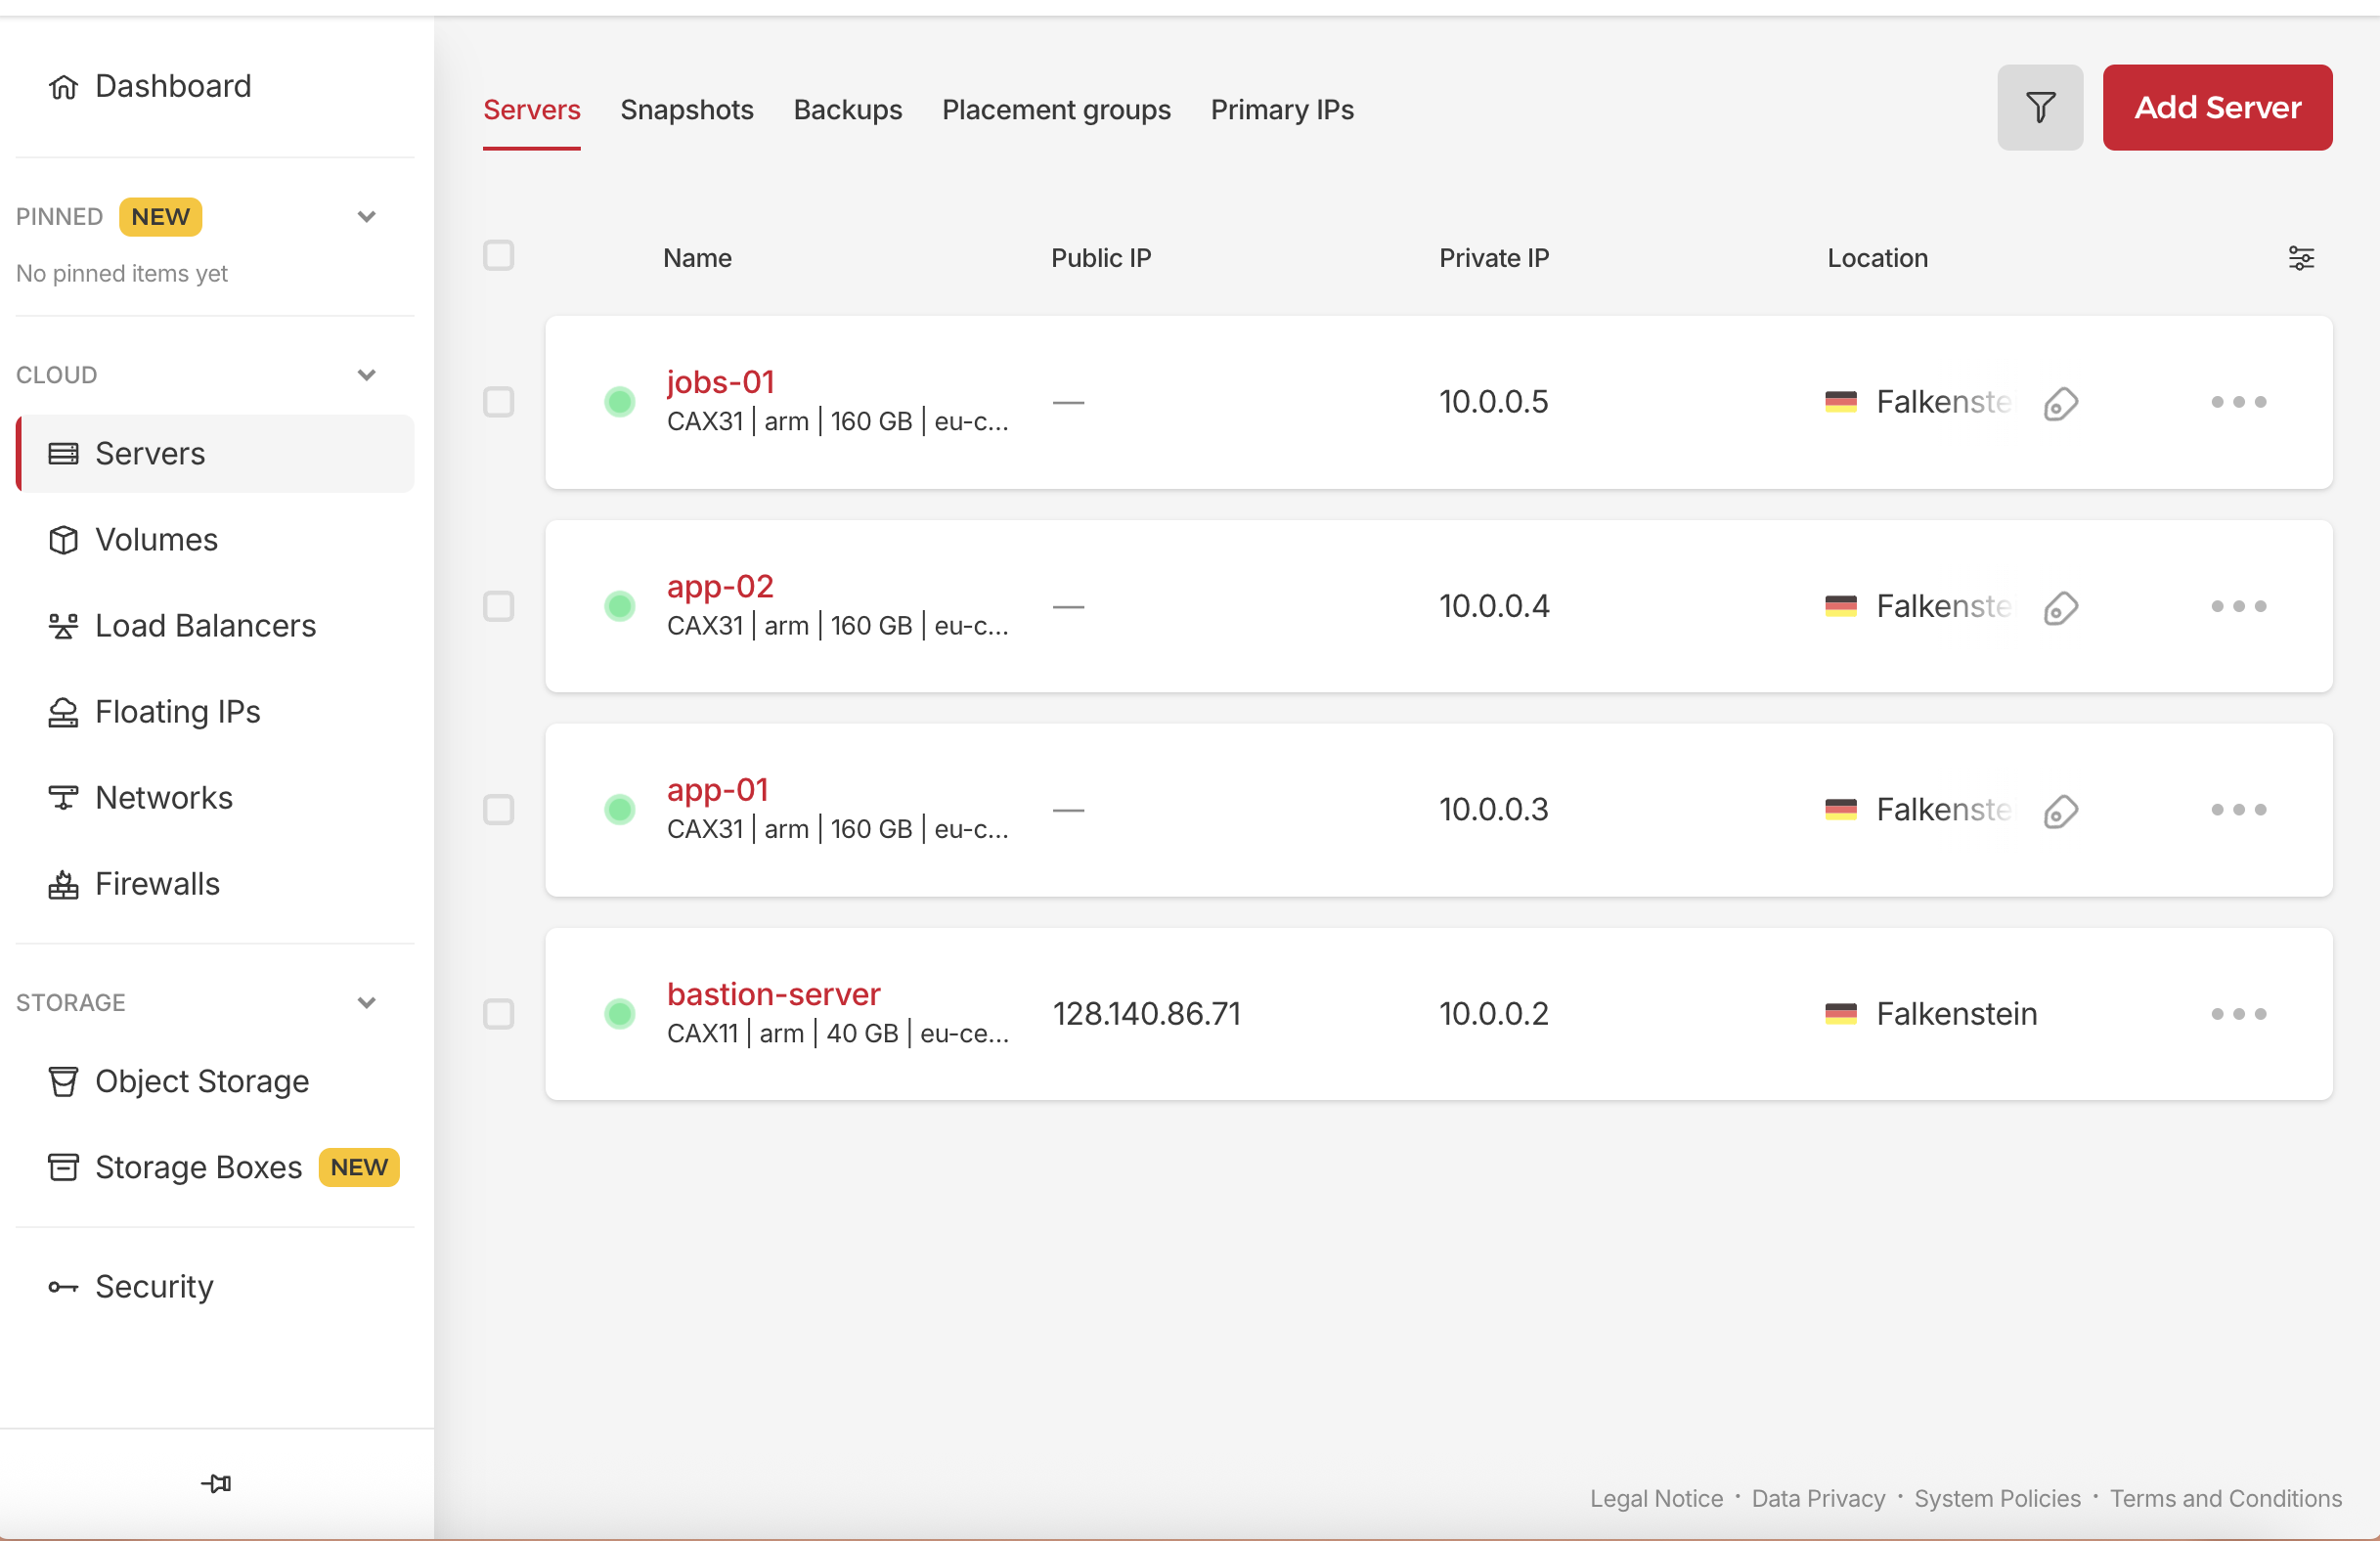
But before that we need to be able to connect to our servers, and it’s not possible to do it simply by using ssh root@YOUR_SERVER_PUBLIC_IP because our servers have no public IP. look at them:
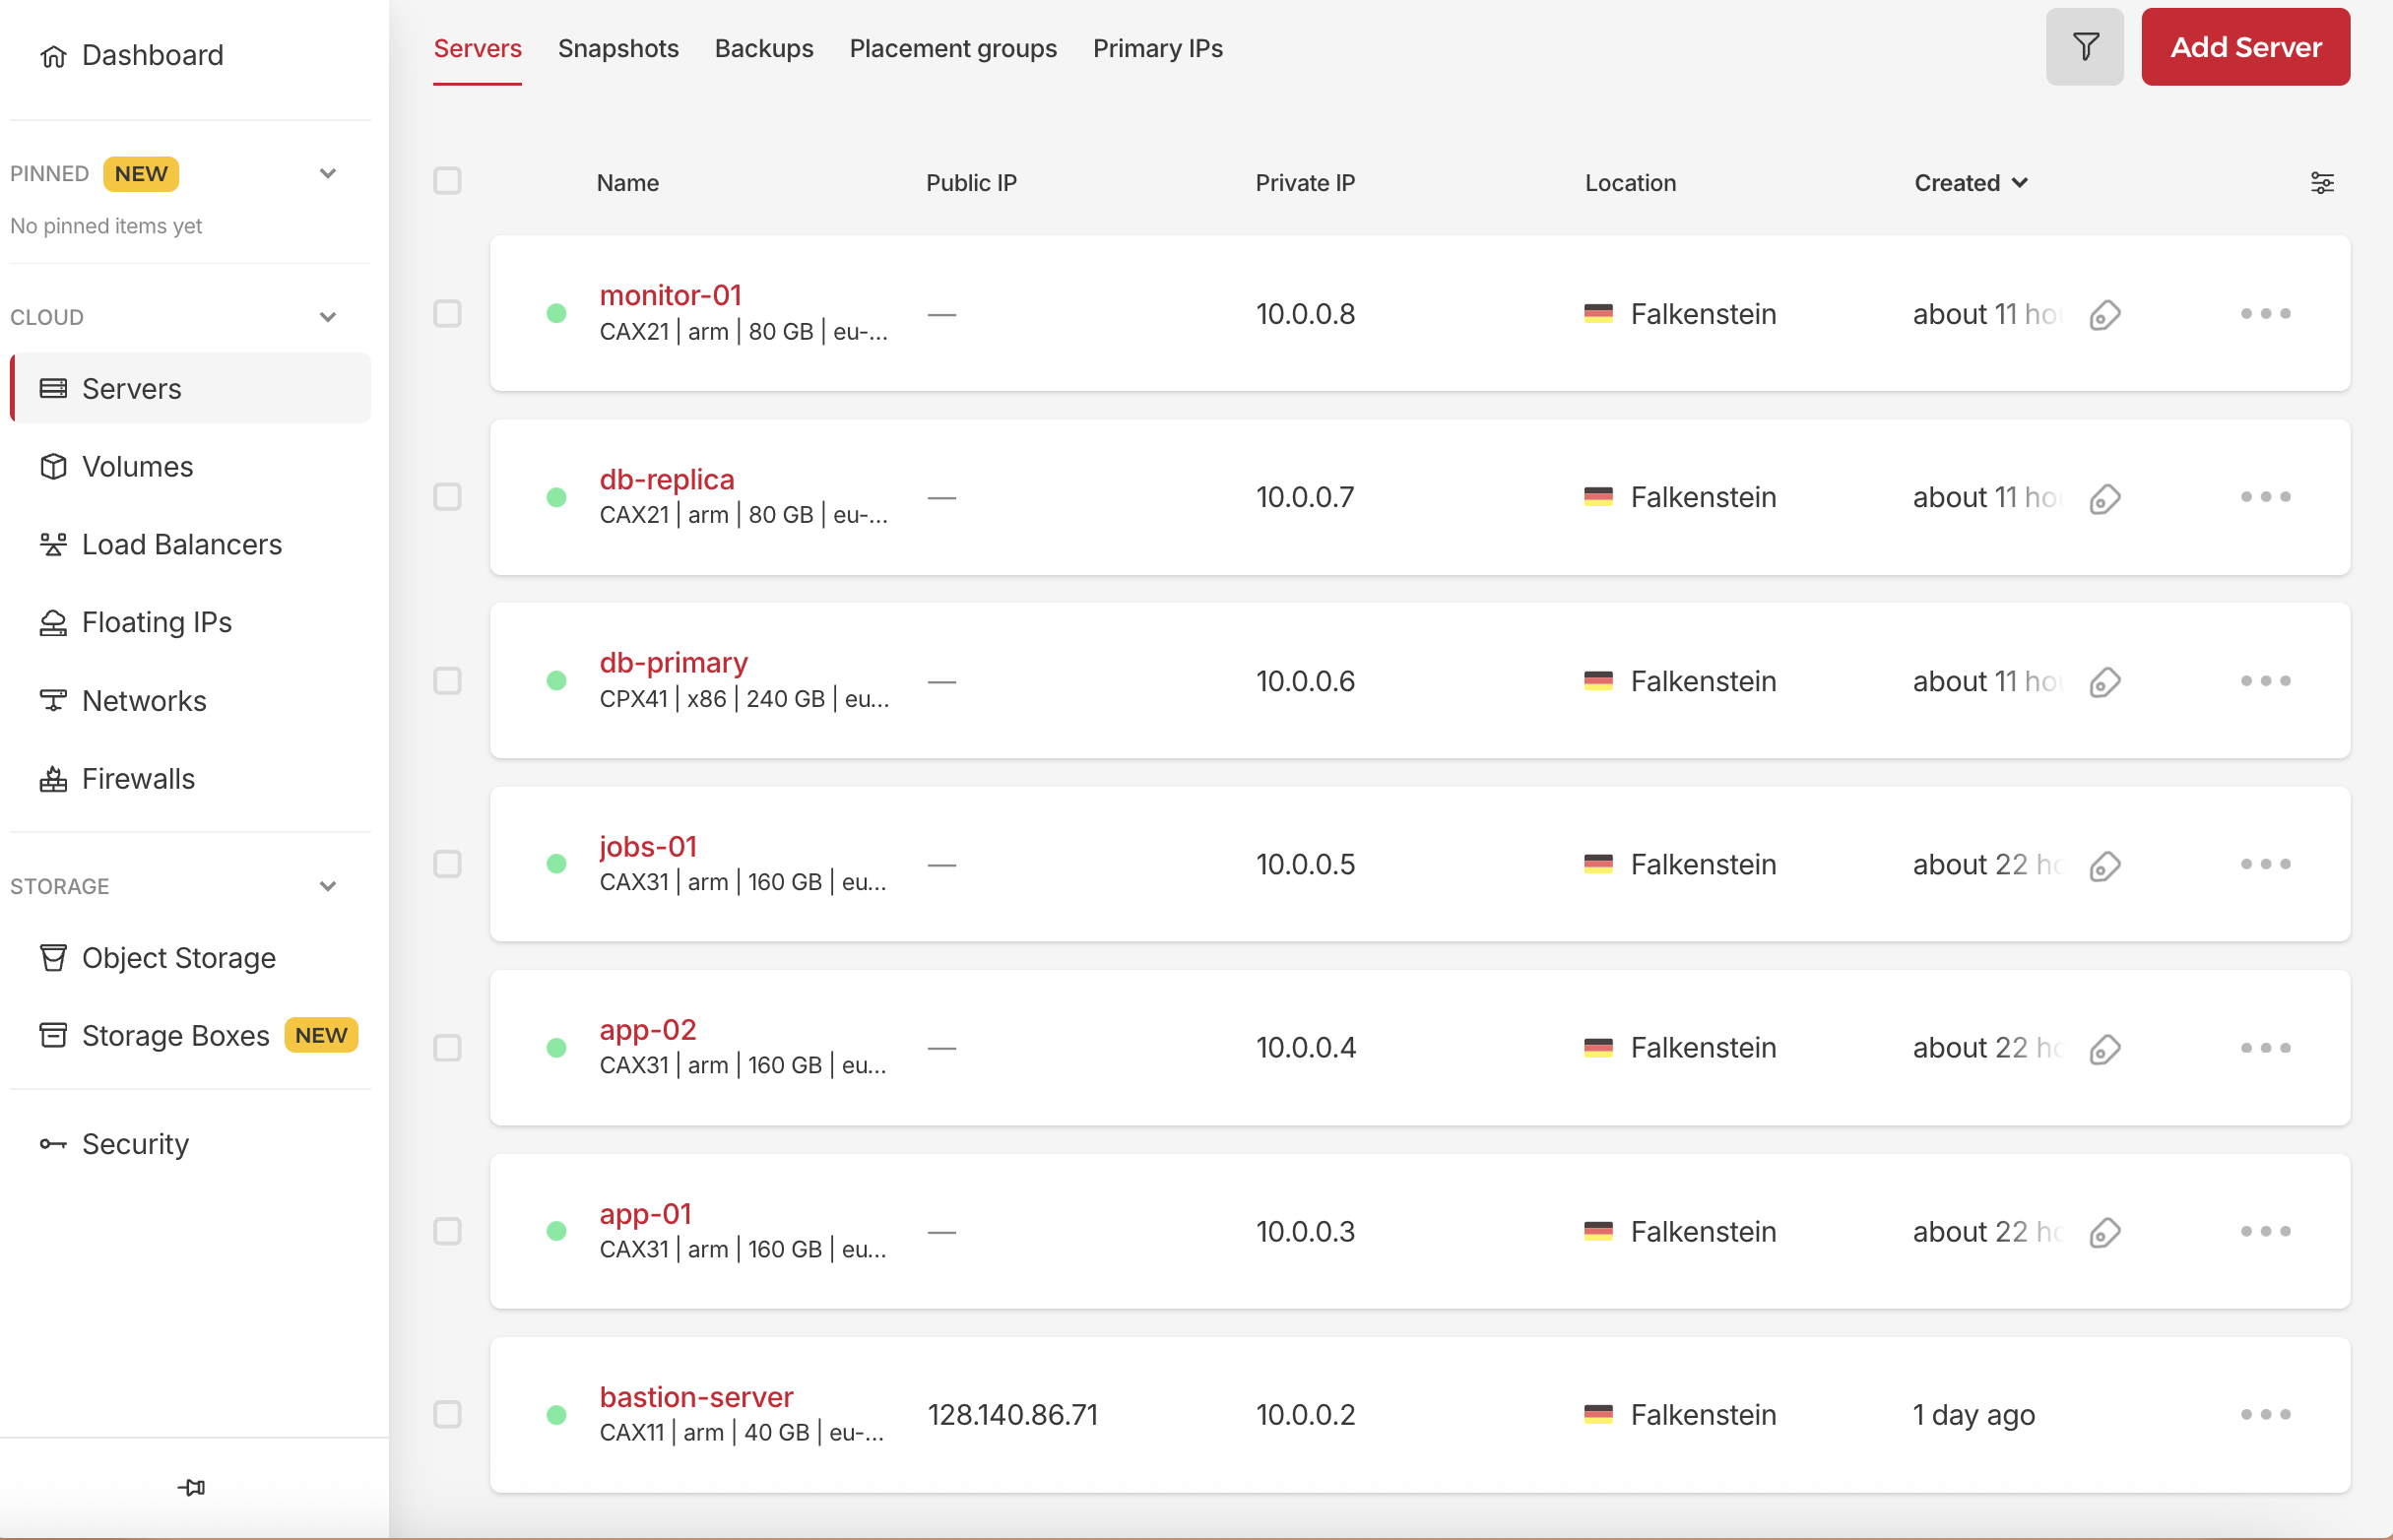
only bastion server has a public IP, so we must connect to the others through the bastion server. To do this we need some configs in our ssh local machine.
Configure SSH Access
Open your ~/.ssh/config file and add the following configuration: Don’t forget to replace BASTION_PUBLIC_IP with the actual public IP of your bastion server. and the user deployer with the user you created in the bastion server, and all private IPs with the actual private IPs of your servers.
Just remember only the bastion server use deployer user, the others use root user.
1
2
3
4
5
6
7
8
9
10
11
12
13
14
15
16
17
18
19
20
21
22
23
24
25
26
27
28
29
# ~/.ssh/config
Host hetzner-bastion
  HostName BASTION_PUBLIC_IP
  User deployer

Host app-01
  HostName 10.0.0.3
  User root
  ProxyJump hetzner-bastion
Host app-02
  HostName 10.0.0.4
  User root
  ProxyJump hetzner-bastion
Host jobs-01
  HostName 10.0.0.5
  User root
  ProxyJump hetzner-bastion
Host db-primary
  HostName 10.0.0.6
  User root
  ProxyJump hetzner-bastion
Host db-replica
  HostName 10.0.0.7
  User root
  ProxyJump hetzner-bastion
Host monitor-01
  HostName 10.0.0.8
  User root
  ProxyJump hetzner-bastion
Now we can connect to each server from our local machine by just typing ssh <server-name> in terminal:
e.g:
1
ssh app-01
Configure Routing and DNS (Persistent Setup for Private Servers)
Each private server (e.g. app-01, app-02, jobs-01, monitor-01) needs access to the internet via the bastion server acting as NAT. We’ll configure:
- A persistent default route via the Hetzner internal gateway (
10.0.0.1) - Reliable DNS resolution with fallback servers
- Reboot-safe setup using Netplan
Step-by-Step Instructions
SSH into the server (e.g. app-01):
1
ssh app-01
Then run the following:
Create or Edit the Netplan Config
1
sudo nano /etc/netplan/99-private-network.yaml
Paste this configuration:
1
2
3
4
5
6
7
8
9
10
11
12
13
14
15
16
17
18
19
20
network:
  version: 2
  ethernets:
    enp7s0:
      dhcp4: true
      dhcp4-overrides:
        use-routes: false
        use-dns: false
      routes:
        - to: 0.0.0.0/0
          via: 10.0.0.1
          on-link: true
      nameservers:
        addresses:
          - 185.12.64.2
          - 185.12.64.1
          - 8.8.8.8
          - 8.8.4.4
          - 1.1.1.1
          - 1.0.0.1
📌 Be sure to check the indentation — YAML is strict.
Fix Permissions (suppress warnings)
1
sudo chmod 600 /etc/netplan/99-private-network.yaml
3. Apply the Configuration
1
sudo netplan apply
Test Connectivity, Internet Access (through bastion):
1
2
curl -4 -s https://ifconfig.me
# Should return your bastion's public IP (e.g. 128.140.86.71)
DNS Resolution:
1
2
nslookup google.com
# Should return valid IP addresses
Repeat for All Private Servers
Apply this configuration on all your private servers:
app-01app-02jobs-01monitor-01db-primarydb-replica
Step 8: Hetzner Load Balancer
Why We Need a Load Balancer
A load balancer provides:
- Traffic Distribution: Spreads requests across multiple app servers
- Health Checks: Automatically removes failed servers from rotation
- SSL Termination: Handles SSL/TLS encryption/decryption
- High Availability: Single point of entry that’s managed by Hetzner
This is what makes your application truly “production-ready” - users always get a response even if servers fail.
How to Create the Load Balancer
Create Hetzner Load Balancer
In the left menu, select “Load Balancers” and then click “Create Load Balancer”.
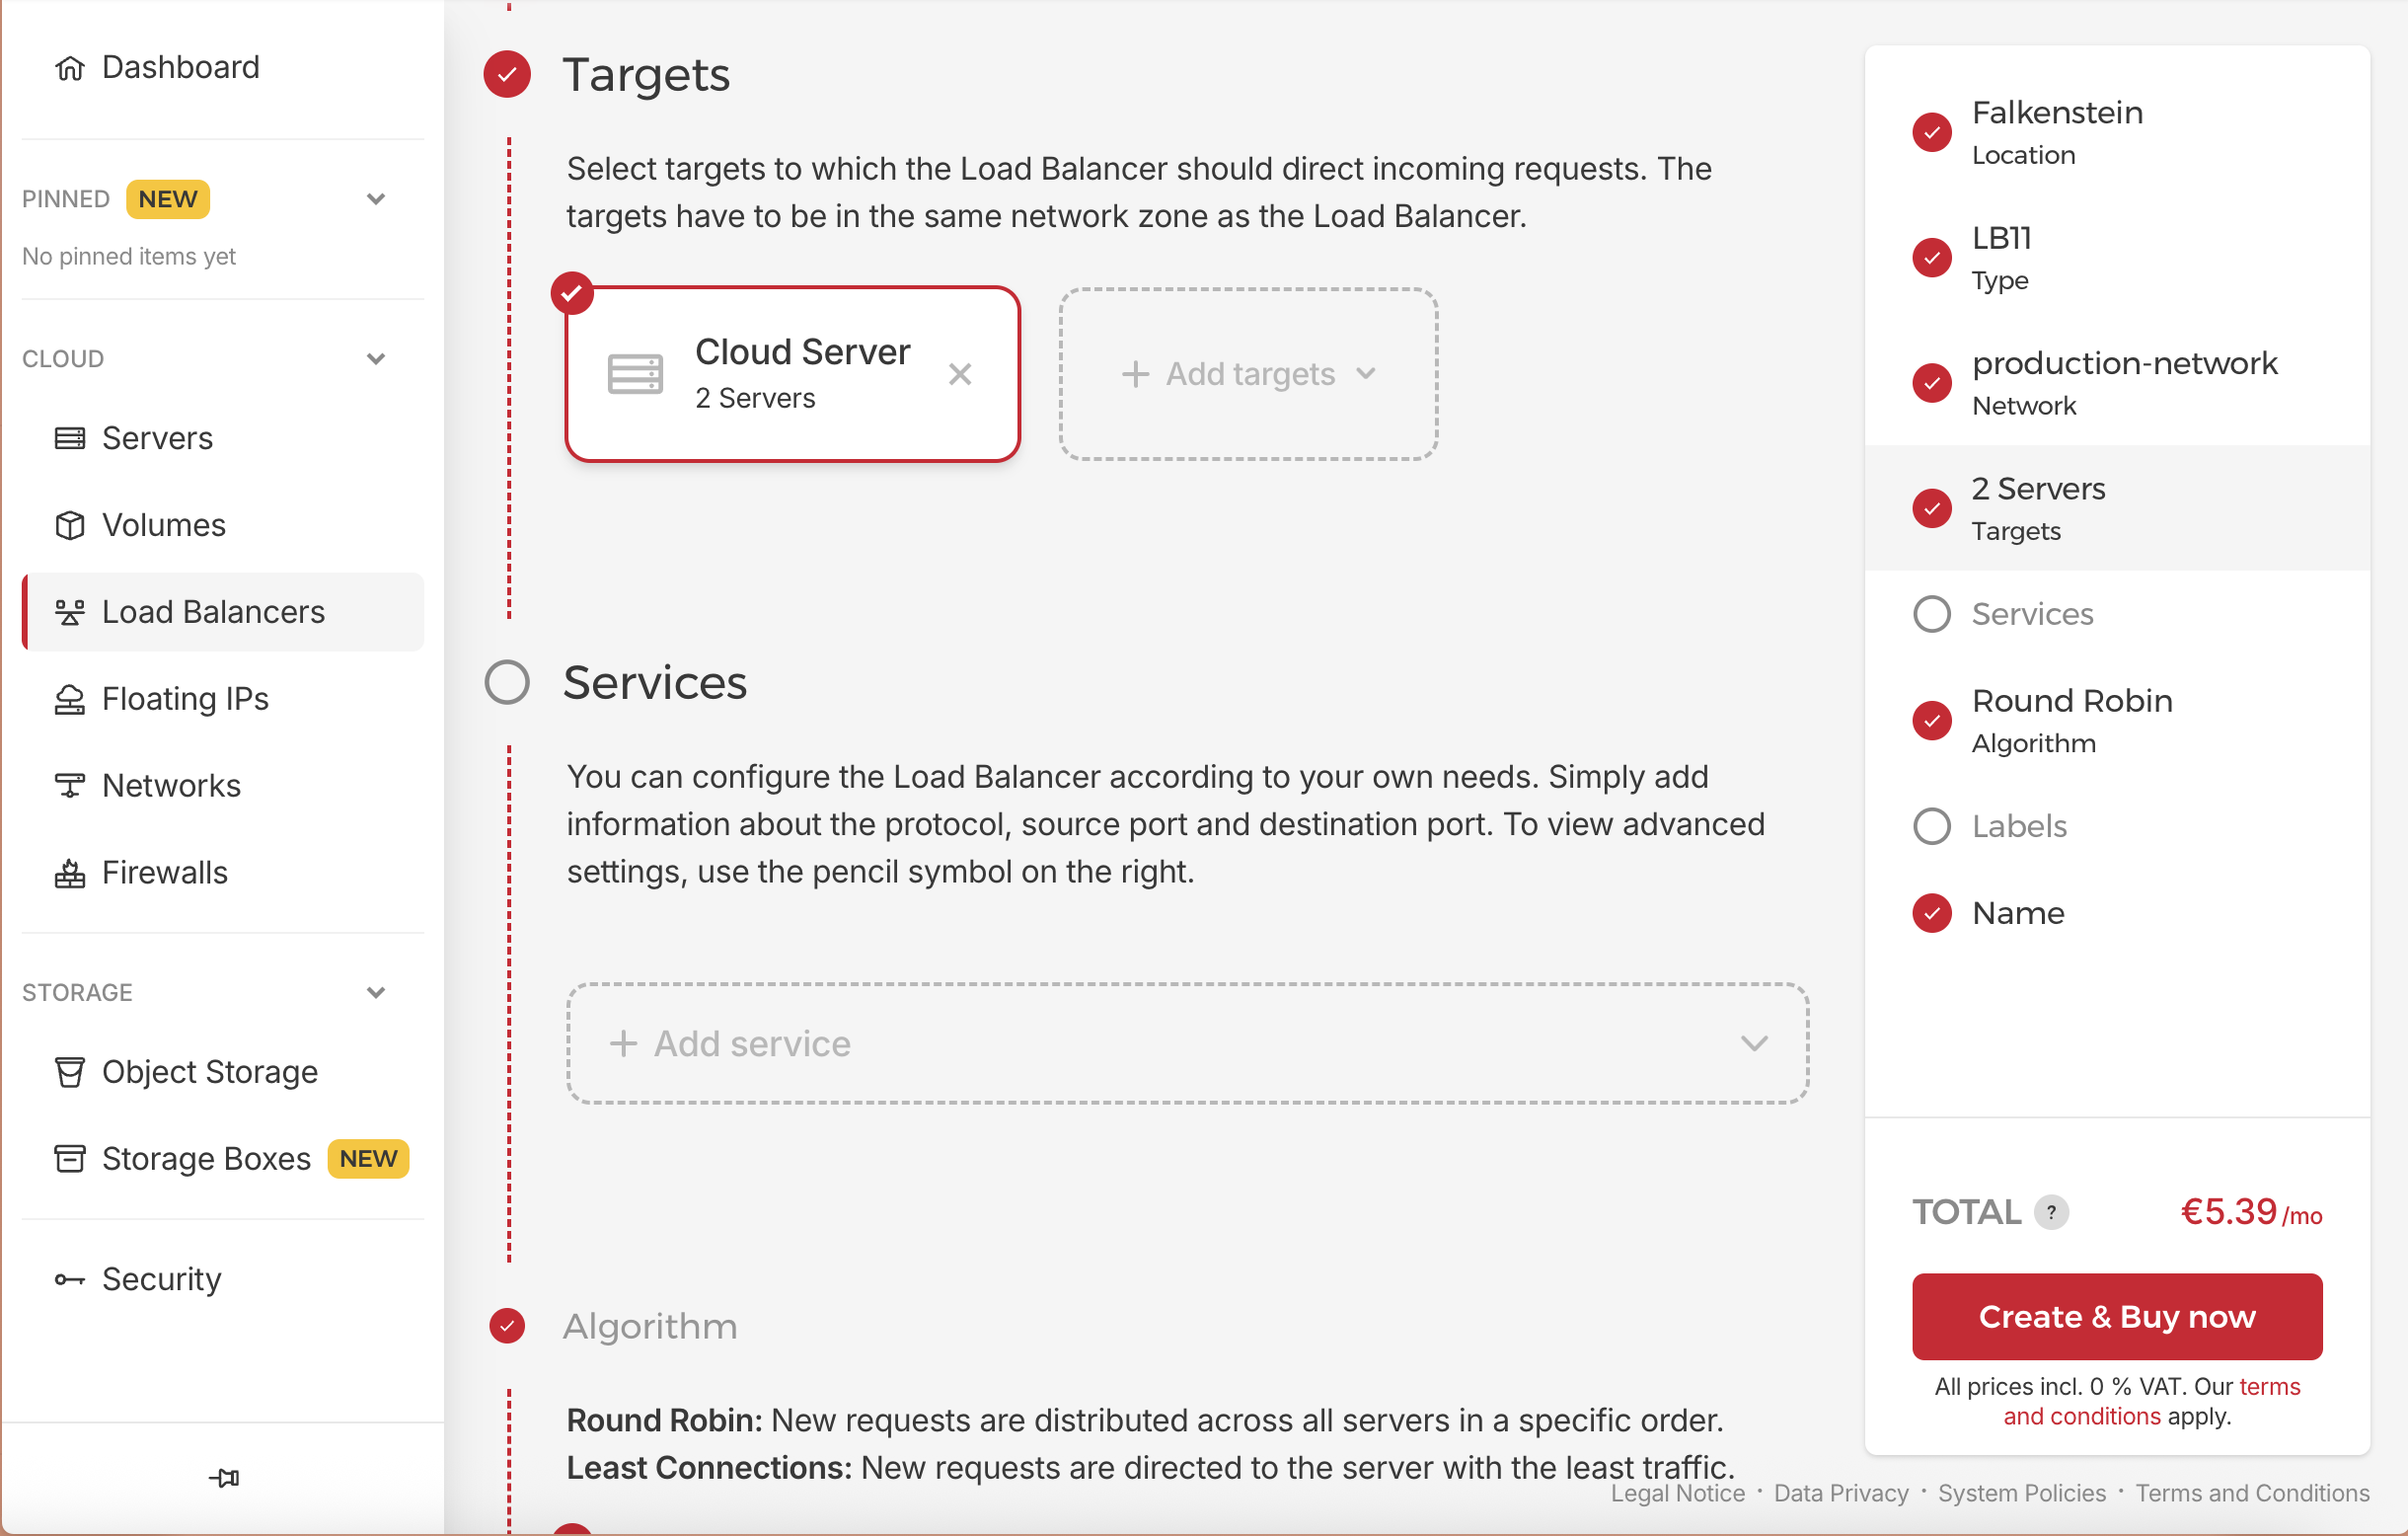
- Configure Load Balancer:
- Name:
rails-lb - Location: Same as your servers (e.g.,
Falkenstein) - Type: LB-11 (basic tier)
- Network: Select
production-network(enables private communication) - Algorithm: Round Robin (default)
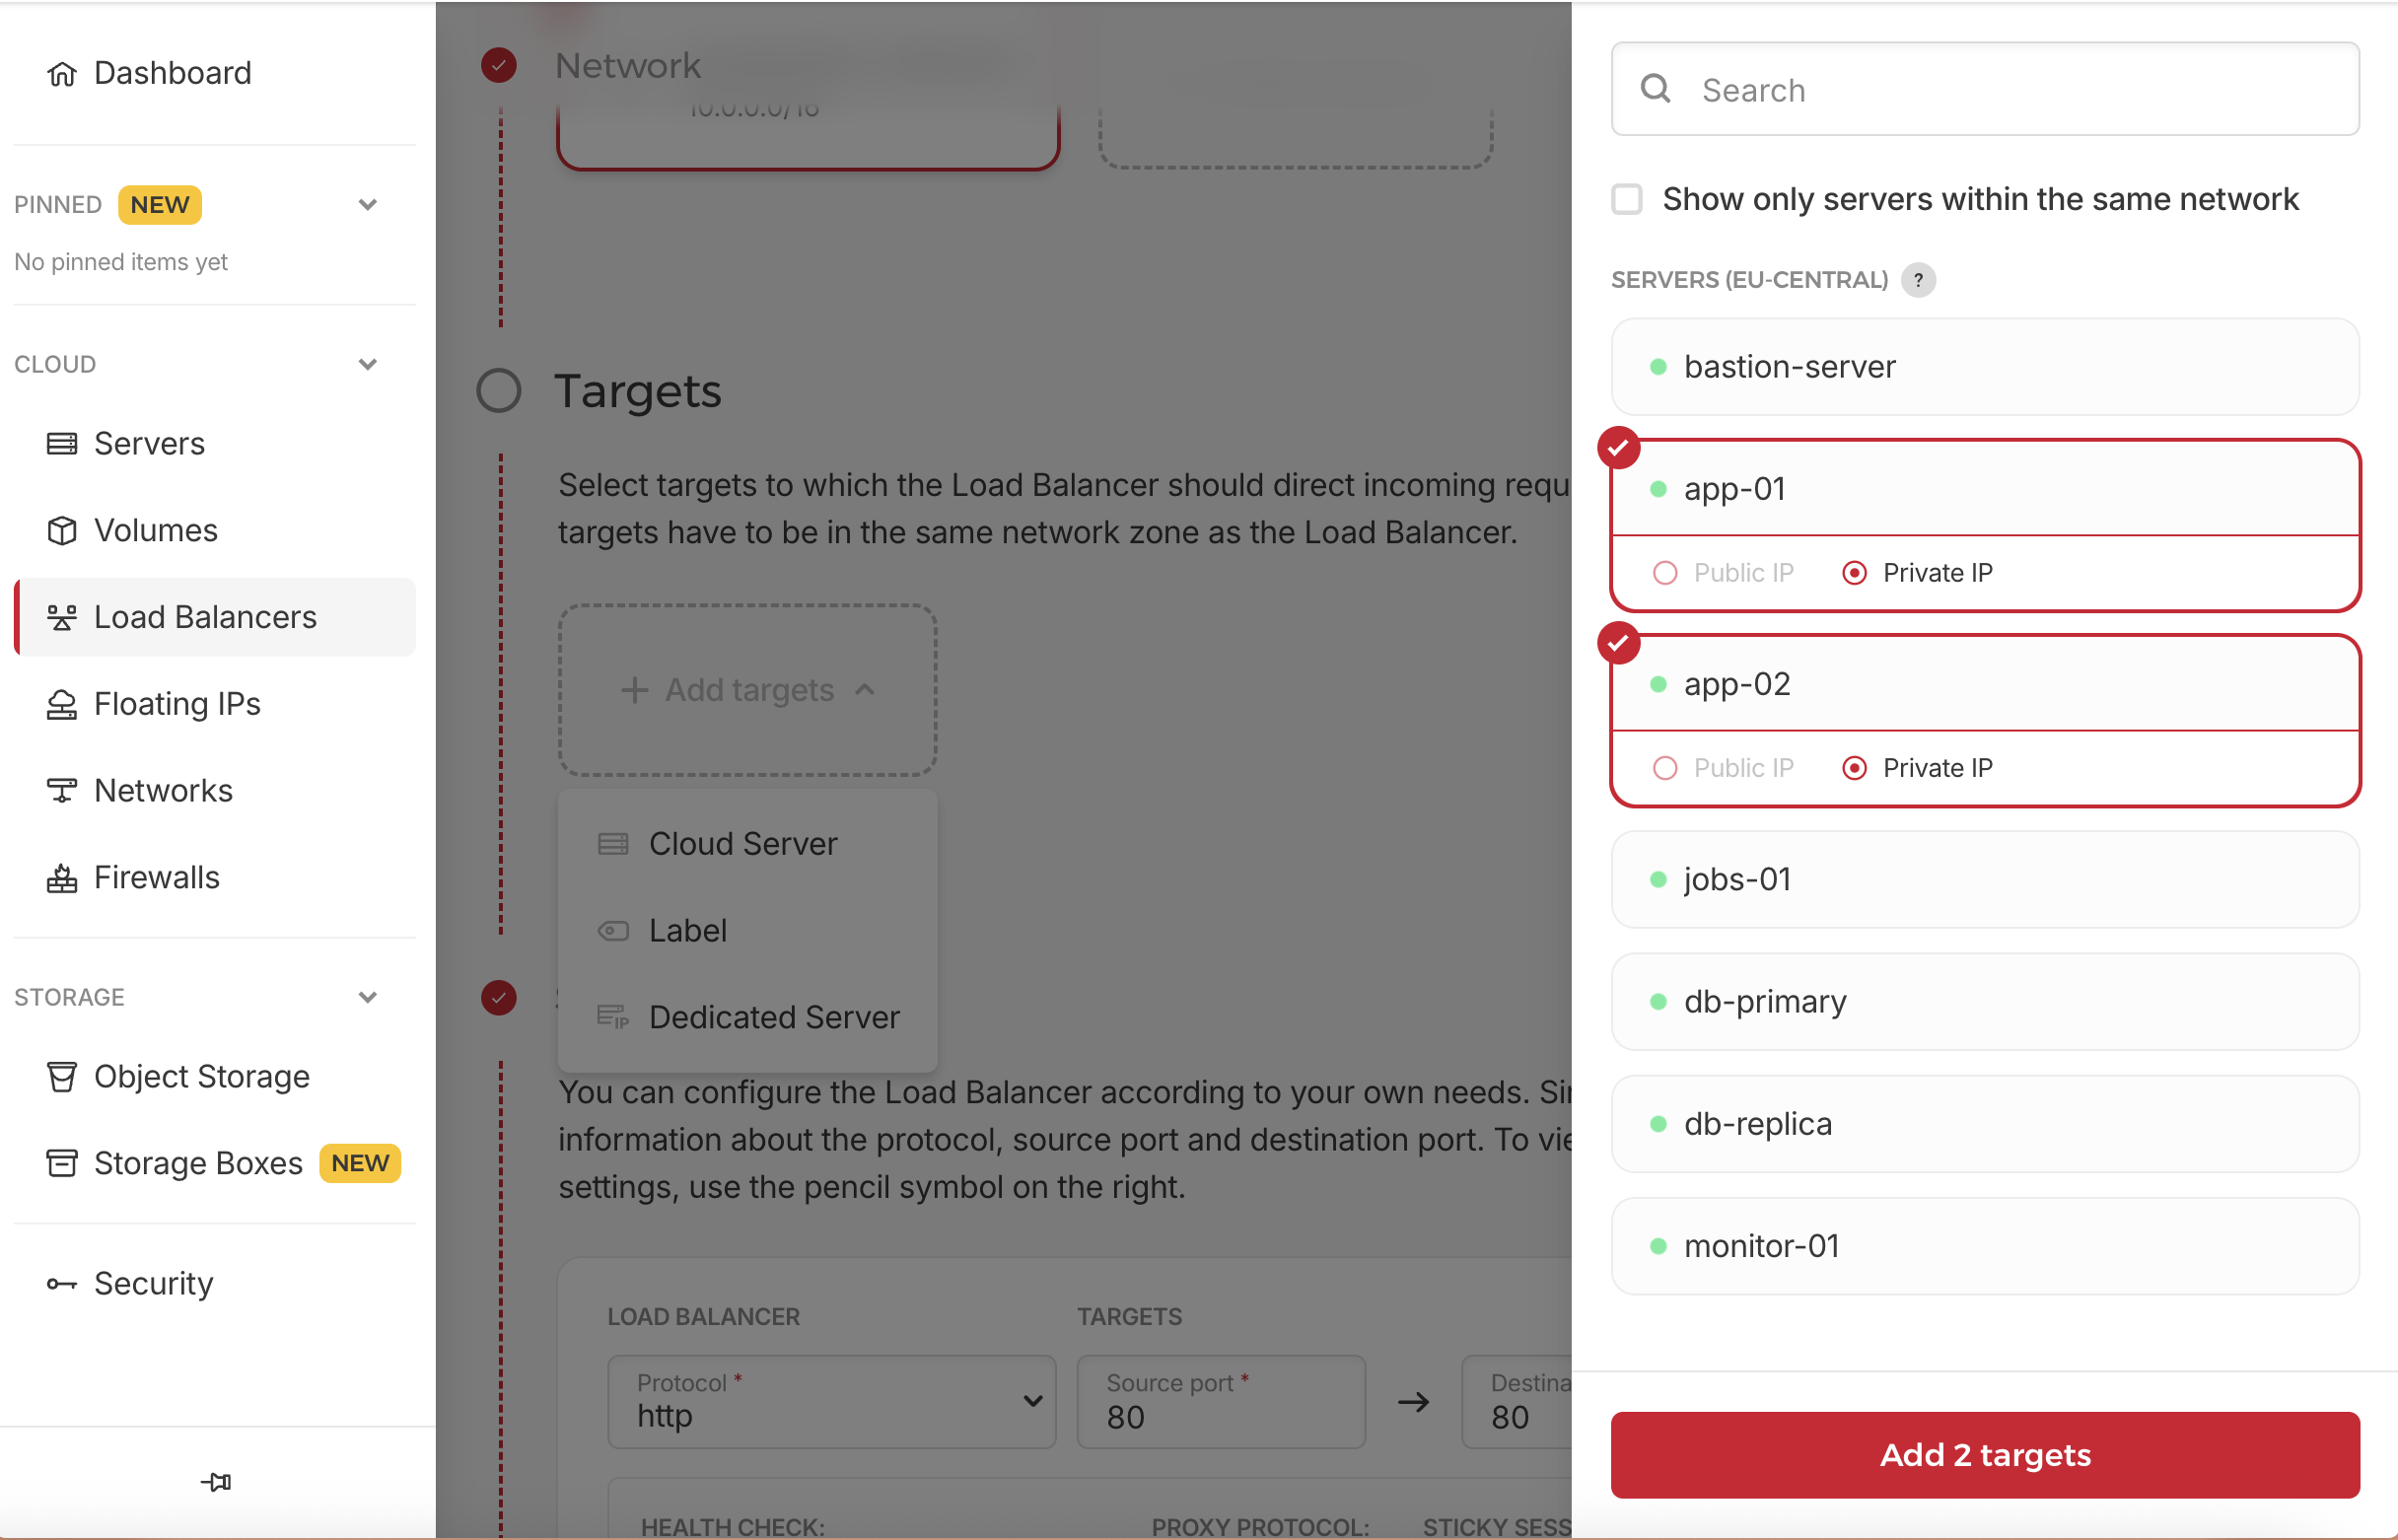
- Targets:
- Click on Add Target dropdown, and then select Cloud Server
- Then at the right side, select our app servers
- app-01
- app-02
- Services: Delete the existing service, we will create it later.
- Name:
Step 9: CloudFlare Integration
Why We Need CloudFlare
CloudFlare provides:
- DDoS Protection: Protects against malicious traffic
- Global CDN: Faster content delivery worldwide
- SSL Management: Automatic SSL certificate management
- DNS Management: Reliable, fast DNS resolution
This is your first line of defense and performance optimization.
How to Configure CloudFlare
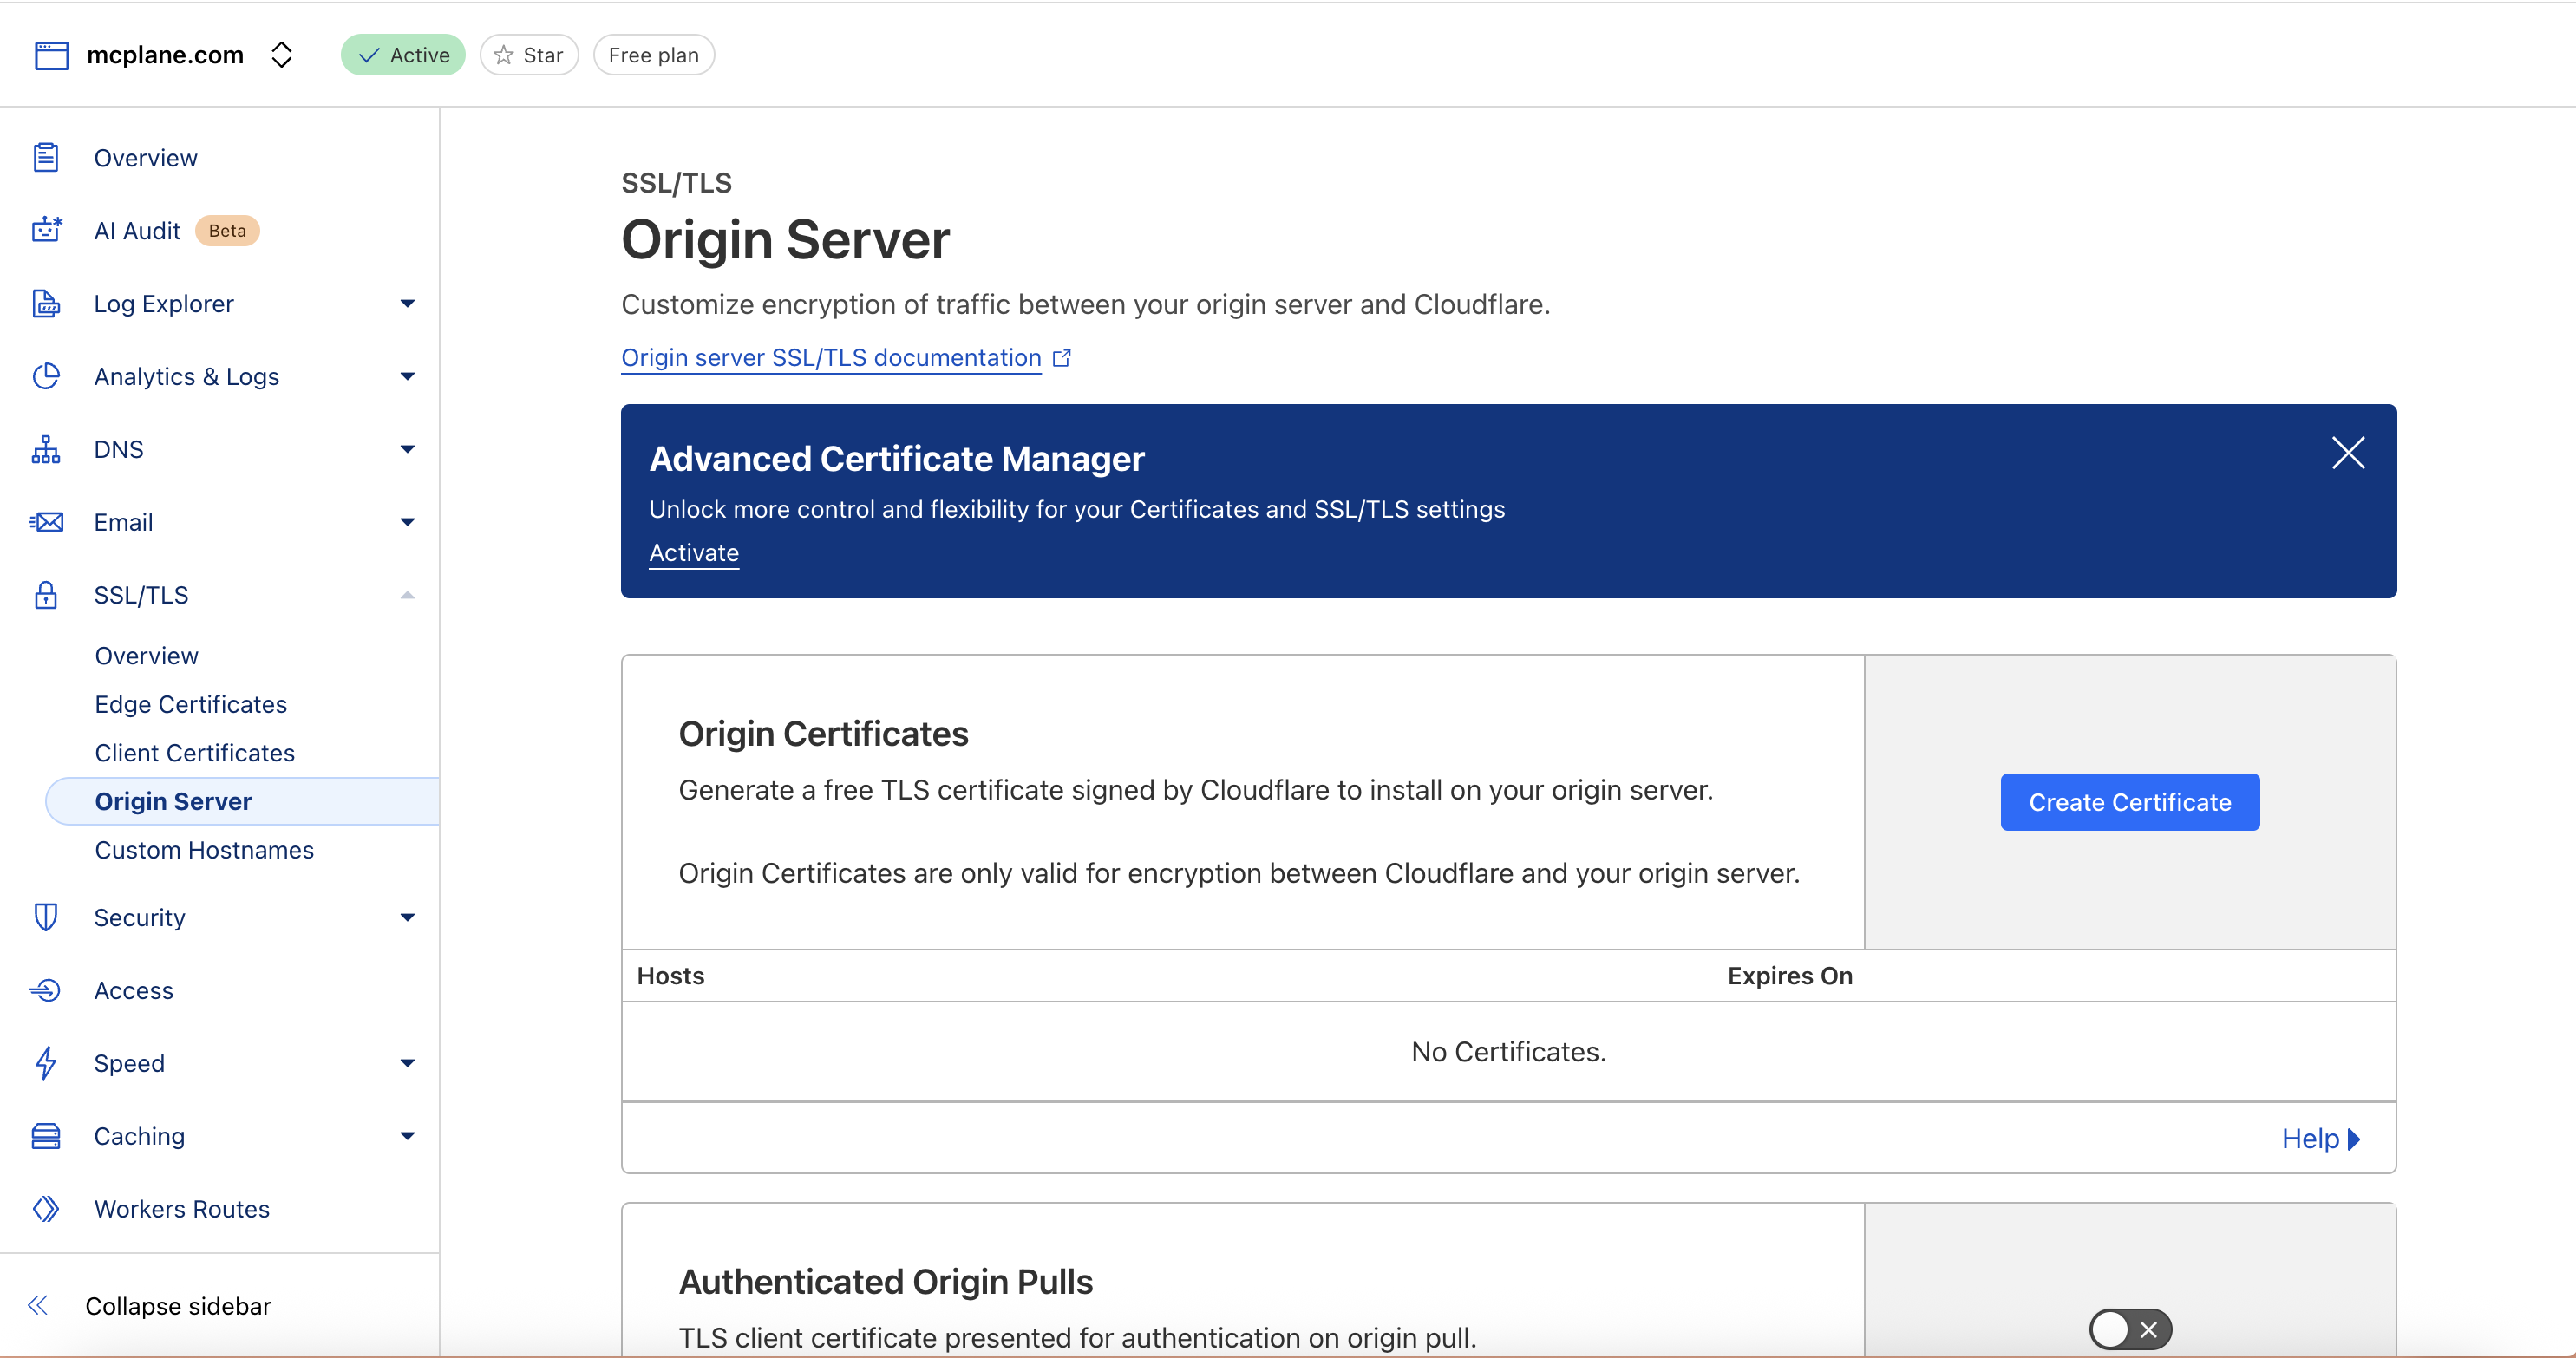
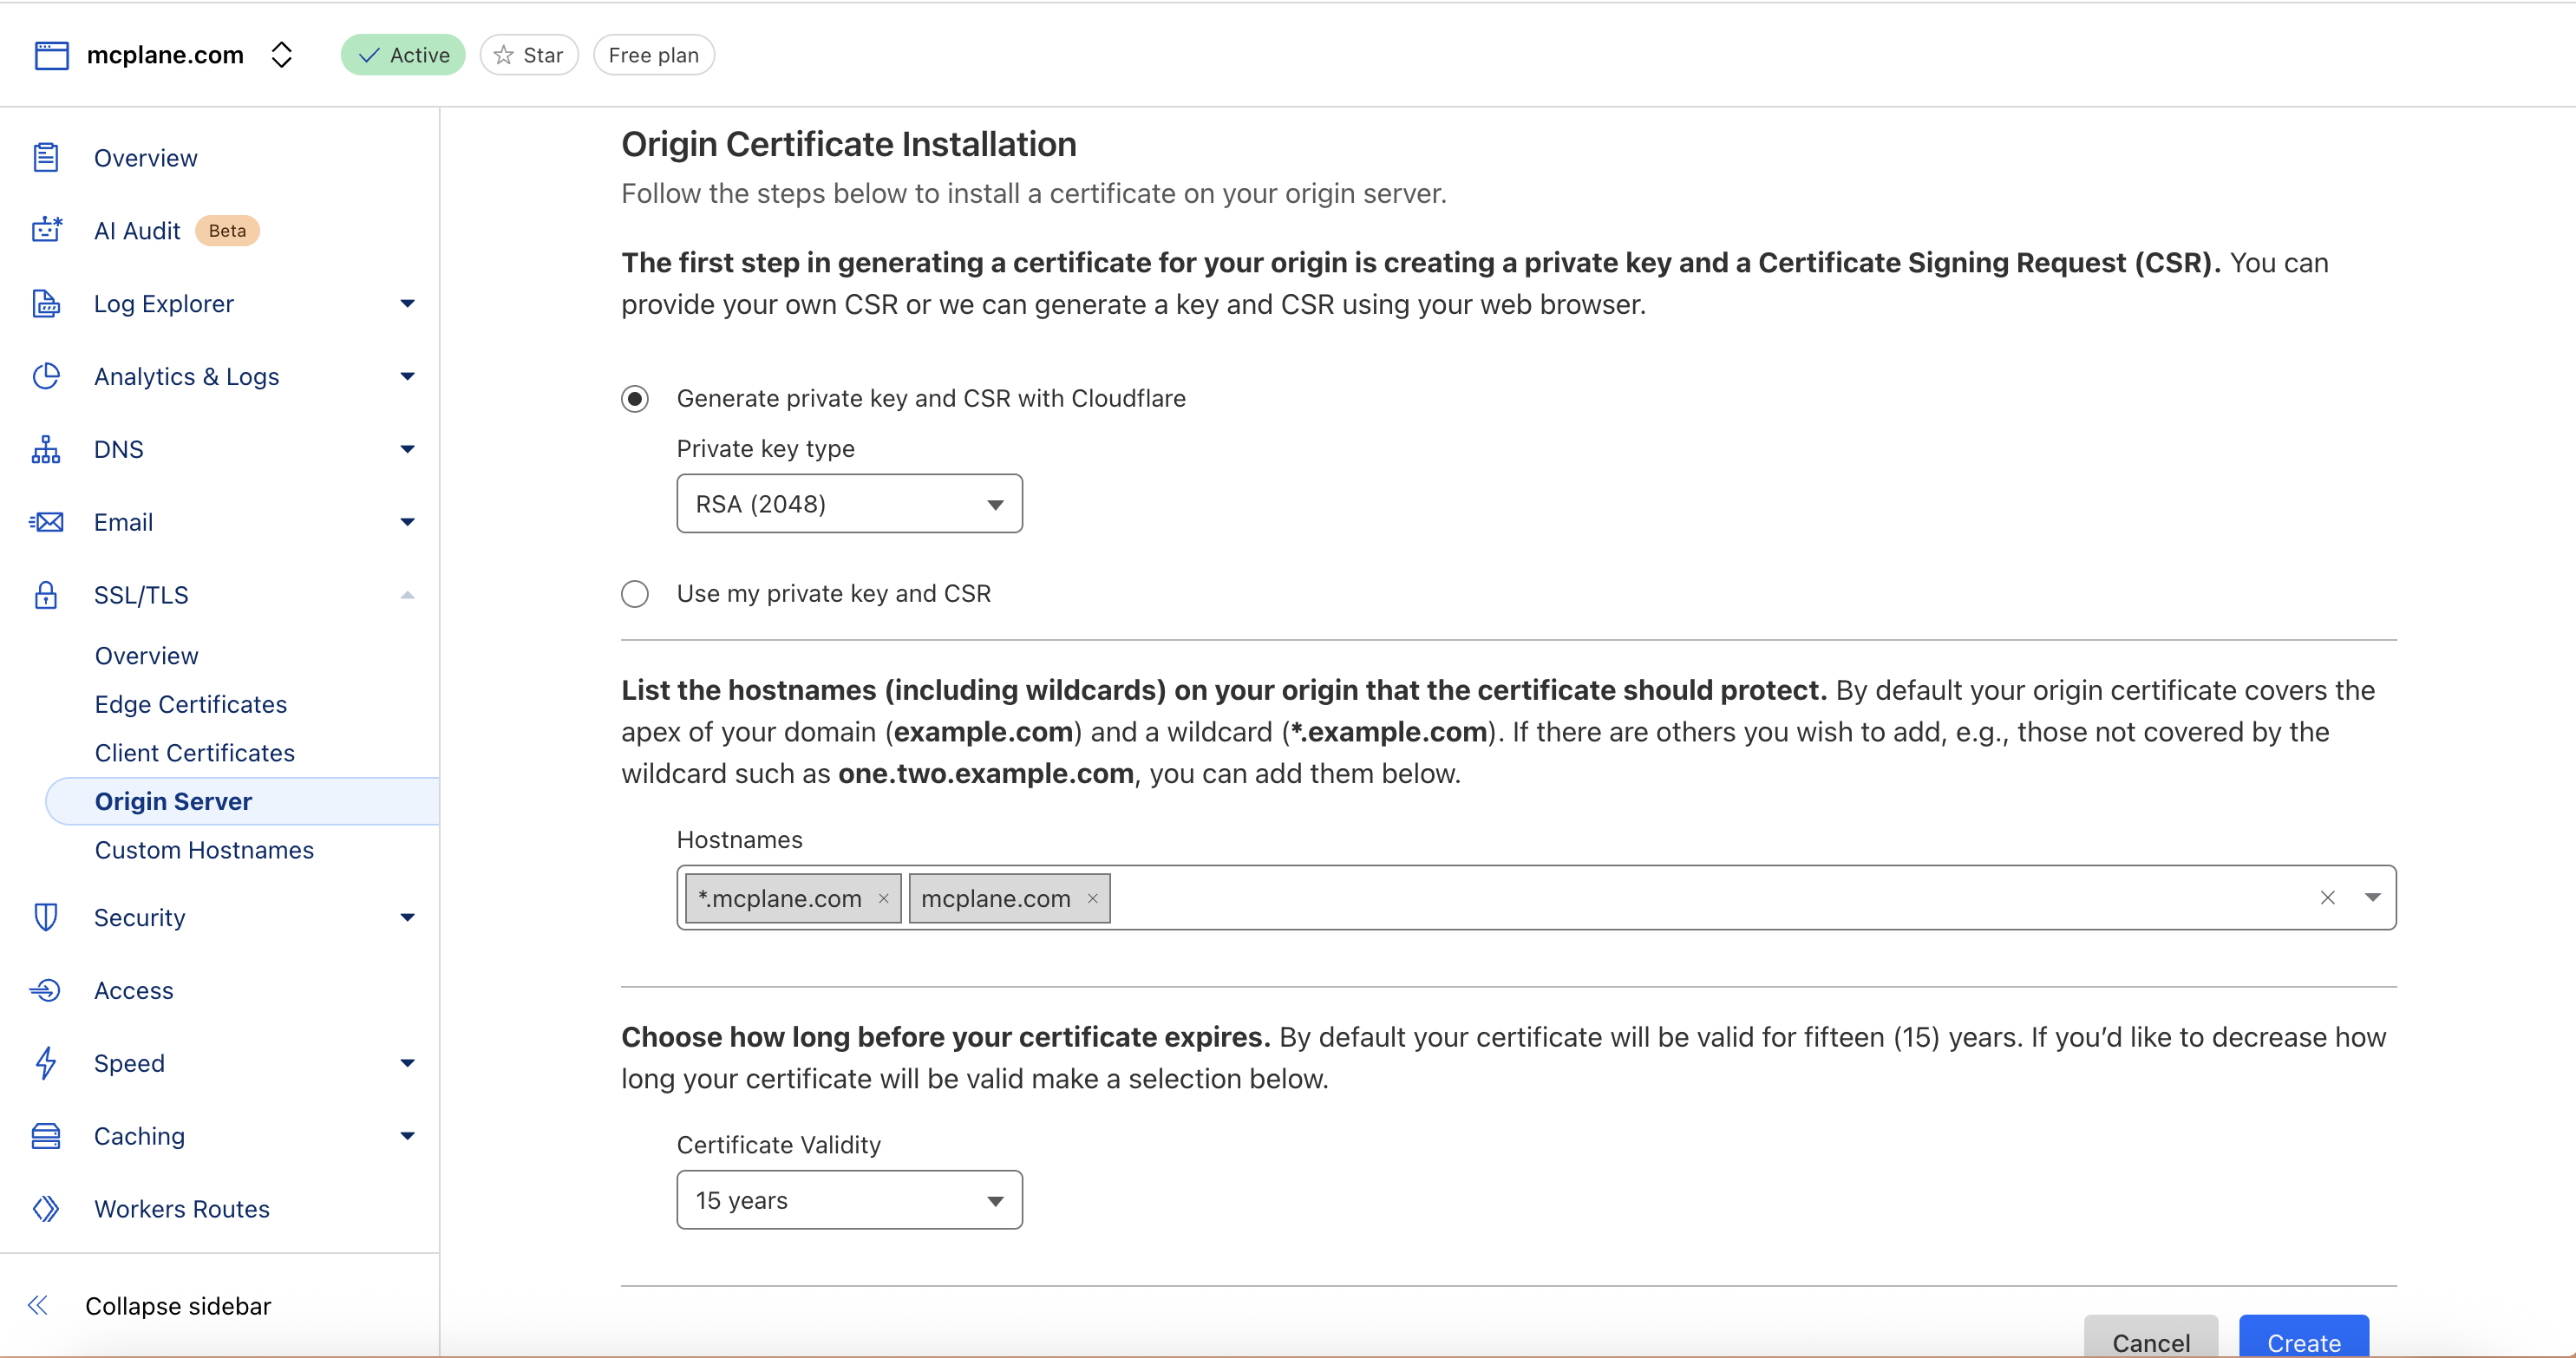
Generate CloudFlare Origin Certificate
- In CloudFlare Dashboard for your domain:
- Go to SSL/TLS → Origin Server
- Click “Create Certificate”
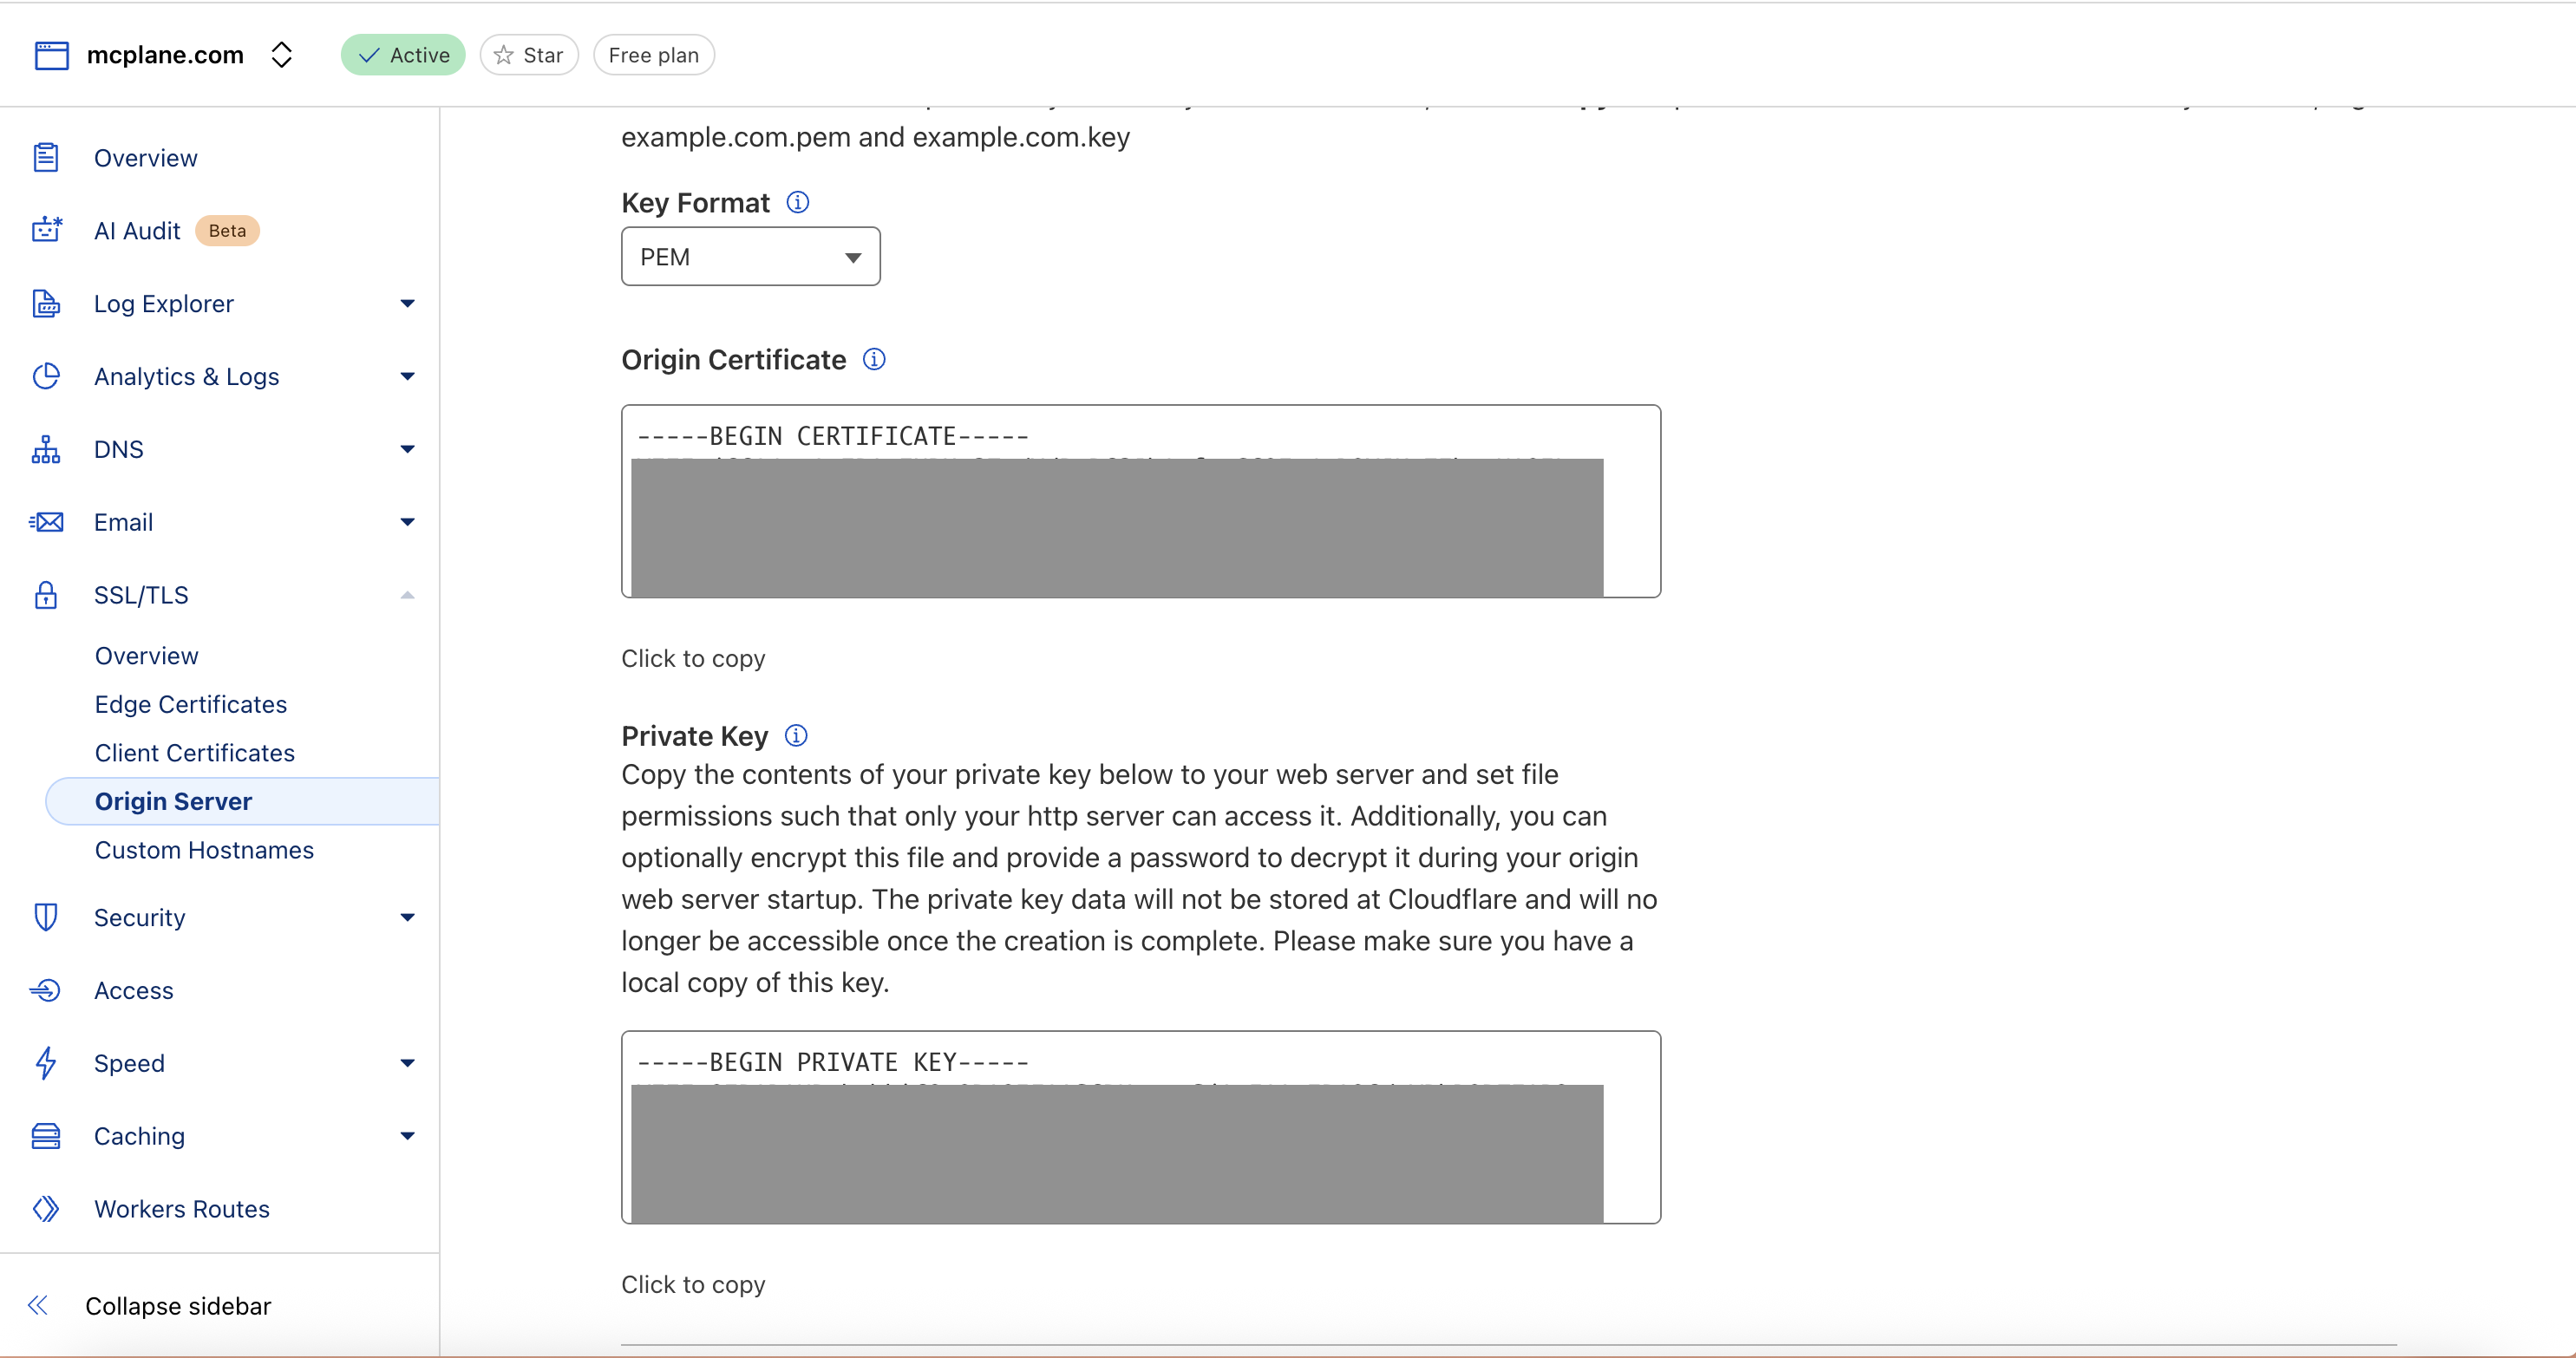
- Keep default settings and generate
- Now you can see certificate and private key. which we will use in the next step.
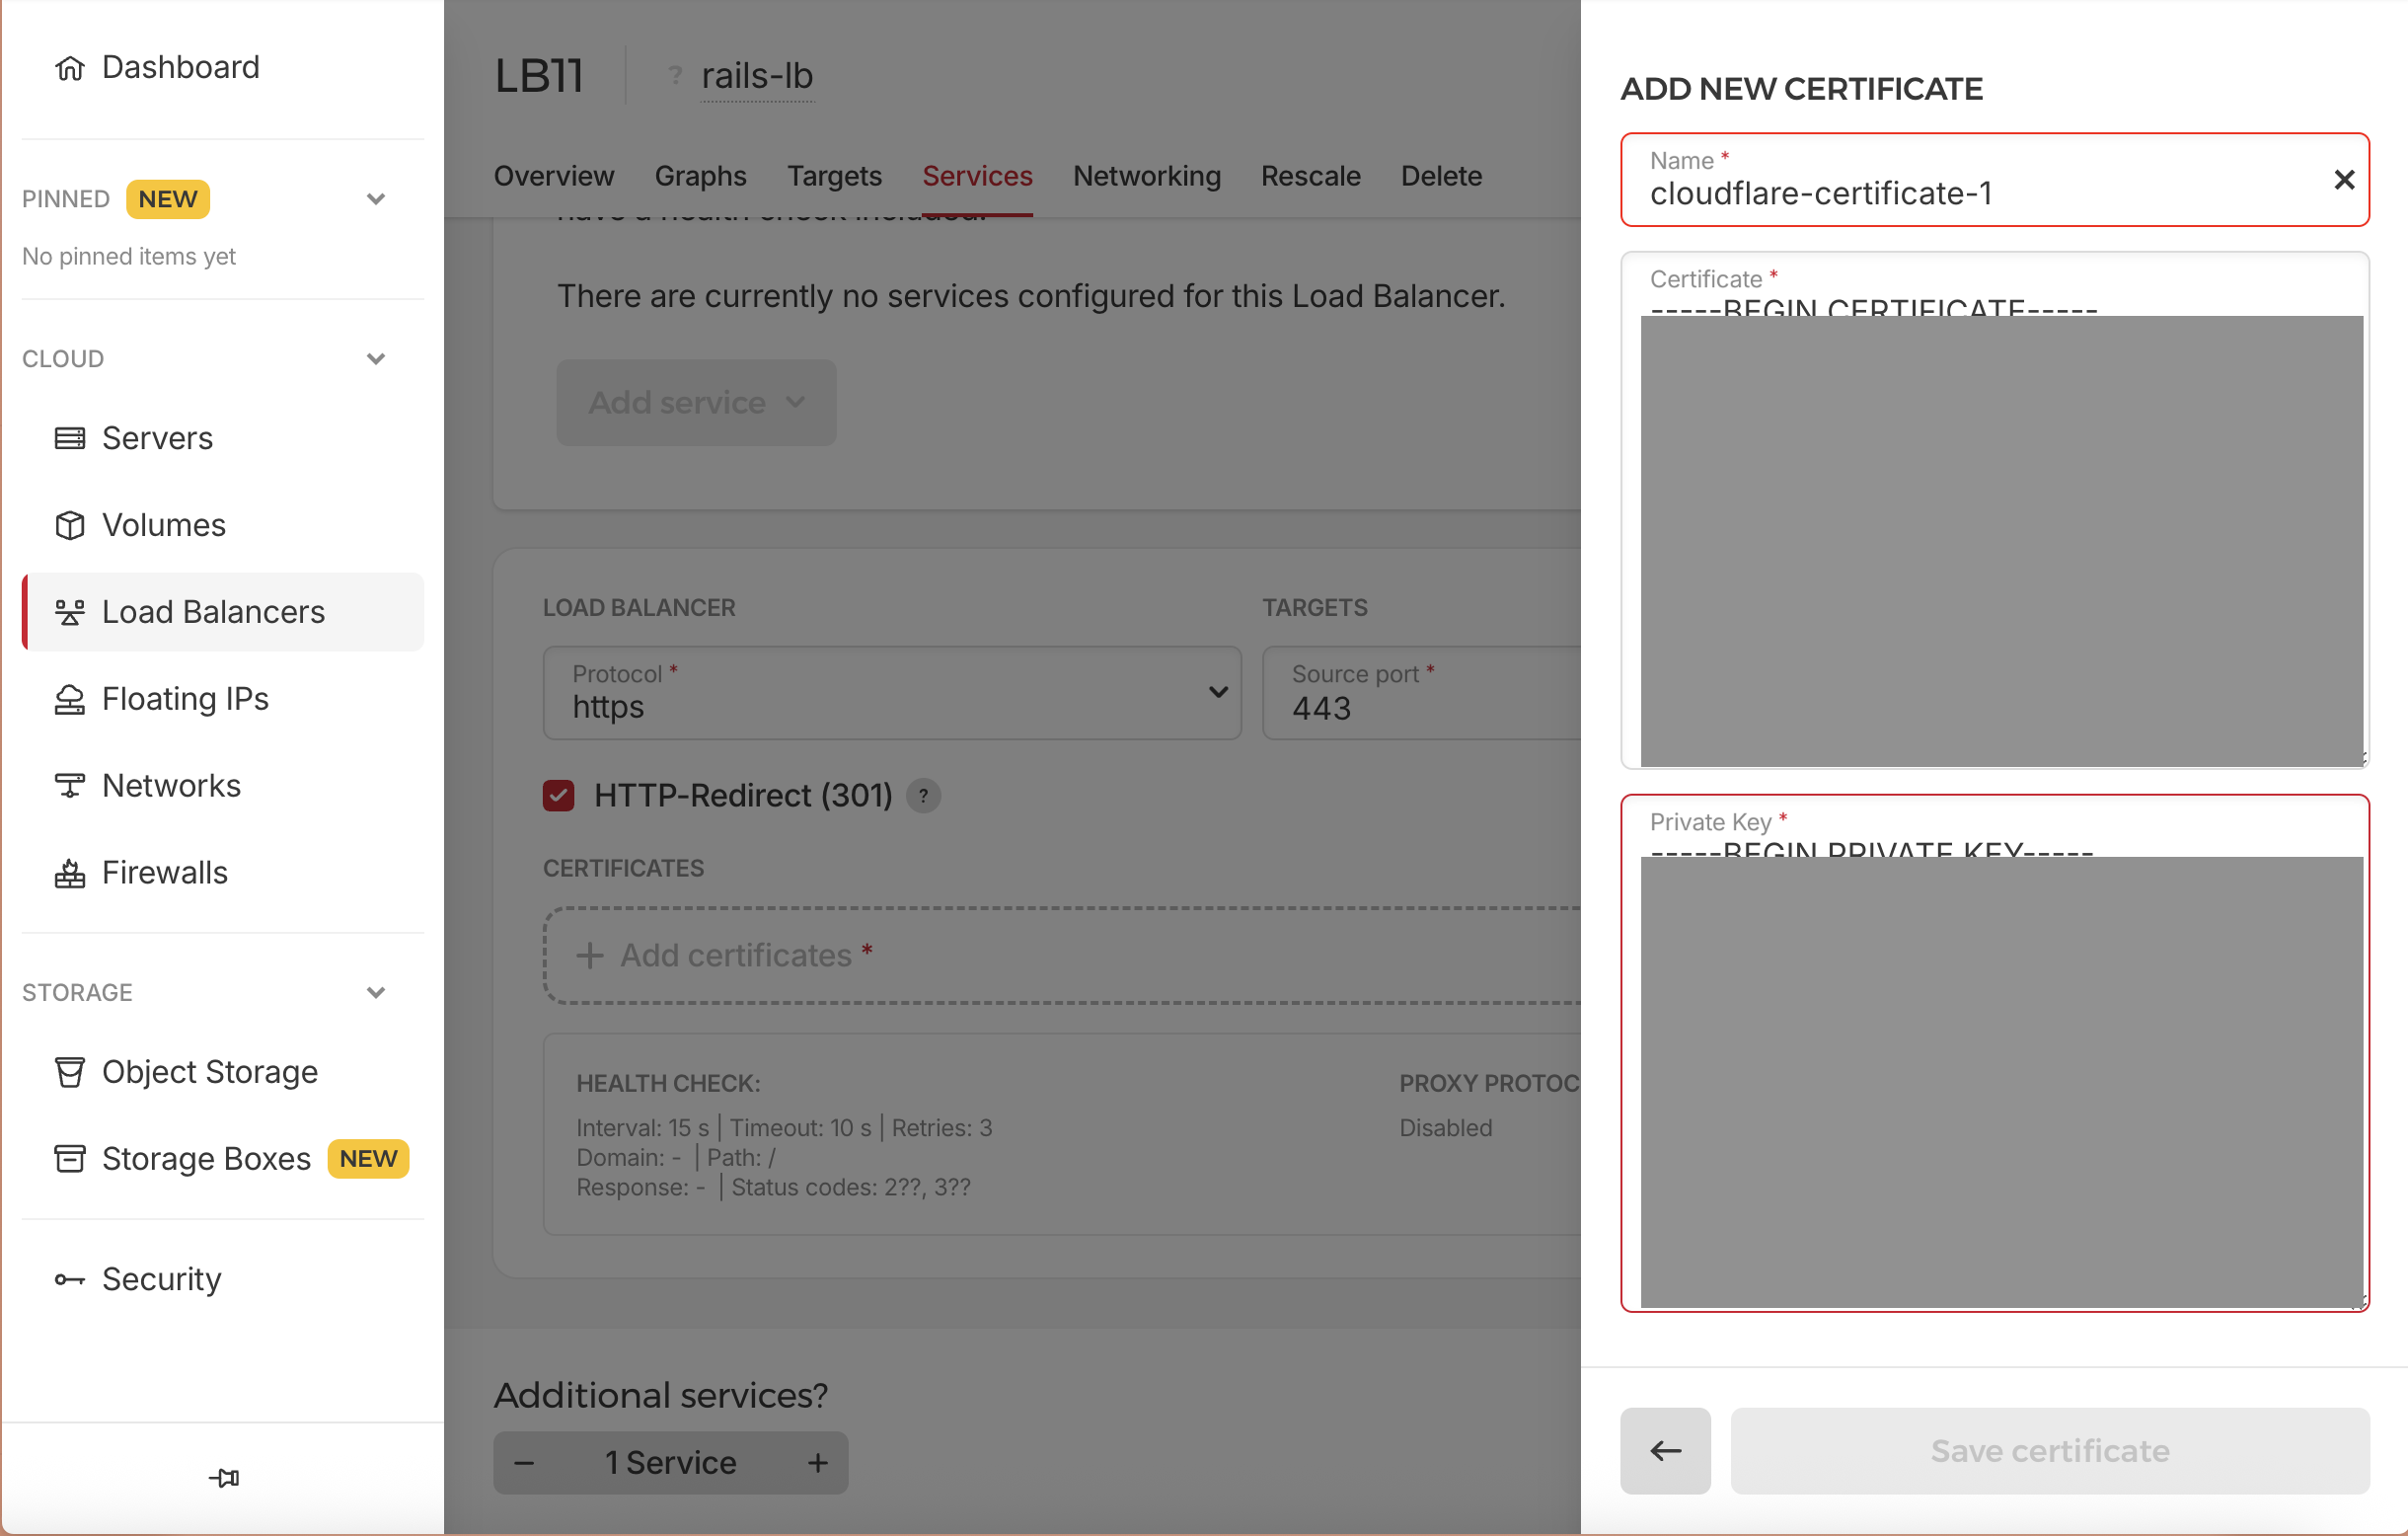
Upload Certificate to Load Balancer
- In Hetzner Cloud Console:
- Go to Load Balancers → Click on rails-lb → Go to Services tab
- Click on Add Service -> New Service:
- Protocol: HTTPS
- Listen Port: 443
- Destination Port: 80
- HTTP Redirect: Enabled (to redirect HTTP to HTTPS)
- Click on Add Certificate
- In the right side, Click on Add Certificate then Upload Certificate
- Name:
cloudflare-certificate-1 - Paste CloudFlare origin certificate and private key from previous step
- Certificate: Paste the Origin Certificate content from CloudFlare
- Private Key: Paste the Private Key content from CloudFlare
- And click on Save Certificate button
1
2
3
4
5
6
7
8
9
10
11
12
13
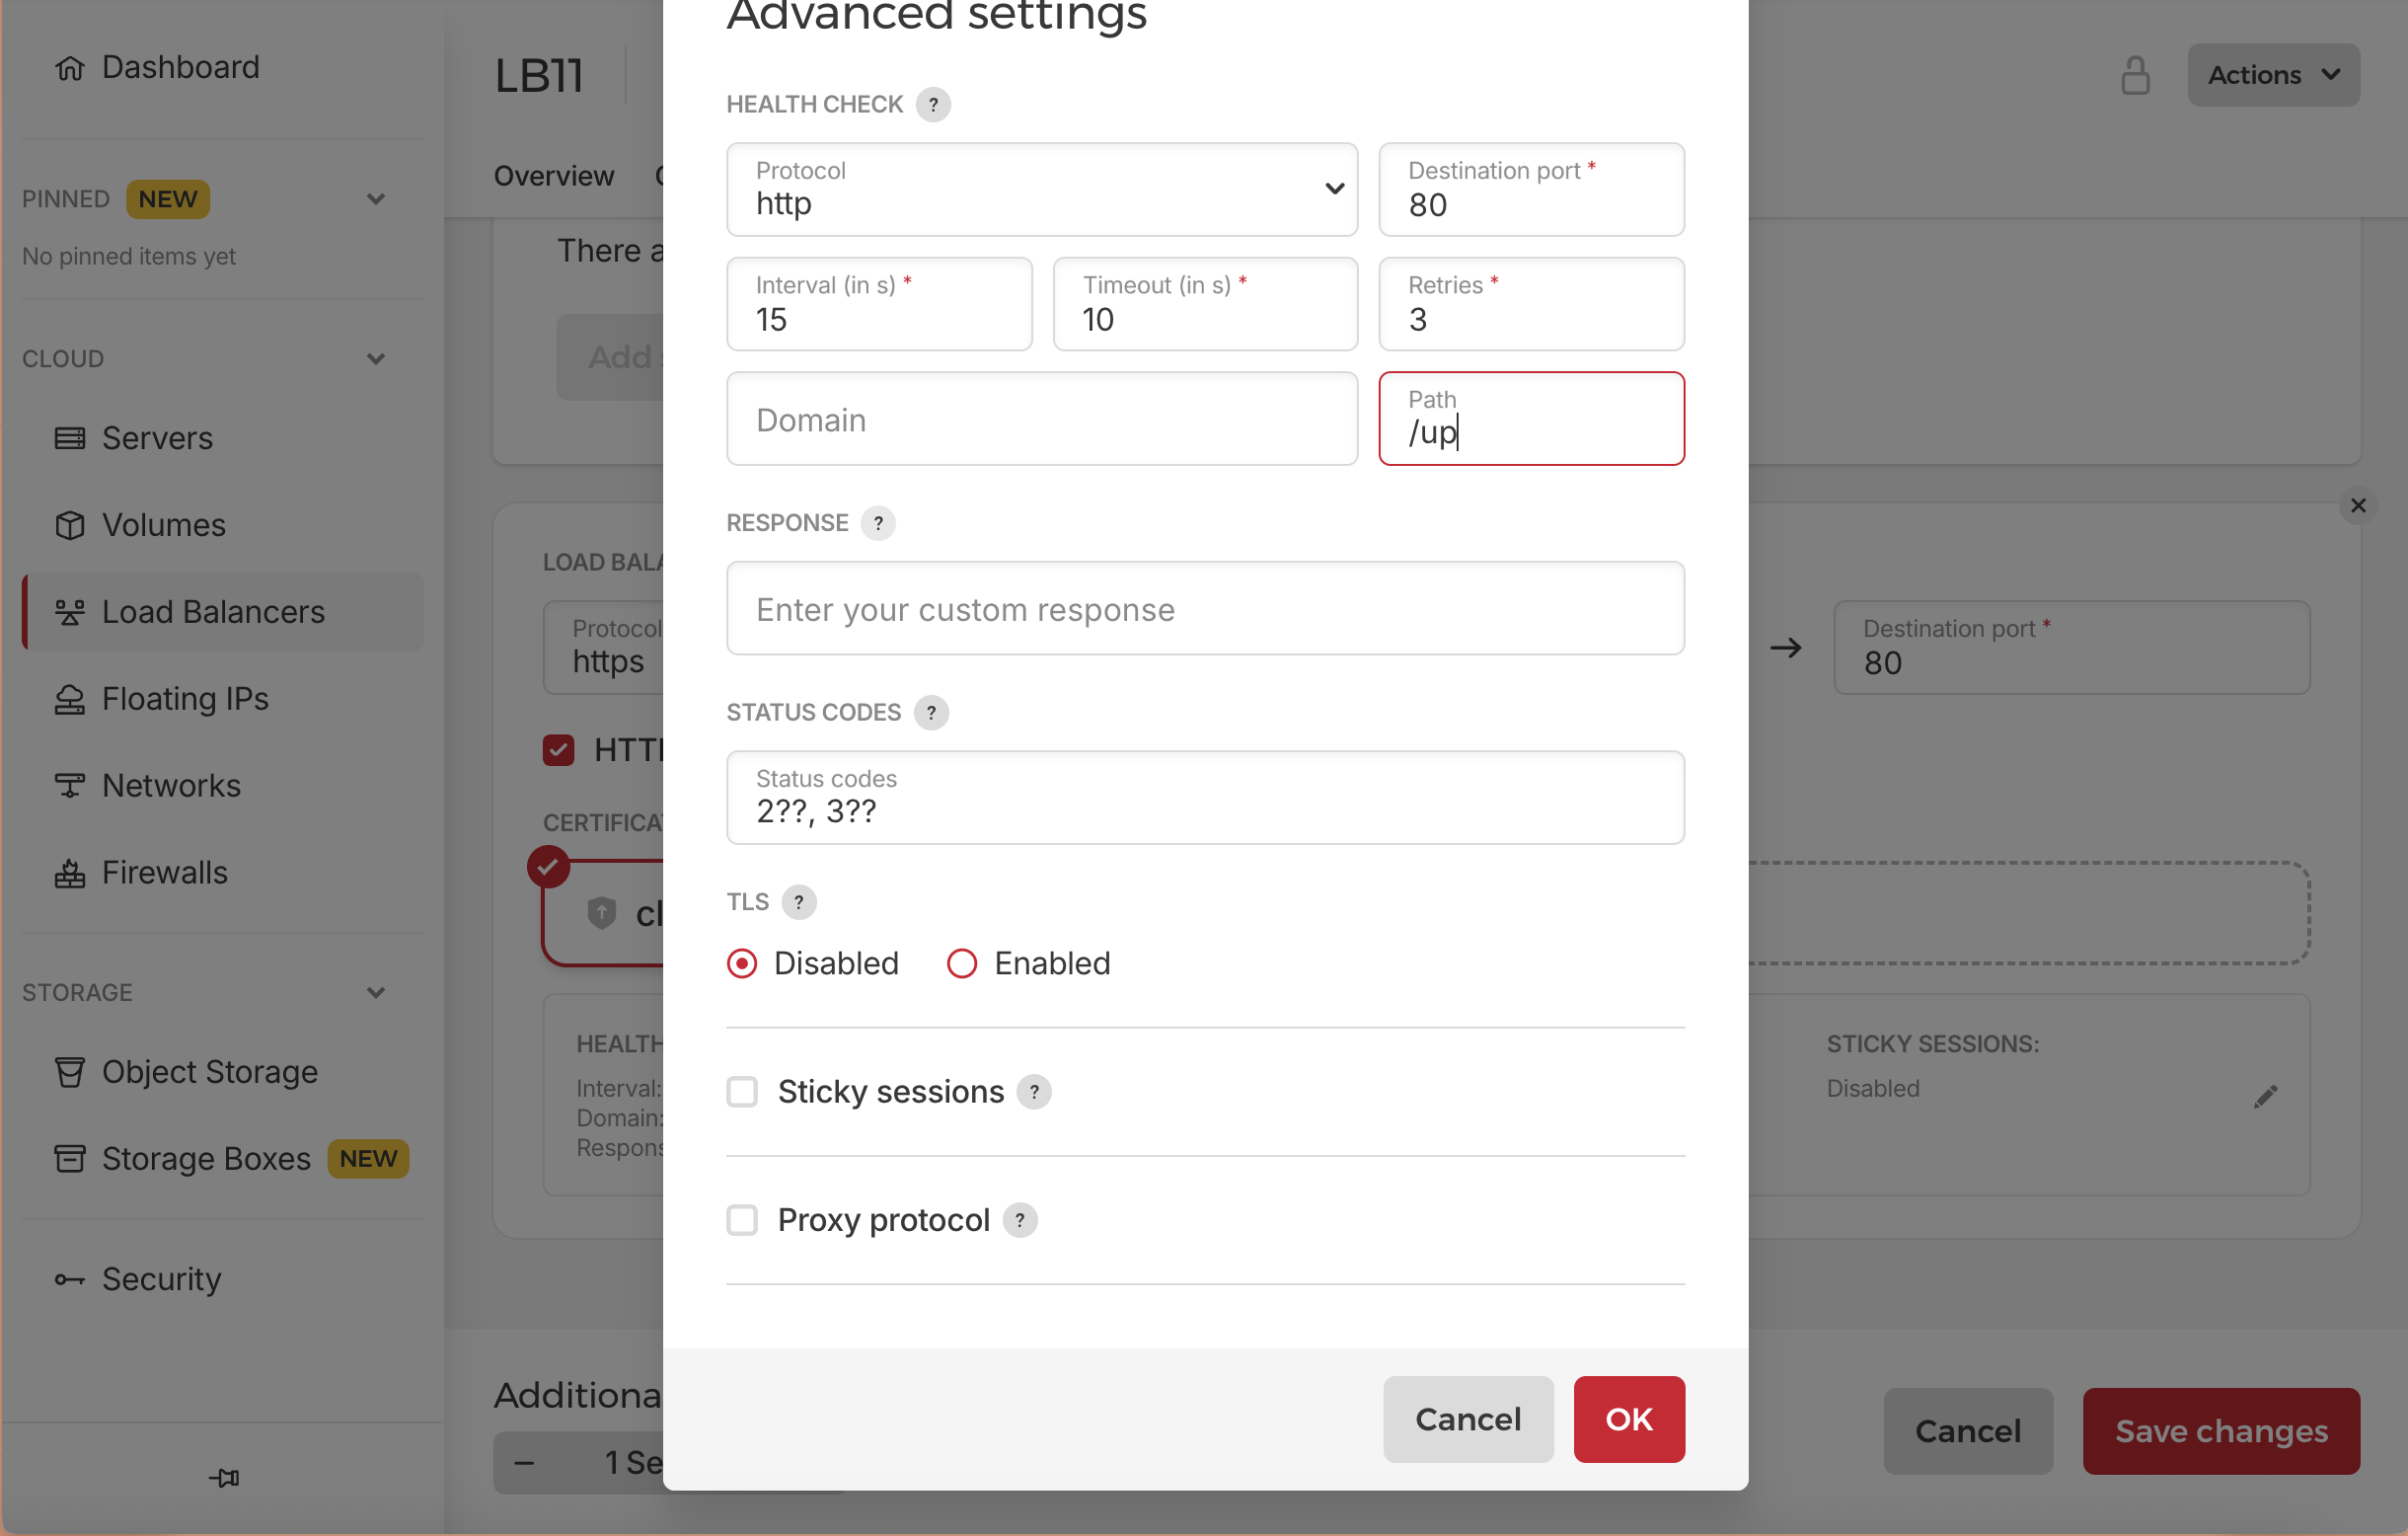
- Click on Edit button (pen icon) right side of the existing service
- Keep everything as it is just change the path to `/up` (our rails health check url)
- **Health Check**:
- Protocol: HTTP
- Port: 80
- Path: `/up`
- Interval: 15s
- Timeout: 5s
- Retries: 3
- Status Codes: ["2??", "3??"]
- Domain: leave it empty
- Reponse: leave it empty
- TLS: Disabled
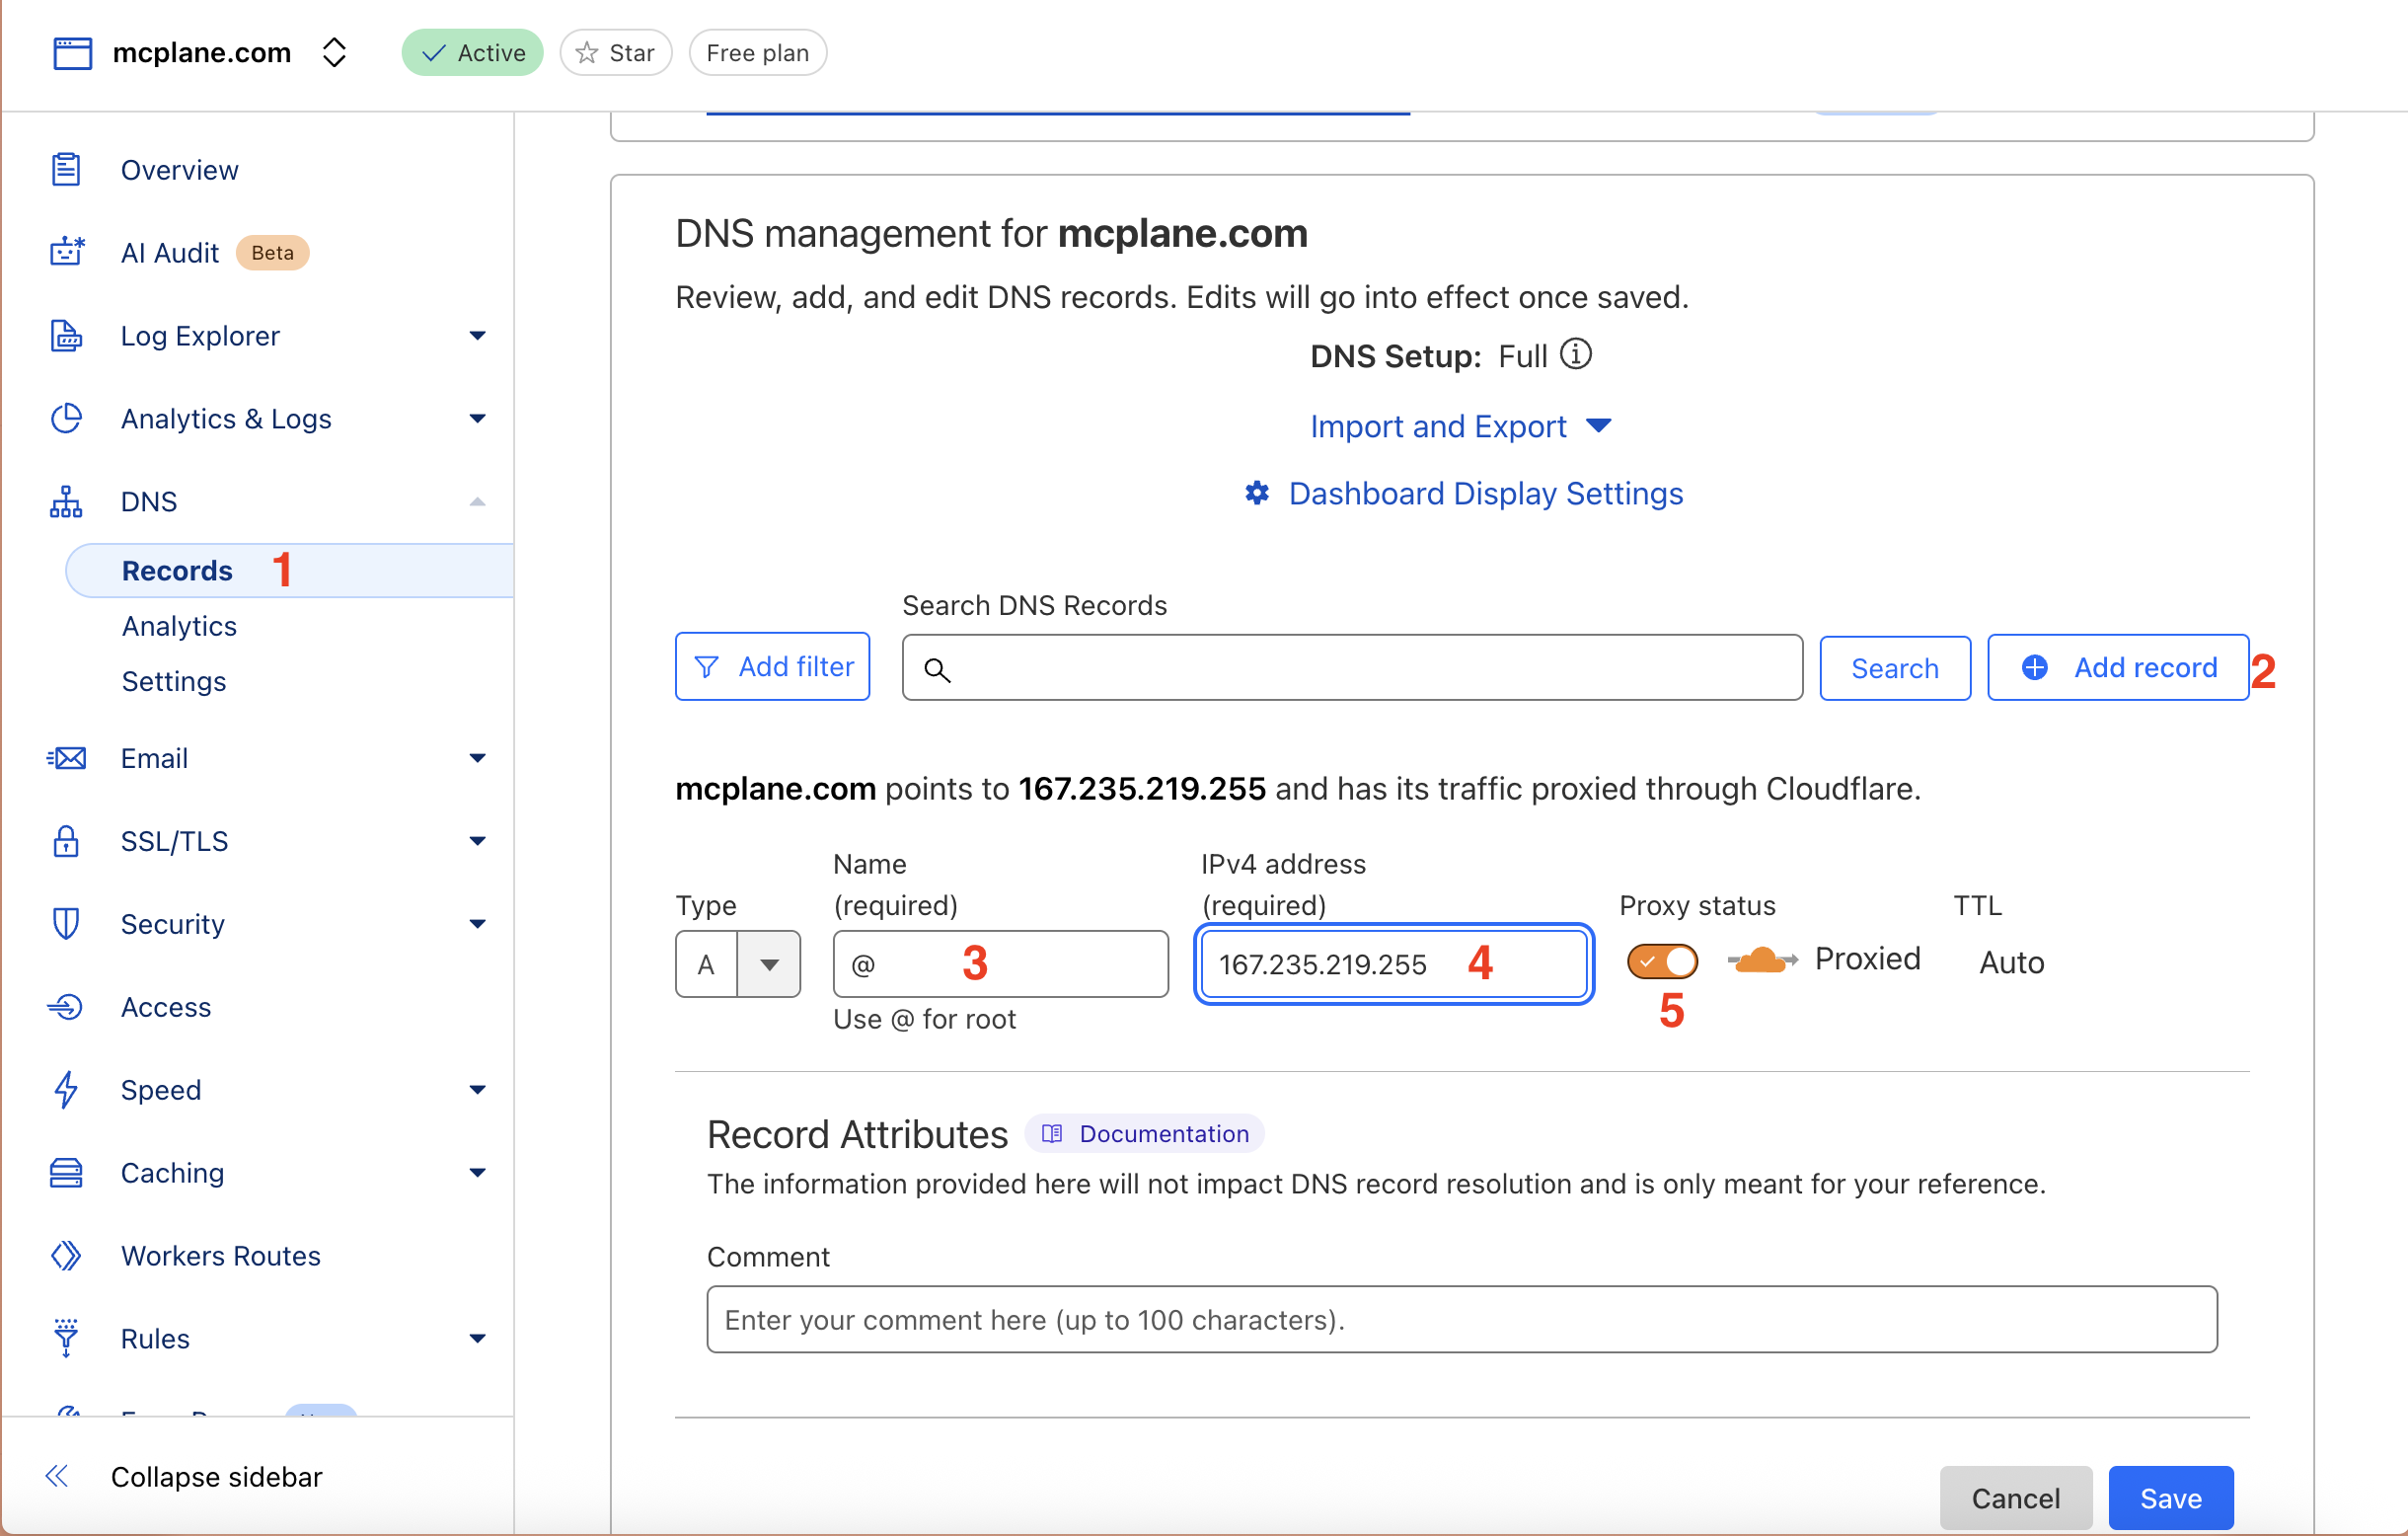
Configure DNS and SSL
Go back to Cloudflare dashboard and configure the following for your domain:
- DNS Records:
- In the left side click on DNS and then click on Records button:
Then click on Add Record button and add the following record:
1 2 3 4
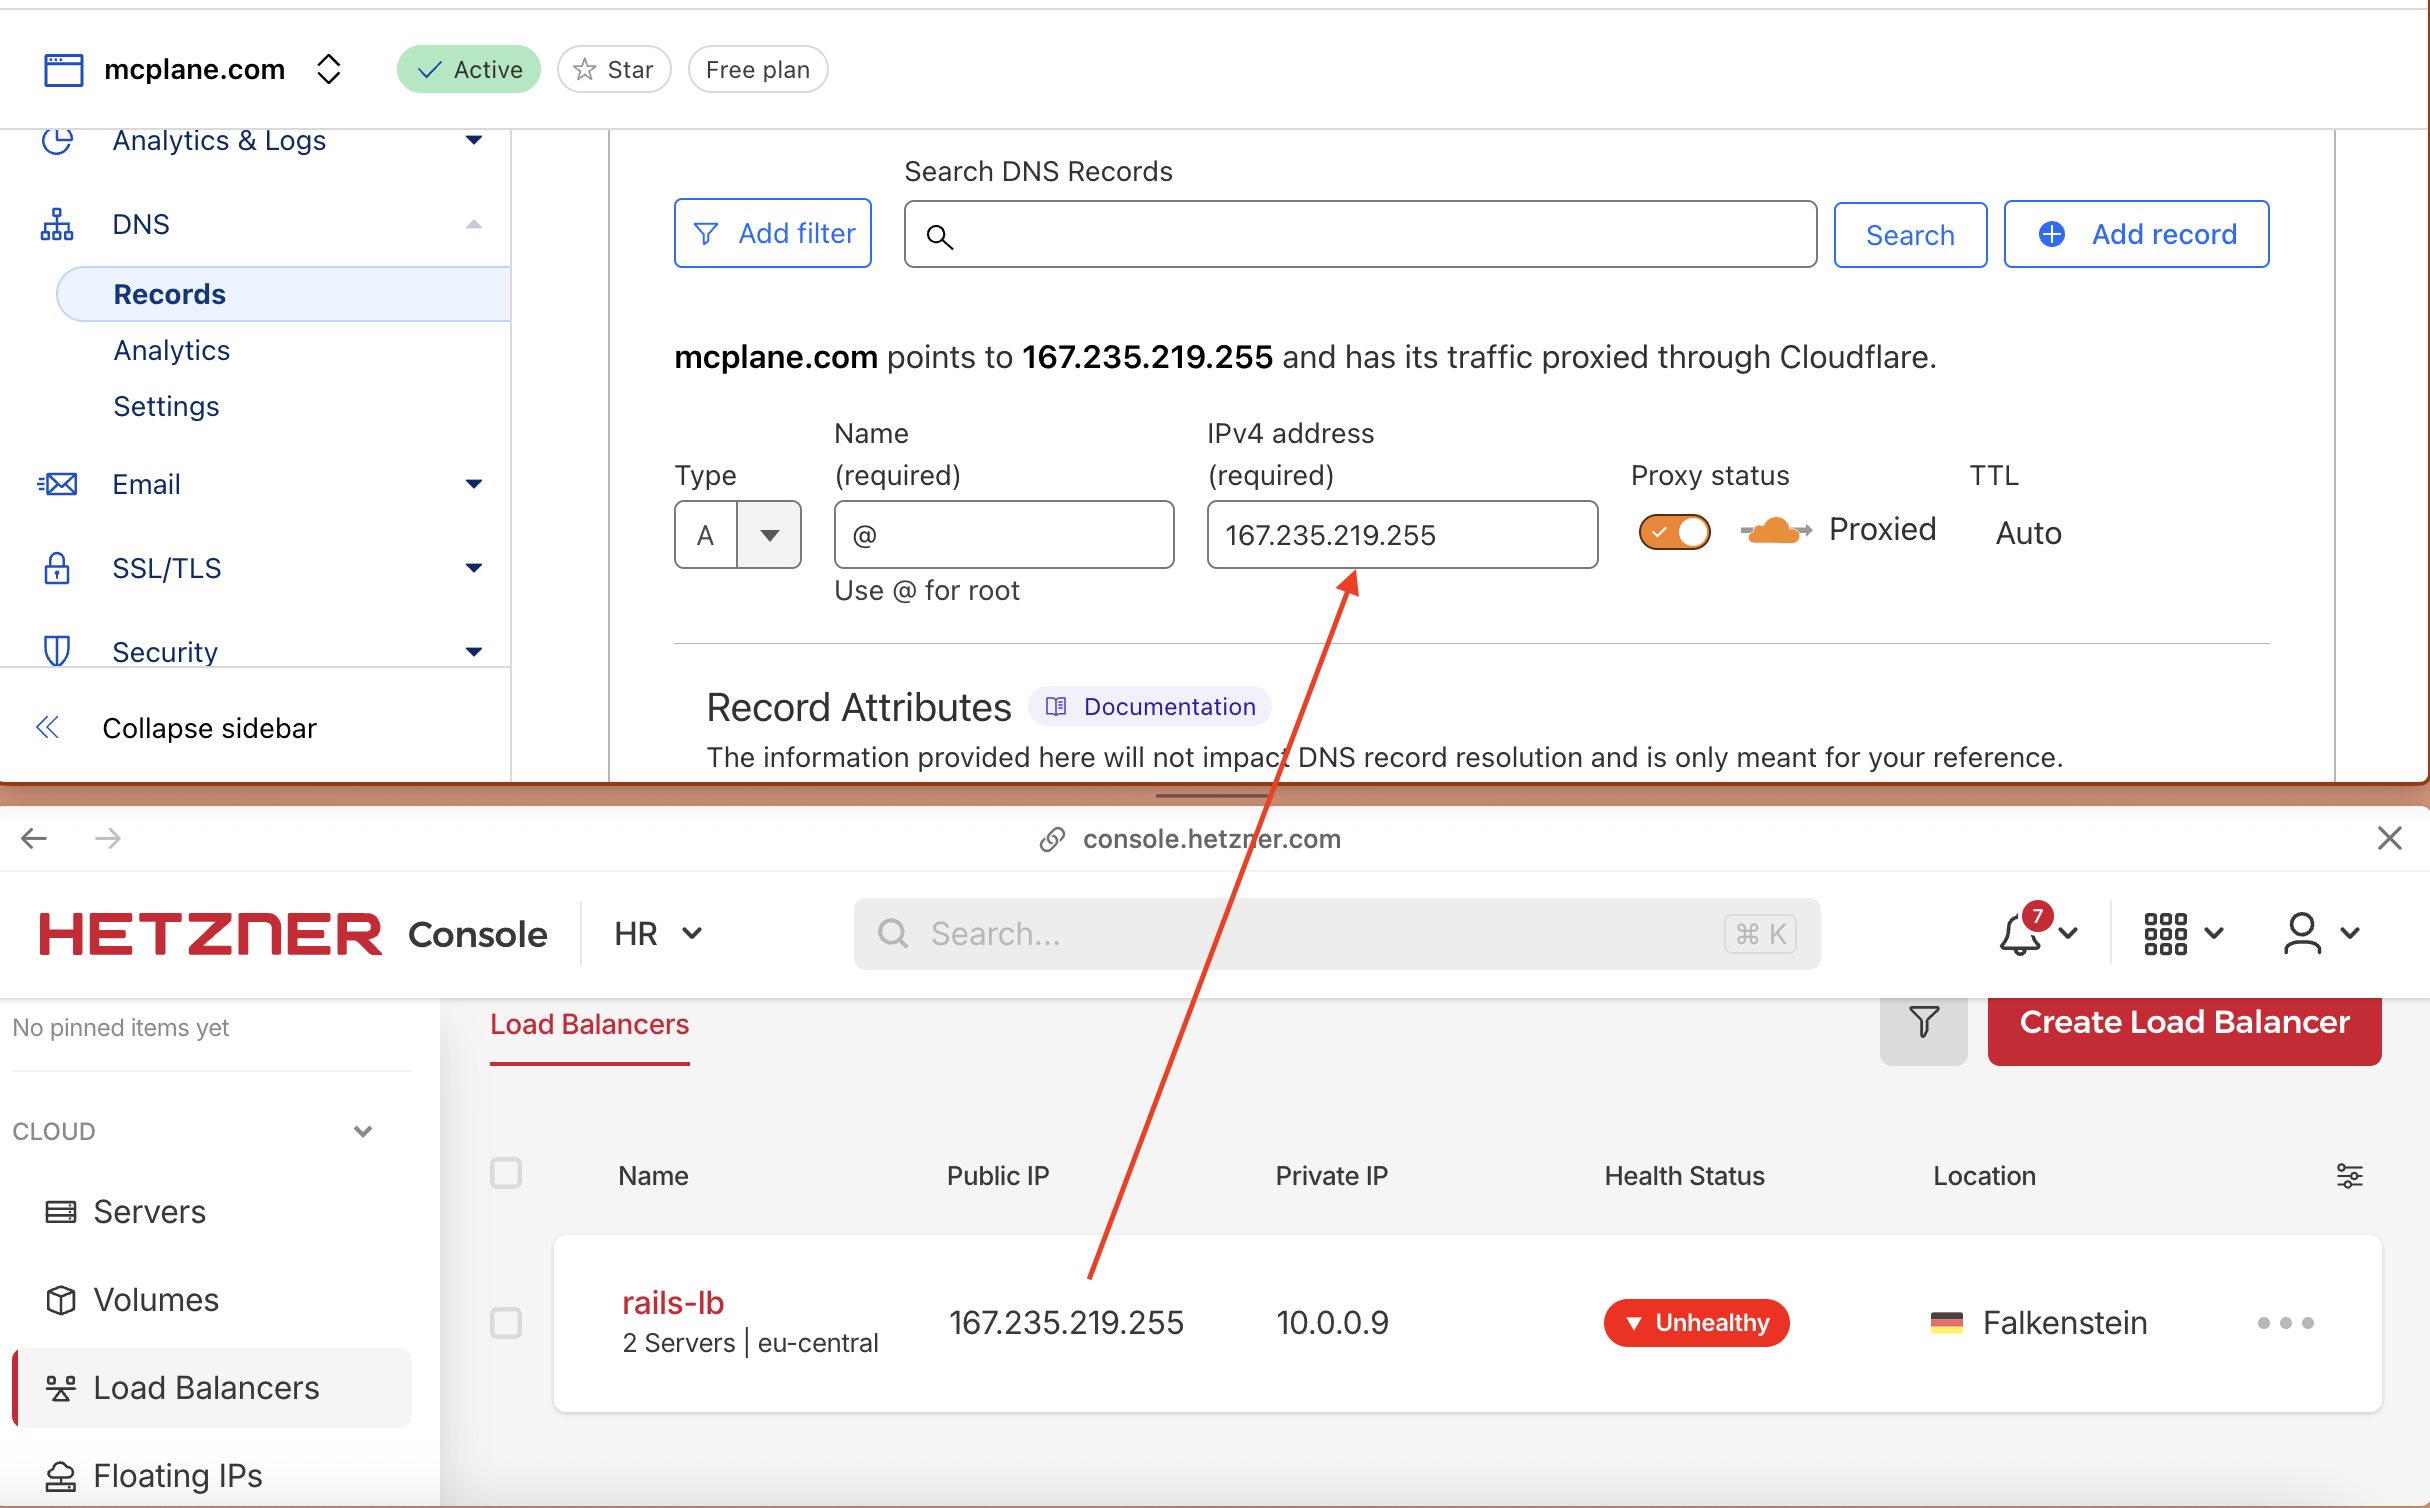
Type: A Name: @ Content: LOAD_BALANCER_PUBLIC_IP Proxy: Enabled (orange cloud)
- Replace
LOAD_BALANCER_PUBLIC_IPwith the public IP of your Hetzner Load Balancer. - and click on Save
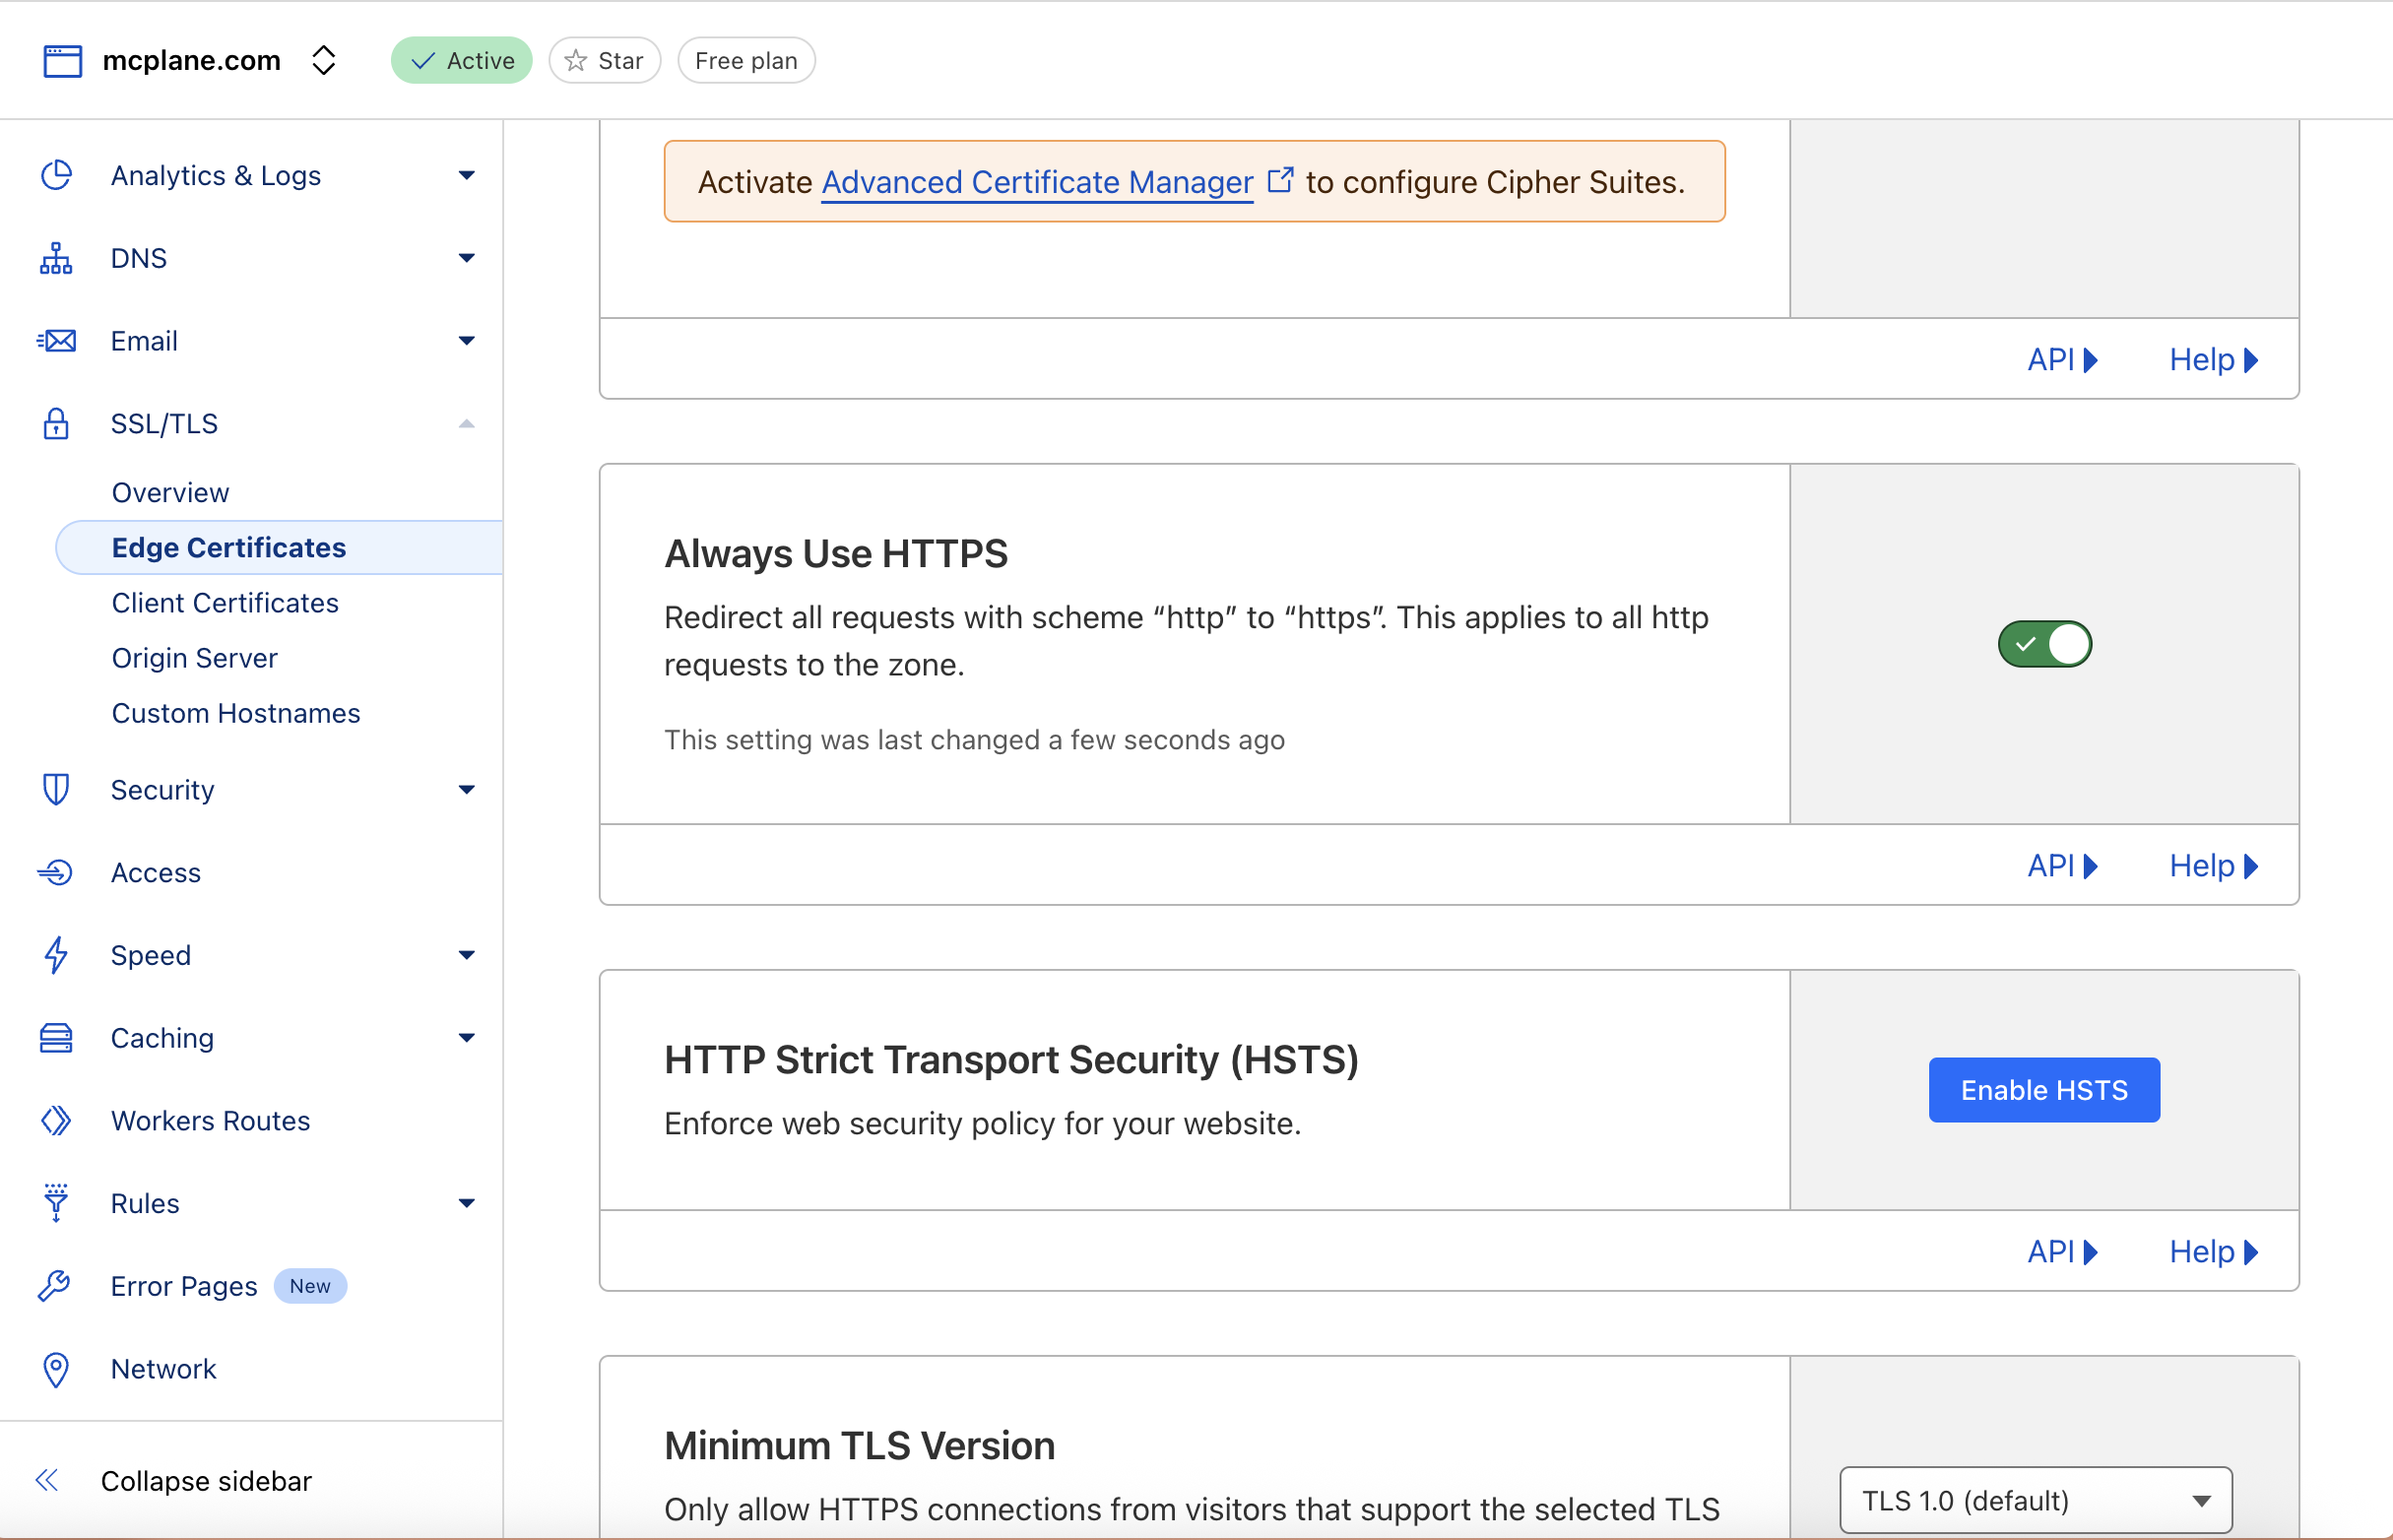
- SSL/TLS Settings:
- In the left side click on SSL/TLS and then click on Edge Certificates:
- Enable “Always Use HTTPS”
- You can enable “HTTP Strict Transport Security (HSTS)” as well.
Step 10: Firewall Configuration
Why We Need Multi-Layered Firewalls
Firewalls provide defense-in-depth security:
- Perimeter Defense: Hetzner Cloud Firewalls block unwanted public traffic
- Internal Segmentation: Host-based firewalls enforce zero-trust between servers
- Principle of Least Privilege: Only allow the minimum required connections
- Attack Surface Reduction: Limit potential entry points for attackers
Critical: Hetzner Cloud Firewalls don’t filter traffic between servers on the same private network, so host-based firewalls are essential.
How to Configure Firewalls
Hetzner Cloud Firewalls (Perimeter Defense)
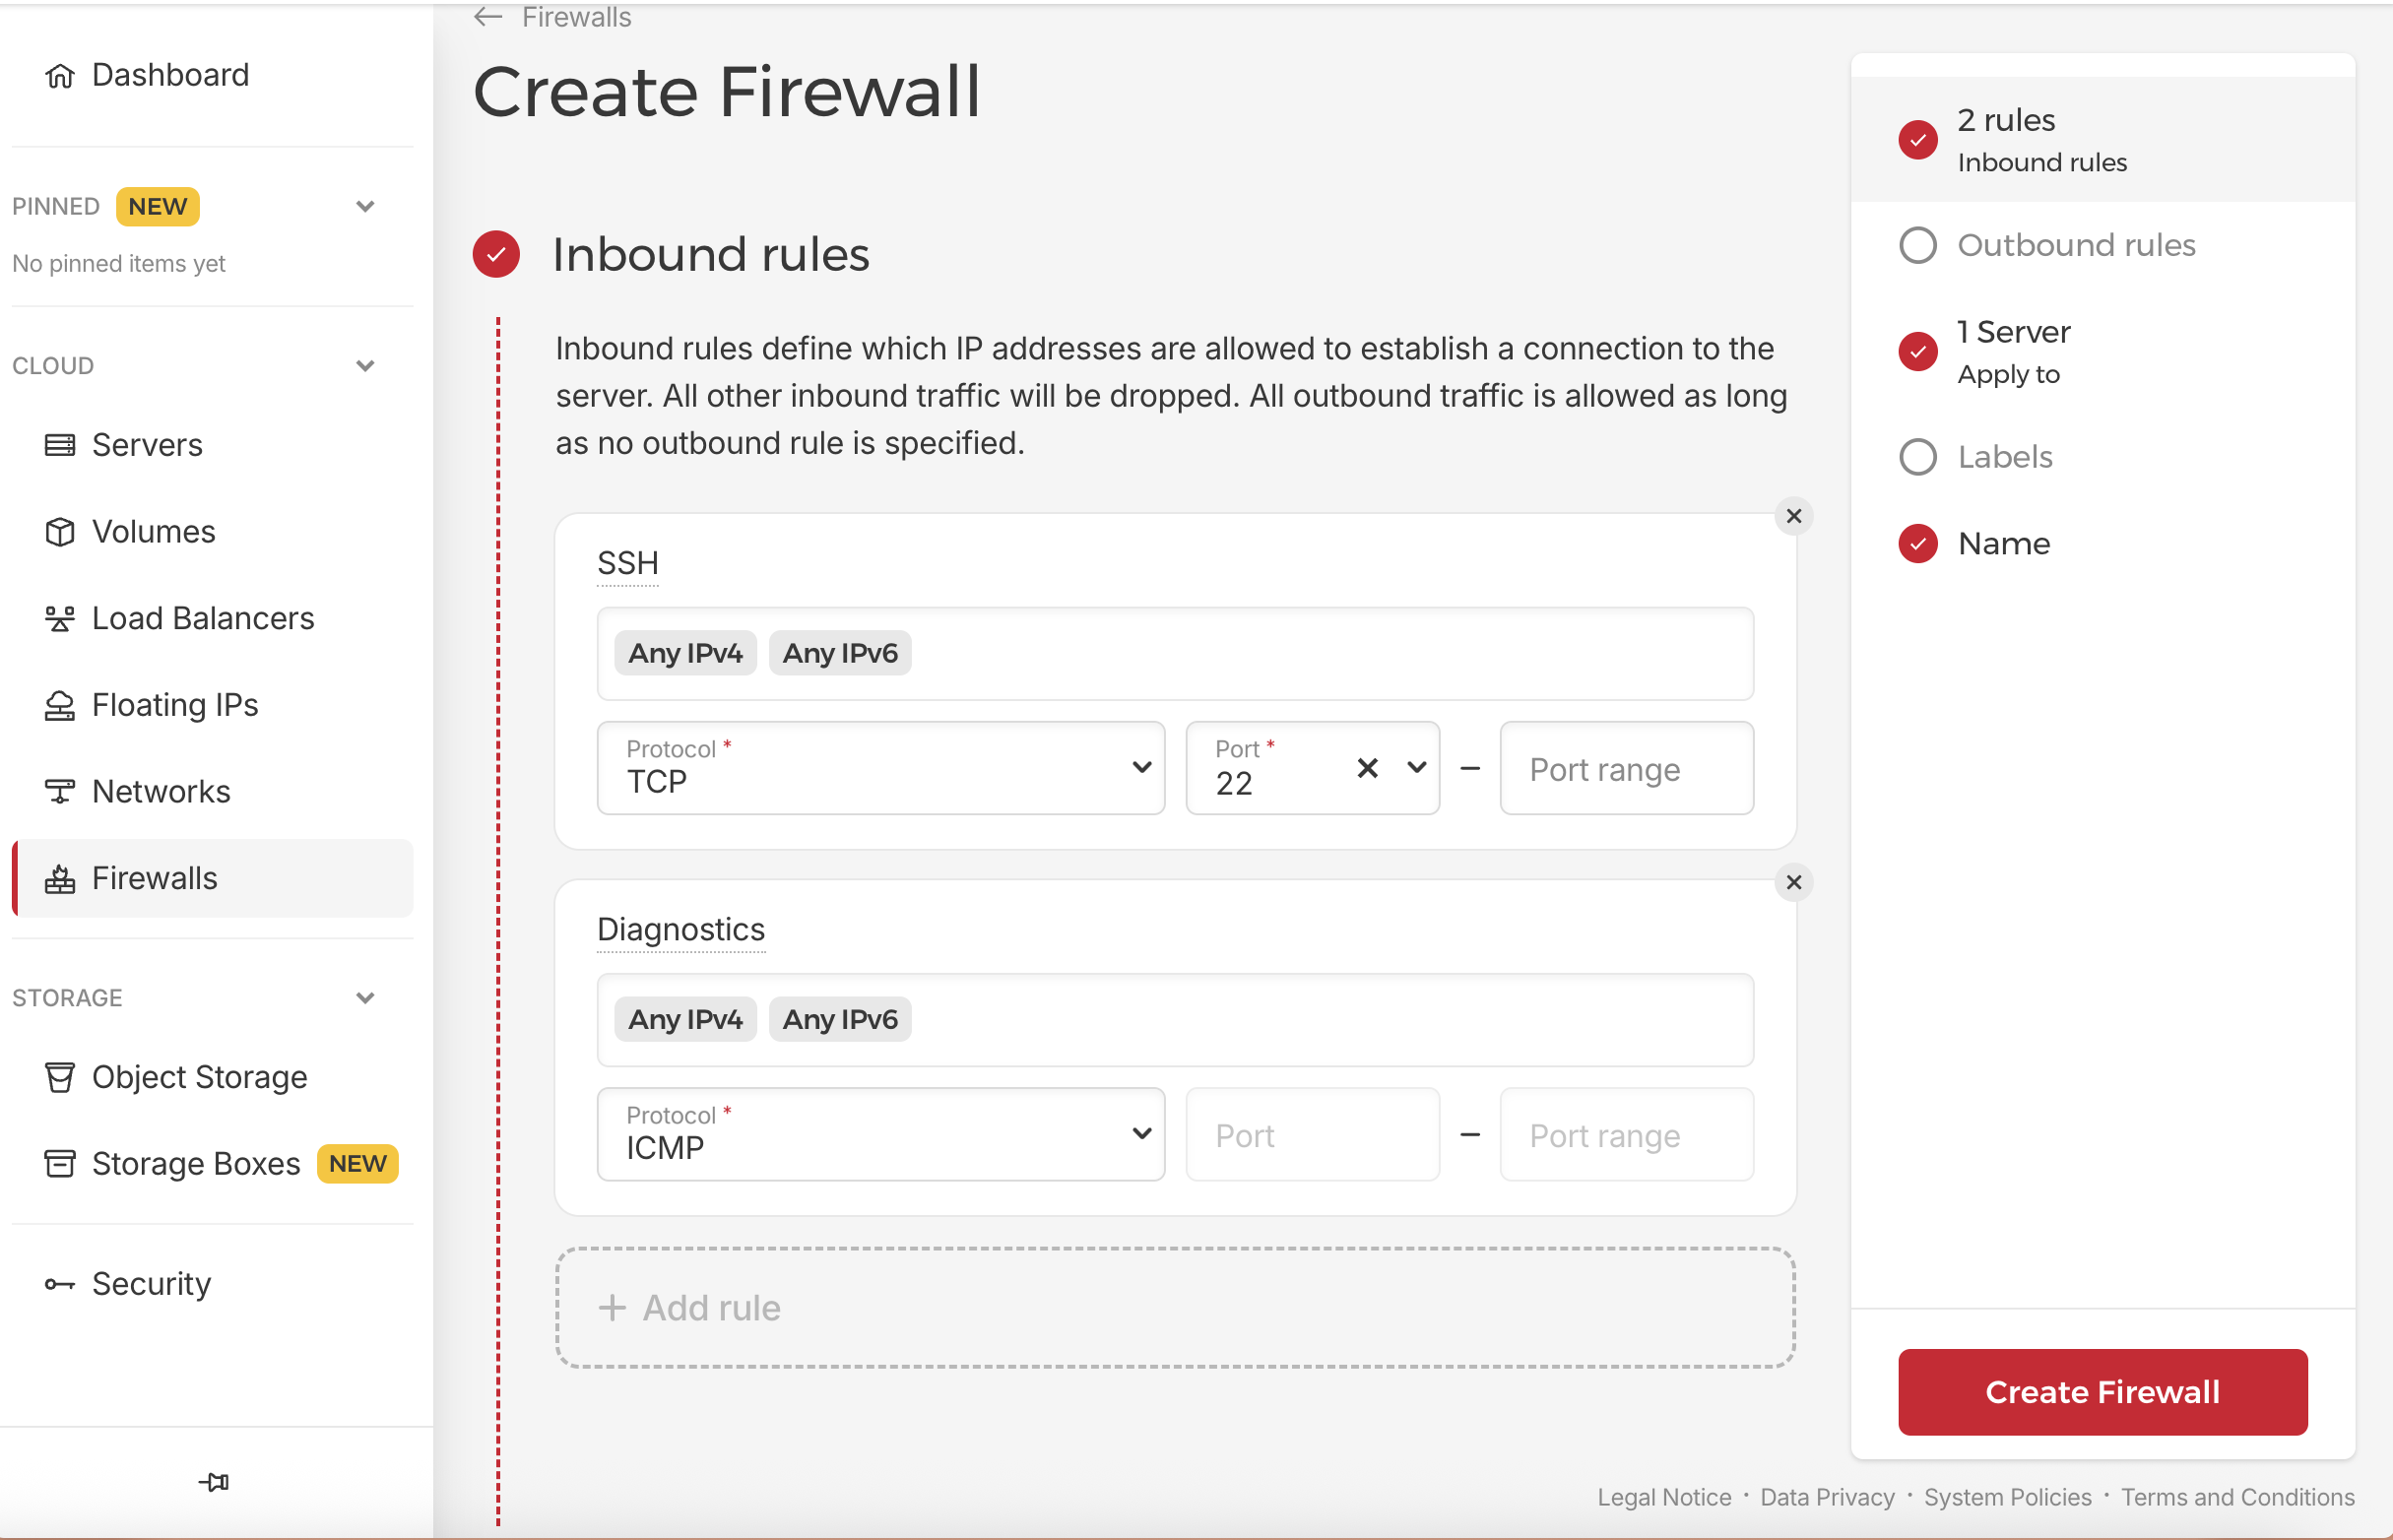
In the left menu, select “Firewalls” and then click “Create Firewall”.
Bastion Firewall:
- Create firewall:
bastion-firewall - Inbound Rules:
- Allow TCP port 22 from and IP, or from YOUR_IP/32 only
- Allow ICMP for diagnostics
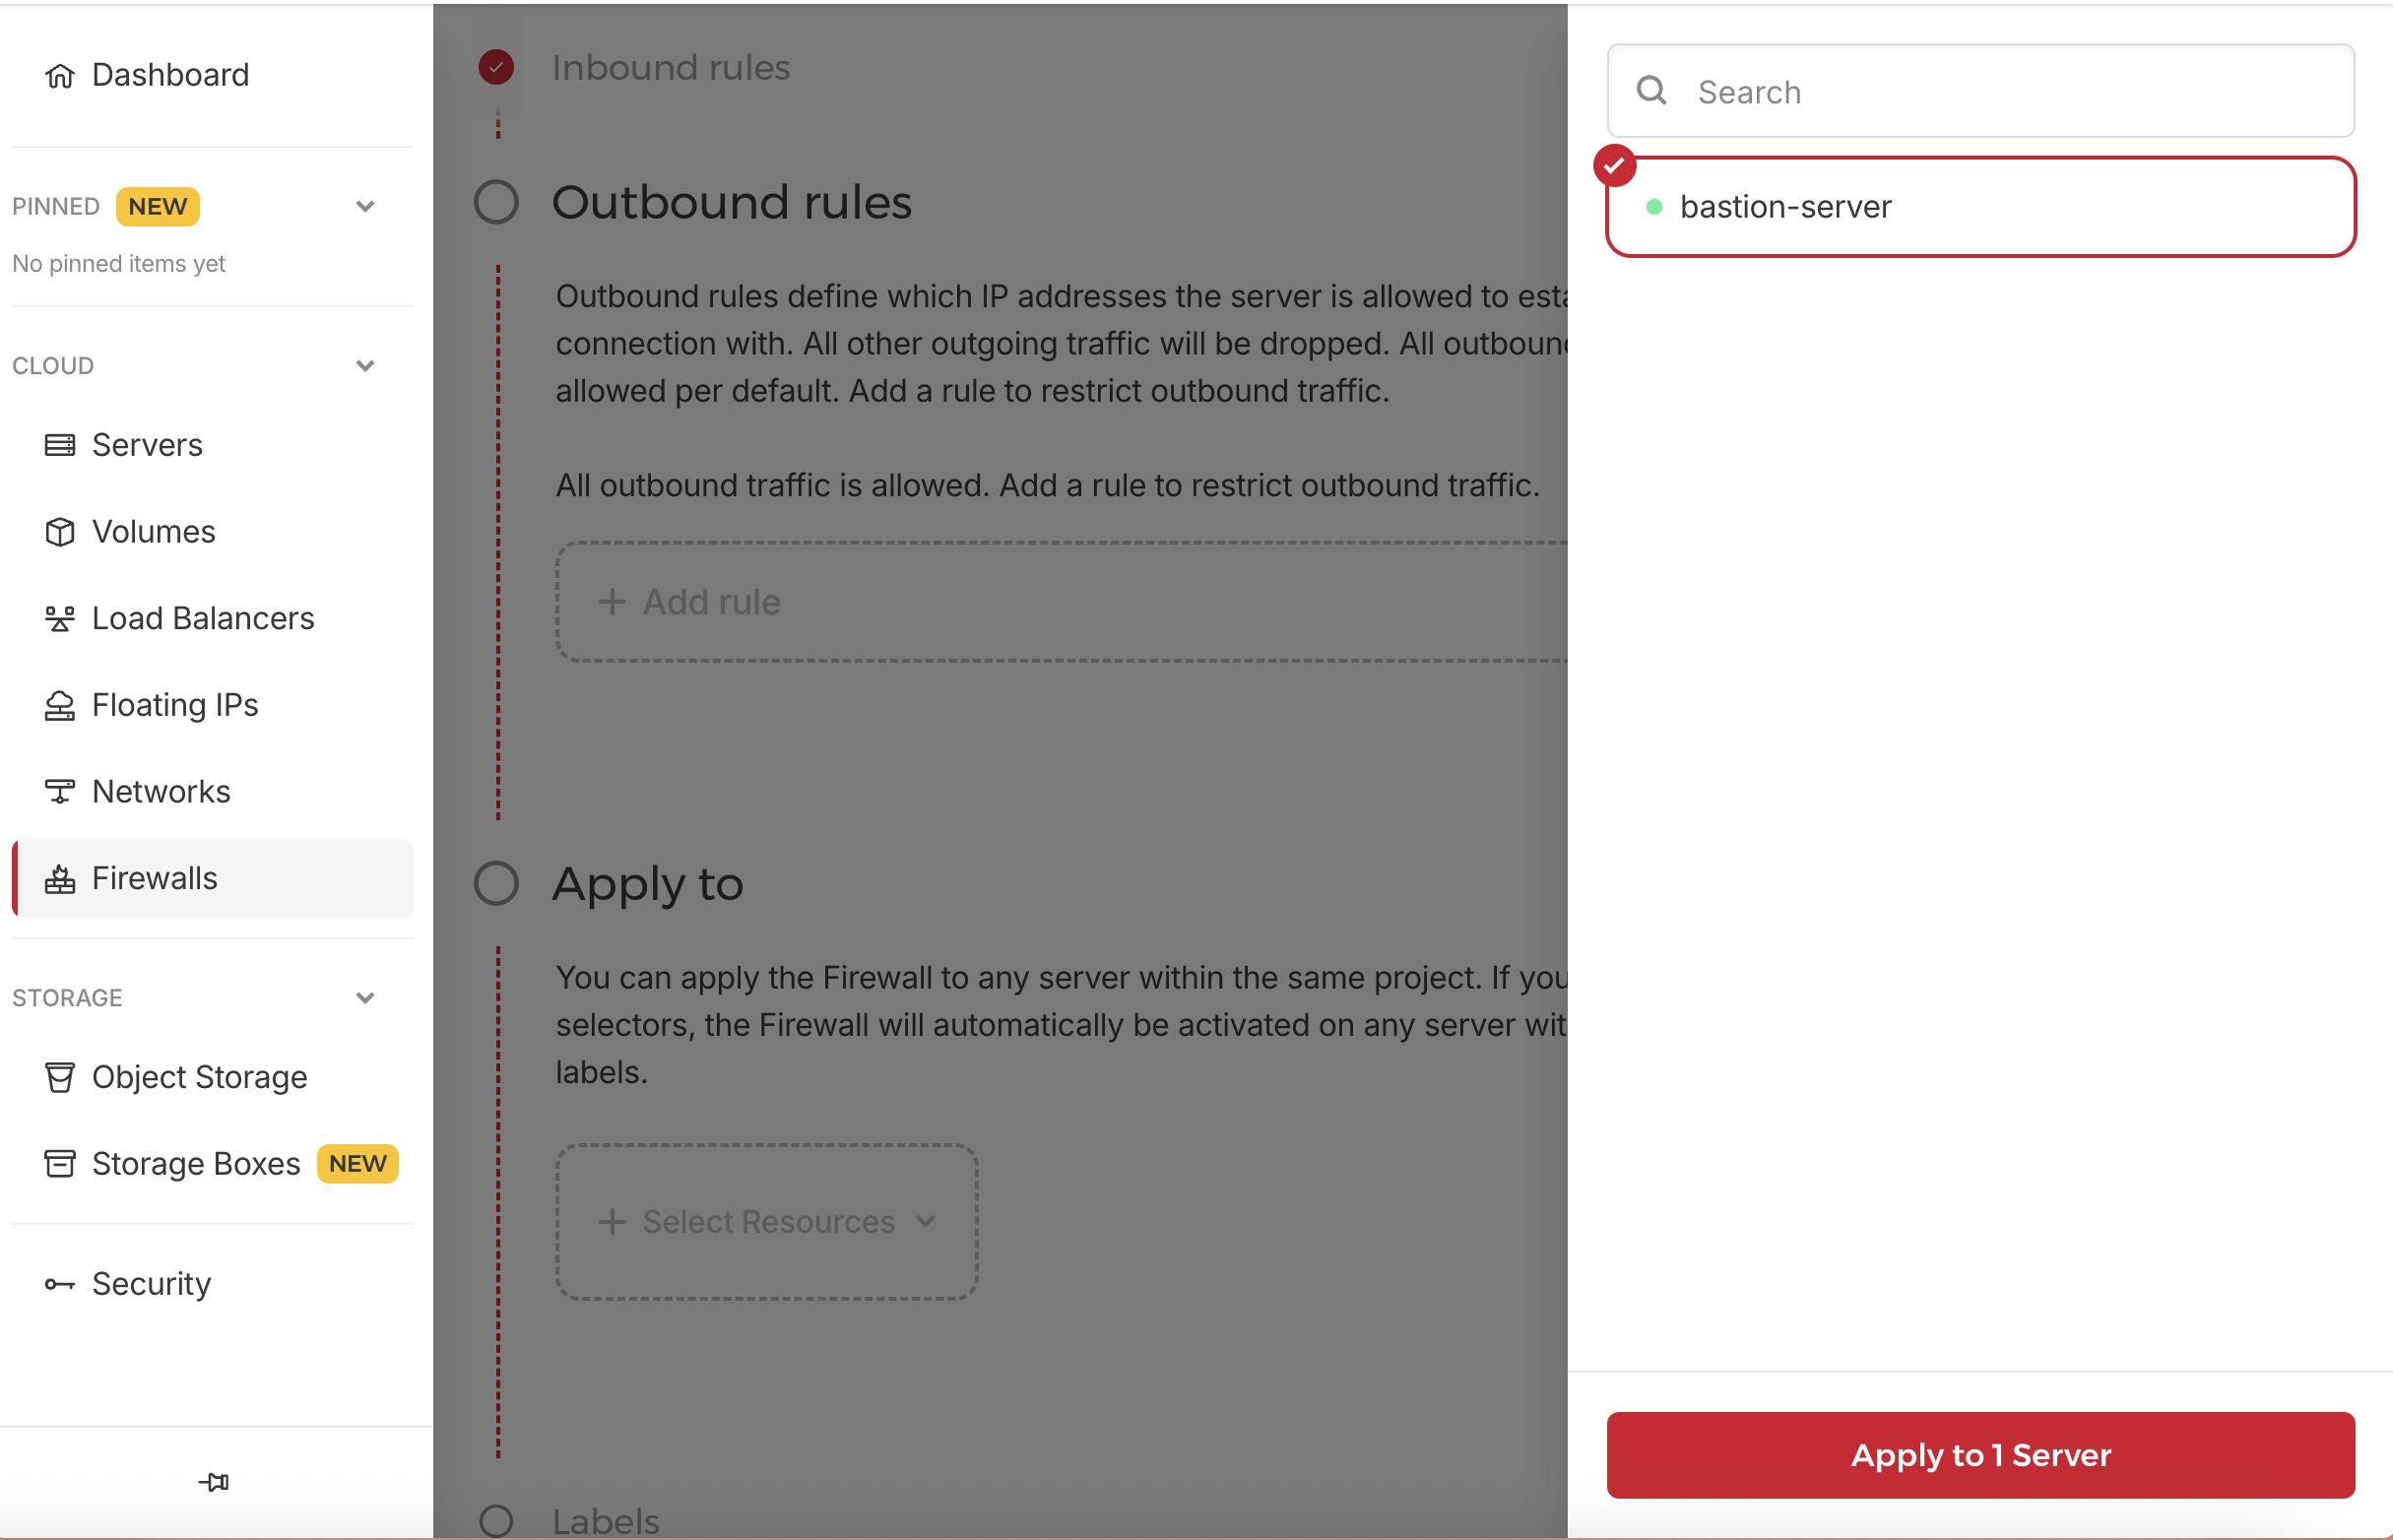
- Apply to: bastion-server only
Host-Based Firewalls (Internal Segmentation)
Now after saving those changes, you can easily connect to each server just by typing ssh <server-name>.
1
ssh app-01
App Servers: as we mentioned before, Hetzner Cloud Firewalls don’t filter traffic between servers on the same private network, so host-based firewalls are essential. to do this, we need to connect to each server and apply some changes:
first connect to server app-01 by running this in your terminal:
1
ssh app-01
Then you will be connected to the server, and run these commands there:
1
2
3
4
5
6
7
8
9
10
11
12
13
14
15
16
17
18
19
20
21
22
23
# Update and upgrade the system packages
sudo apt update && sudo apt upgrade -y

# Install UFW (Uncomplicated Firewall)
sudo apt install ufw -y

# Set default policies
# Deny all incoming traffic by default
# Allow all outgoing traffic by default
# This is a good starting point for security
sudo ufw default deny incoming
sudo ufw default allow outgoing

# SSH from bastion only. Replace 10.0.0.2 with the actual private IP of your bastion server
sudo ufw allow from 10.0.0.2 to any port 22 proto tcp

# App traffic from load balancer private IP. Replace 10.0.0.9 with the actual private IP of your load balancer
sudo ufw allow from 10.0.0.9 to any port 80 proto tcp

# Monitoring access. Replace 10.0.0.8 with the actual private IP of your monitoring server
sudo ufw allow from 10.0.0.8 to any port 9100 proto tcp

sudo ufw --force enable
Run the exactly the same commands for app-02 server. to do this, just open a new terminal and run:
1
ssh app-02
Then run the same commands as above.
Jobs Server:
We will do the same for the jobs server, but we need to allow access from app servers as well, because jobs server needs to communicate with app servers. and there is no income traffic from load balancer to jobs server, so we don’t need to allow that.
first connect to server jobs-01 by running this in your terminal:
1
ssh jobs-01
Then you will be connected to the server, and run these commands there:
1
2
3
4
5
6
7
8
9
10
11
12
13
14
15
16
17
18
19
sudo apt update && sudo apt upgrade -y

sudo apt install ufw -y

sudo ufw default deny incoming
sudo ufw default allow outgoing

# SSH from bastion only. Replace 10.0.0.2 with the actual private IP of your bastion server
sudo ufw allow from 10.0.0.2 to any port 22 proto tcp

# HTTP access from app servers (for API calls, webhooks, etc.)
# Replace 10.0.0.3 and 10.0.0.4 with the actual private IPs of your app servers
sudo ufw allow from 10.0.0.3 to any port 80 proto tcp
sudo ufw allow from 10.0.0.4 to any port 80 proto tcp

# Monitoring access. Replace 10.0.0.8 with the actual private IP of your monitoring server
sudo ufw allow from 10.0.0.8 to any port 9100 proto tcp

sudo ufw --force enable
PostgreSQL Primary:
We will do the same for the primary database server, but we need to allow access from app servers and jobs server as well, because they need to communicate with the database. and there is no income traffic from load balancer to database server, so we don’t need to allow that. and we need to allow access from the replica server for replication. first connect to server db-primary by running this in your terminal:
1
ssh db-primary
Then you will be connected to the server, and run these commands there:
1
2
3
4
5
6
7
8
9
10
11
12
13
14
15
16
17
18
19
20
21
22
23
24
25
26
27
28
29
sudo apt update && sudo apt upgrade -y

sudo apt install ufw -y

sudo ufw default deny incoming
sudo ufw default allow outgoing

# SSH from bastion only. Replace 10.0.0.2 with the actual private IP of your bastion server
sudo ufw allow from 10.0.0.2 to any port 22 proto tcp

# Administrative database access from bastion
sudo ufw allow from 10.0.0.2 to any port 5432 proto tcp

# HTTP access from app servers (for API calls, webhooks, etc.)
# Replace 10.0.0.3 and 10.0.0.4 with the actual private IPs of your app servers
sudo ufw allow from 10.0.0.3 to any port 5432 proto tcp
sudo ufw allow from 10.0.0.4 to any port 5432 proto tcp

# Database access from jobs server (Solid Queue operations)
# Replace 10.0.0.5 with the actual private IP of your jobs server
sudo ufw allow from 10.0.0.5 to any port 5432 proto tcp

# Replication from replica server. Replace 10.0.0.7 with the actual private IP of your replica server
sudo ufw allow from 10.0.0.7 to any port 5432 proto tcp

# Monitoring access. Replace 10.0.0.8 with the actual private IP of your monitoring server
sudo ufw allow from 10.0.0.8 to any port 9100 proto tcp

sudo ufw --force enable
PostgreSQL Replica:
We will do the same for the replica database server, but we need to allow access from primary database server for replication, and we need to allow access from monitoring server as well. And there is no income traffic from load balancer or app servers to replica server, so we don’t need to allow that. first connect to server db-replica by running this in your terminal:
1
ssh db-replica
Then you will be connected to the server, and run these commands there:
1
2
3
4
5
6
7
8
9
10
11
12
13
14
15
16
17
18
19
20
21
22
23
24
25
26
27
sudo apt update && sudo apt upgrade -y

sudo apt install ufw -y

sudo ufw default deny incoming
sudo ufw default allow outgoing

# SSH from bastion only. Replace 10.0.0.2 with the actual private IP of your bastion server
sudo ufw allow from 10.0.0.2 to any port 22 proto tcp

# Administrative database access from bastion
sudo ufw allow from 10.0.0.2 to any port 5432 proto tcp

# Replication from primary db server. Replace 10.0.0.6 with the actual private IP of your primary server
sudo ufw allow from 10.0.0.6 to any port 5432 proto tcp

# Read-only access from app servers (if configured for read scaling)
sudo ufw allow from 10.0.0.3 to any port 5432 proto tcp
sudo ufw allow from 10.0.0.4 to any port 5432 proto tcp

# Read-only access from jobs server (for reporting, analytics jobs)
sudo ufw allow from 10.0.0.5 to any port 5432 proto tcp

# Monitoring access. Replace 10.0.0.8 with the actual private IP of your monitoring server
sudo ufw allow from 10.0.0.8 to any port 9100 proto tcp

sudo ufw --force enable
Monitoring Server:
We will do the same for the monitoring server, but we need to allow access from bastion server for Prometheus and Grafana web UI, and we need to allow access from app servers for Prometheus metrics scraping.
first connect to server monitor-01 by running this in your terminal:
1
ssh monitor-01
Then you will be connected to the server, and run these commands there:
1
2
3
4
5
6
7
8
9
10
11
12
13
14
15
16
17
sudo apt update && sudo apt upgrade -y

sudo apt install ufw -y

sudo ufw default deny incoming
sudo ufw default allow outgoing

# SSH from bastion only. Replace 10.0.0.2 with the actual private IP of your bastion server
sudo ufw allow from 10.0.0.2 to any port 22 proto tcp

# Prometheus access from bastion (for web UI)
sudo ufw allow from 10.0.0.2 to any port 9090 proto tcp

# Grafana access from bastion (for web UI)
sudo ufw allow from 10.0.0.2 to any port 3001 proto tcp

sudo ufw --force enable
Step 11: Install Docker on All Servers
Why We Need Docker
We are using Docker to run our Rails application and PostgreSQL database and monitoring tools in containers, which provides:
- Isolation: Each service runs in its own container, reducing conflicts.
- Scalability: Easily scale services up or down as needed.
- Consistency: Ensures the same environment across all stages of development and production.
How to Install Docker on All Servers
first connect to server app-01 by running this in your terminal:
1
ssh app-01
Then you will be connected to the server, and run these commands there:
1
2
3
4
5
6
7
8
9
10
11
12
13
14
15
16
17
18
19
20
21
22
23
# Add Docker's official GPG key:
sudo apt-get update
sudo apt-get install ca-certificates curl
sudo install -m 0755 -d /etc/apt/keyrings
sudo curl -fsSL https://download.docker.com/linux/ubuntu/gpg -o /etc/apt/keyrings/docker.asc
sudo chmod a+r /etc/apt/keyrings/docker.asc

# Add the repository to Apt sources:
echo \
  "deb [arch=$(dpkg --print-architecture) signed-by=/etc/apt/keyrings/docker.asc] https://download.docker.com/linux/ubuntu \
  $(. /etc/os-release && echo "${UBUNTU_CODENAME:-$VERSION_CODENAME}") stable" | \
  sudo tee /etc/apt/sources.list.d/docker.list > /dev/null

# Update the Apt package index:
sudo apt-get update

# Install the Docker packages, latest version:
sudo apt-get install docker-ce docker-ce-cli containerd.io docker-buildx-plugin docker-compose-plugin

# Verify that the installation is successful by running the hello-world image:
sudo docker run hello-world

# the above command downloads a test image and runs it in a container. When the container runs, it prints a confirmation message and exits.
Apply these steps on all your private servers:
app-01app-02jobs-01monitor-01db-primarydb-replica
Step 12: Database Cluster Setup
Why We Use Docker Compose Instead of Kamal Accessories
We use Docker Compose to run PostgreSQL because it provides:
- Full Control: Complete control over PostgreSQL configuration (replication, authentication, WAL, performance tuning)
- Persistent Storage: Direct volume management without relying on Hetzner’s buggy volume UI
- Simple Reproducibility: Version-controlled setup that’s easy to replicate and maintain
- Better Modularity: Easier to add monitoring, backups, connection pooling, and other PostgreSQL tools
- No Host Dependencies: Completely decoupled from host OS package management
- Production Best Practices: Industry-standard approach for containerized databases
Using Kamal accessories for PostgreSQL introduces unnecessary abstraction that makes advanced configuration and replication setup complex. With Docker Compose, we stay closer to standard PostgreSQL practices while maintaining container benefits.
How to Setup PostgreSQL with Streaming Replication
Setup PostgreSQL Primary (db-primary)
Create Directory Structure
1
2
3
4
5
ssh db-primary

# Create organized directory structure
sudo mkdir -p /opt/postgres/{data,conf,init}
cd /opt/postgres
Create Docker Compose Configuration
1
sudo nano /opt/postgres/docker-compose.yml
Copy and paste the following configuration:
1
2
3
4
5
6
7
8
9
10
11
12
13
14
15
16
17
18
19
20
21
22
23
services:
  postgres:
    image: postgres:16
    container_name: postgres-primary
    restart: always
    ports:
      - "5432:5432"
    environment:
      POSTGRES_DB: rails_production
      POSTGRES_USER: postgres
      POSTGRES_PASSWORD: super_secure_postgres_password
      PGDATA: /var/lib/postgresql/data/pgdata
    volumes:
      - ./data:/var/lib/postgresql/data
      - ./init:/docker-entrypoint-initdb.d
      - ./conf/postgresql.conf:/var/lib/postgresql/data/postgresql.conf
      - ./conf/pg_hba.conf:/var/lib/postgresql/data/pg_hba.conf
    command: ["postgres", "-c", "config_file=/var/lib/postgresql/data/postgresql.conf"]
    healthcheck:
      test: ["CMD-SHELL", "pg_isready -U postgres"]
      interval: 10s
      timeout: 5s
      retries: 5
Replace
super_secure_postgres_passwordwith your real password.
Create PostgreSQL Configuration
1
sudo nano /opt/postgres/conf/postgresql.conf
1
2
3
4
5
6
7
8
9
10
11
12
13
14
15
16
17
18
19
20
21
22
23
24
25
26
27
28
29
30
31
32
33
34
35
36
37
38
39
40
41
42
43
44
# Basic Connection Settings
listen_addresses = '*'
port = 5432
max_connections = 100

# Memory Settings (optimized for 16GB server)
shared_buffers = 4GB                    # 25% of total RAM
effective_cache_size = 12GB             # 75% of total RAM
work_mem = 32MB                         # Safe for 100 connections
maintenance_work_mem = 1GB              # Faster maintenance operations

# WAL and Replication Settings
wal_level = replica
archive_mode = off
max_wal_senders = 10
wal_keep_size = 1GB
hot_standby = on

# Performance Settings
checkpoint_completion_target = 0.9
checkpoint_timeout = 5min
max_wal_size = 2GB
min_wal_size = 512MB
random_page_cost = 1.1

# Connection and Worker Settings
max_worker_processes = 8
max_parallel_workers = 6
max_parallel_workers_per_gather = 4

# Logging Settings
log_line_prefix = '%t [%p]: [%l-1] user=%u,db=%d,app=%a,client=%h '
log_statement = 'none'
log_min_duration_statement = 1000
log_checkpoints = on
log_connections = on
log_disconnections = on
log_lock_waits = on

# Autovacuum Settings
autovacuum = on
autovacuum_vacuum_threshold = 50
autovacuum_analyze_threshold = 50
autovacuum_work_mem = 512MB
Create Authentication Configuration
1
sudo nano /opt/postgres/conf/pg_hba.conf
1
2
3
4
5
6
7
8
9
10
11
12
13
14
15
16
17
18
19
20
21
22
23
24
25
26
27
28
29
30
31
# PostgreSQL Client Authentication Configuration File
# TYPE  DATABASE        USER            ADDRESS                 METHOD

# Local connections (needed for Docker exec commands)
local   all             postgres                                trust
local   all             all                                     md5

# IPv4 local connections
host    all             postgres        127.0.0.1/32            trust
host    all             all             127.0.0.1/32            md5

# IPv6 local connections
host    all             postgres        ::1/128                 trust
host    all             all             ::1/128                 md5

# Replication connection from replica server
host    replication     replicator      10.0.0.7/32             scram-sha-256

# Application connections from app servers
host    all             rails_app       10.0.0.3/32             scram-sha-256
host    all             rails_app       10.0.0.4/32             scram-sha-256

# Application connections from jobs server
host    all             rails_app       10.0.0.5/32             scram-sha-256

# Monitoring access from monitoring server
host    all             rails_app       10.0.0.8/32             scram-sha-256

# Administrative access from bastion
host    all             postgres        10.0.0.2/32             scram-sha-256
host    all             rails_app       10.0.0.2/32             scram-sha-256
Create User Initialization Script
1
sudo nano /opt/postgres/init/01-create-users.sql
1
2
3
4
5
6
7
8
9
10
11
12
13
14
15
16
17
18
19
20
21
22
23
24
25
26
27
28
29
30
31
32
33
34
35
36
37
38
39
40
41
42
-- Create replication user for streaming replication
CREATE USER replicator REPLICATION LOGIN ENCRYPTED PASSWORD 'very_secure_replication_password';

-- Create application user for Rails
CREATE USER rails_app WITH ENCRYPTED PASSWORD 'very_secure_rails_password';

-- Grant database creation privileges to rails_app
ALTER USER rails_app CREATEDB;

-- Create application database
CREATE DATABASE rails_production OWNER rails_app;

-- Grant all privileges on the database
GRANT ALL PRIVILEGES ON DATABASE rails_production TO rails_app;

-- Connect to the rails_production database to set schema privileges
\c rails_production

-- Grant comprehensive schema privileges
GRANT USAGE ON SCHEMA public TO rails_app;
GRANT CREATE ON SCHEMA public TO rails_app;
GRANT ALL ON SCHEMA public TO rails_app;

-- Set default privileges for future objects
ALTER DEFAULT PRIVILEGES IN SCHEMA public GRANT ALL ON TABLES TO rails_app;
ALTER DEFAULT PRIVILEGES IN SCHEMA public GRANT ALL ON SEQUENCES TO rails_app;
ALTER DEFAULT PRIVILEGES IN SCHEMA public GRANT ALL ON FUNCTIONS TO rails_app;

-- Grant privileges on existing objects
GRANT ALL ON ALL TABLES IN SCHEMA public TO rails_app;
GRANT ALL ON ALL SEQUENCES IN SCHEMA public TO rails_app;
GRANT ALL ON ALL FUNCTIONS IN SCHEMA public TO rails_app;

-- Make rails_app the owner of the public schema for full control
ALTER SCHEMA public OWNER TO rails_app;

-- Display created users for verification
\c postgres
\du

-- Display databases
\l
Replace
very_secure_replication_passwordwith your real password. Replacevery_secure_rails_passwordwith your real password.
Start the Primary Database
1
2
3
4
5
6
7
8
9
10
11
12
13
14
# Set proper permissions for PostgreSQL data directory
sudo chown -R 999:999 /opt/postgres/data

# Ensure data directory has correct permissions
sudo chmod 700 /opt/postgres/data

# Start the PostgreSQL primary server
sudo docker compose up -d

# Check that the container started successfully
sudo docker ps

# Monitor the logs to ensure proper startup
sudo docker logs -f postgres-primary
Verify Primary Setup
1
2
3
4
5
6
7
8
9
10
11
12
# Check that users were created successfully. This should show all three users
sudo docker exec -it postgres-primary psql -U postgres -c "\du"

# Verify database creation. This should show rails_production database
sudo docker exec -it postgres-primary psql -U postgres -c "\l"

# Test application user connection
sudo docker exec -it postgres-primary psql -U rails_app -d rails_production -c "SELECT current_user, current_database();"

# Check replication configuration
sudo docker exec -it postgres-primary psql -U postgres -c "SHOW wal_level;"
sudo docker exec -it postgres-primary psql -U postgres -c "SHOW max_wal_senders;"
Setup PostgreSQL Replica (db-replica)
Create Replica Directory Structure
1
2
3
4
5
ssh db-replica

# Create directory structure (simpler for replica)
sudo mkdir -p /opt/postgres/{data,conf}
cd /opt/postgres
Create Replica Docker Compose Configuration
1
sudo nano /opt/postgres/docker-compose.yml
Copy and paste the following configuration:
1
2
3
4
5
6
7
8
9
10
11
12
13
14
15
16
17
services:
  postgres:
    image: postgres:16
    container_name: postgres-replica
    restart: always
    ports:
      - "5432:5432"
    environment:
      POSTGRES_USER: postgres
      POSTGRES_PASSWORD: super_secure_postgres_password
    volumes:
      - ./data:/var/lib/postgresql/data
    healthcheck:
      test: ["CMD-SHELL", "pg_isready -U postgres"]
      interval: 10s
      timeout: 5s
      retries: 5
Initialize Replica with pg_basebackup
Important: The replica data must be initialized from the primary using pg_basebackup. This creates a byte-for-byte copy of the primary database and sets up streaming replication.
1
2
3
4
5
6
7
8
9
10
11
# Stop any running containers and clear data directory
sudo docker compose down 2>/dev/null || true
sudo rm -rf /opt/postgres/data/*

# Use pg_basebackup to clone the primary database
# This creates a complete copy and sets up replication automatically
sudo docker run --rm \
  -v /opt/postgres/data:/backup \
  --entrypoint="" \
  postgres:16 \
  bash -c "PGPASSWORD='very_secure_replication_password' pg_basebackup -h 10.0.0.6 -U replicator -D /backup -Fp -Xs -P -R"
Command explanation:
-h 10.0.0.6: Connect to primary server-U replicator: Use the replication user we created-D /backup: Target directory for the backup-Fp: Plain format (file-per-tablespace)-Xs: Stream WAL while backing up-P: Show progress-R: Write recovery configuration (createsstandby.signalandpostgresql.auto.conf)
Start the Replica
1
2
3
4
5
6
7
8
# Set proper permissions
sudo chown -R 999:999 /opt/postgres/data

# Start the replica server
sudo docker compose up -d

# Monitor replica startup logs
sudo docker logs -f postgres-replica
You should see logs indicating it’s entering standby mode and starting replication:
1
2
3
4
5
LOG:  entering standby mode
LOG:  redo starts at 0/2000028
LOG:  consistent recovery state reached
LOG:  database system is ready to accept read only connections
LOG:  started streaming WAL from primary at 0/3000000
Verify Replication is Working
Check Replication Status on Primary
1
2
3
4
5
6
7
8
9
10
11
12
13
ssh db-primary

# Check replication status - should show connected replica
sudo docker exec -it postgres-primary psql -U postgres -c "
SELECT
    client_addr,
    state,
    sent_lsn,
    write_lsn,
    flush_lsn,
    replay_lsn,
    sync_state
FROM pg_stat_replication;"
Expected output: You should see one row showing the replica’s IP (10.0.0.7) with state = 'streaming'
Check Replica Status
1
2
3
4
ssh db-replica

# Verify replica is in recovery mode
sudo docker exec -it postgres-replica psql -U postgres -c "SELECT pg_is_in_recovery();"
Expected output: t (true) - confirming it’s a replica
1
2
3
4
5
6
7
8
9
# Check replication lag
sudo docker exec -it postgres-replica psql -U postgres -c "
SELECT
    status,
    receive_start_lsn,
    received_lsn,
    last_msg_send_time,
    last_msg_receipt_time
FROM pg_stat_wal_receiver;"
Test Replication with Real Data
On primary: Create test data
1
2
3
4
5
6
7
8
9
10
11
ssh db-primary

sudo docker exec -it postgres-primary psql -U rails_app -d rails_production -c "
CREATE TABLE replication_test (
    id SERIAL PRIMARY KEY,
    message TEXT,
    created_at TIMESTAMP DEFAULT NOW()
);
INSERT INTO replication_test (message) VALUES ('Hello from primary server!');
SELECT * FROM replication_test;
"
On replica: Verify data was replicated (wait a few seconds)
1
2
3
ssh db-replica

sudo docker exec -it postgres-replica psql -U rails_app -d rails_production -c "SELECT * FROM replication_test;"
Clean up test table on primary:
1
2
3
ssh db-primary

sudo docker exec -it postgres-primary psql -U rails_app -d rails_production -c "DROP TABLE replication_test;"
Expected result: You should see the same data on both primary and replica, confirming replication is working.
Update Your Kamal Configuration
Now that PostgreSQL is running, update your .kamal/secrets file to connect to your database:
1
2
3
4
5
6
7
8
9
# .kamal/secrets
KAMAL_REGISTRY_PASSWORD=your_docker_registry_password
RAILS_MASTER_KEY=your_rails_master_key

# Database connection to your PostgreSQL primary
DATABASE_URL=postgresql://rails_app:very_secure_rails_password@10.0.0.6:5432/rails_production

# Optional: Read replica connection for read-heavy operations
REPLICA_DATABASE_URL=postgresql://rails_app:very_secure_rails_password@10.0.0.7:5432/rails_production
You now have a production-ready PostgreSQL cluster with:
- ✅ Primary-Replica Replication: Automatic failover capability and read scaling
- ✅ Proper Security: User isolation and network-based authentication
- ✅ Performance Tuning: Optimized configuration for Rails workloads
- ✅ Health Monitoring: Built-in health checks and status monitoring
- ✅ Verified Setup: Confirmed replication is working with test data
Step 13: Monitoring Server Setup
Why We Need Comprehensive Monitoring
Monitoring provides:
- System Health: Track CPU, memory, disk usage across all servers
- Application Performance: Monitor Rails request times, error rates
- Database Metrics: PostgreSQL performance and replication status
- Business Metrics: Track user activity, revenue, custom KPIs
- Proactive Alerts: Know about problems before users do
- Historical Data: Analyze trends and plan capacity
- Troubleshooting: Quickly identify root causes of issues
Without monitoring, you’re flying blind in production. Node exporter specifically gives us system-level metrics that are critical for production monitoring:
🖥️ System Resource Monitoring
- CPU Usage: Per-core utilization, load averages, context switches
- Memory Usage: RAM utilization, swap usage, buffer/cache metrics
- Disk I/O: Read/write operations, disk utilization, queue depths
- Network I/O: Bytes sent/received, packet counts, error rates
🚨 Proactive Alerting Capabilities
- Capacity Planning: Know when to scale before hitting limits
- Performance Degradation: Detect slowdowns before users notice
- Resource Exhaustion: Alert when disk/memory/CPU hits thresholds
- Hardware Issues: Identify failing disks, network interfaces
How to Setup Complete Monitoring
Create Central Monitoring Stack
First, let’s set up the central monitoring server with Prometheus, Grafana, and PostgreSQL exporter.
1
2
3
4
5
ssh monitor-01

# Create monitoring directory
sudo mkdir -p /opt/monitoring
cd /opt/monitoring
Create Monitoring Docker Compose Configuration
1
sudo nano /opt/monitoring/docker-compose.yml
Copy and paste the following configuration:
1
2
3
4
5
6
7
8
9
10
11
12
13
14
15
16
17
18
19
20
21
22
23
24
25
26
27
28
29
30
31
32
33
34
35
36
37
38
39
40
41
42
43
44
45
46
47
48
49
50
51
52
53
54
55
56
57
58
59
services:
  prometheus:
    image: prom/prometheus:latest
    container_name: prometheus
    ports:
      - "9090:9090"
    volumes:
      - ./prometheus.yml:/etc/prometheus/prometheus.yml
      - prometheus_data:/prometheus
    command:
      - '--config.file=/etc/prometheus/prometheus.yml'
      - '--storage.tsdb.path=/prometheus'
      - '--storage.tsdb.retention.time=30d'
      - '--web.console.libraries=/etc/prometheus/console_libraries'
      - '--web.console.templates=/etc/prometheus/consoles'
      - '--web.enable-lifecycle'
    restart: unless-stopped

  grafana:
    image: grafana/grafana:latest
    container_name: grafana
    ports:
      - "3001:3000"
    volumes:
      - grafana_data:/var/lib/grafana
    environment:
      - GF_SECURITY_ADMIN_PASSWORD=strong_admin_password_here
      - GF_USERS_ALLOW_SIGN_UP=false
      - GF_SERVER_ROOT_URL=http://localhost:3001
    restart: unless-stopped

  postgres_exporter:
    image: prometheuscommunity/postgres-exporter:latest
    container_name: postgres_exporter
    environment:
      PGHOST: "10.0.0.6"
      PGPORT: "5432"
      PGUSER: "rails_app"
      PGPASSWORD: "your_actual_password_with_special_chars"
      PGDATABASE: "rails_production"
      PGSSLMODE: "disable"
    ports:
      - "9187:9187"
    restart: unless-stopped

  loki:
    image: grafana/loki:latest
    container_name: loki
    ports:
      - "3100:3100"
    volumes:
      - loki_data:/loki
    command: -config.file=/etc/loki/local-config.yaml
    restart: unless-stopped

volumes:
  prometheus_data:
  grafana_data:
  loki_data:
Important: Replace
strong_admin_password_herewith your real Grafana admin password. Replacevery_secure_rails_passwordwith your actual PostgreSQL password for userrails_app. Replace10.0.0.6with the actual private IP of your PostgreSQL primary server.
Create Prometheus Configuration
1
sudo nano /opt/monitoring/prometheus.yml
Copy and paste the following configuration:
1
2
3
4
5
6
7
8
9
10
11
12
13
14
15
16
17
18
19
20
21
22
23
24
25
26
27
28
29
30
31
32
33
34
35
36
37
38
39
40
41
42
43
44
45
46
47
48
49
50
51
52
53
54
# Prometheus configuration file
global:
  scrape_interval: 15s
  evaluation_interval: 15s

rule_files:
  # - "first_rules.yml"
  # - "second_rules.yml"

scrape_configs:
  # Prometheus itself
  - job_name: 'prometheus'
    static_configs:
      - targets: ['localhost:9090']

  # PostgreSQL metrics
  - job_name: 'postgres'
    static_configs:
      - targets: ['postgres_exporter:9187']
    scrape_interval: 10s

  # Application servers system metrics
  - job_name: 'app-servers'
    static_configs:
      - targets: ['10.0.0.3:9100', '10.0.0.4:9100']
    scrape_interval: 5s
    metrics_path: '/metrics'

  # Jobs server system metrics
  - job_name: 'jobs-server'
    static_configs:
      - targets: ['10.0.0.5:9100']
    scrape_interval: 5s
    metrics_path: '/metrics'

  # Database servers system metrics
  - job_name: 'database-servers'
    static_configs:
      - targets: ['10.0.0.6:9100', '10.0.0.7:9100']
    scrape_interval: 5s
    metrics_path: '/metrics'

  # Future Rails application metrics (uncomment when Rails apps are deployed)
  # - job_name: 'rails-apps'
  #   static_configs:
  #     - targets: ['10.0.0.3:3000', '10.0.0.4:3000']
  #   metrics_path: '/metrics'
  #   scrape_interval: 10s

  # - job_name: 'rails-jobs'
  #   static_configs:
  #     - targets: ['10.0.0.5:3000']
  #   metrics_path: '/metrics'
  #   scrape_interval: 10s
Start the Central Monitoring Stack
1
2
3
4
5
6
7
8
9
10
# Start all monitoring services
sudo docker compose up -d

# Verify all containers are running
sudo docker ps

# Check logs to ensure proper startup
sudo docker logs prometheus
sudo docker logs grafana
sudo docker logs postgres_exporter
Install Node Exporter on All Servers
Now we need to install node exporter on each server to collect system metrics. Run these steps on all servers: app-01, app-02, jobs-01, db-primary, db-replica.
For each server, execute:
1
2
3
4
5
6
7
8
ssh app-01  # Replace with: app-02, jobs-01, db-primary, db-replica

# Create monitoring directory
sudo mkdir -p /opt/monitoring
cd /opt/monitoring

# Create node exporter configuration
sudo nano docker-compose.yml
Copy and paste the following configuration:
1
2
3
4
5
6
7
8
9
10
11
12
13
14
15
16
17
18
19
services:
  node_exporter:
    image: prom/node-exporter:latest
    container_name: node_exporter
    restart: unless-stopped
    ports:
      - "9100:9100"  # External port 9100 maps to internal port 9100
    command:
      - '--path.procfs=/host/proc'
      - '--path.rootfs=/rootfs'
      - '--path.sysfs=/host/sys'
      - '--collector.filesystem.mount-points-exclude=^/(sys|proc|dev|host|etc)($$|/)'
      - '--web.listen-address=0.0.0.0:9100'
    volumes:
      - /proc:/host/proc:ro
      - /sys:/host/sys:ro
      - /:/rootfs:ro
    pid: host
    network_mode: host
Start node exporter on each server:
1
2
3
4
5
6
7
8
# Start node exporter
sudo docker compose up -d

# Verify it's running
sudo docker ps

# Test metrics endpoint locally
curl http://localhost:9100/metrics | head -10
Repeat this process for all servers:
app-01app-02jobs-01db-primarydb-replica
Verify Monitoring Setup
Test connectivity from monitoring server:
1
2
3
4
5
6
7
8
9
10
11
ssh monitor-01

# Test each node exporter endpoint
curl http://10.0.0.3:9100/metrics | head -5  # app-01
curl http://10.0.0.4:9100/metrics | head -5  # app-02
curl http://10.0.0.5:9100/metrics | head -5  # jobs-01
curl http://10.0.0.6:9100/metrics | head -5  # db-primary
curl http://10.0.0.7:9100/metrics | head -5  # db-replica

# Test PostgreSQL exporter
sudo docker exec -it postgres_exporter wget -qO- http://localhost:9187/metrics | head -5
Restart Prometheus to pick up new targets:
1
2
cd /opt/monitoring
sudo docker compose restart prometheus
Access Monitoring Dashboards
You can access the monitoring tools via SSH tunneling through the bastion:
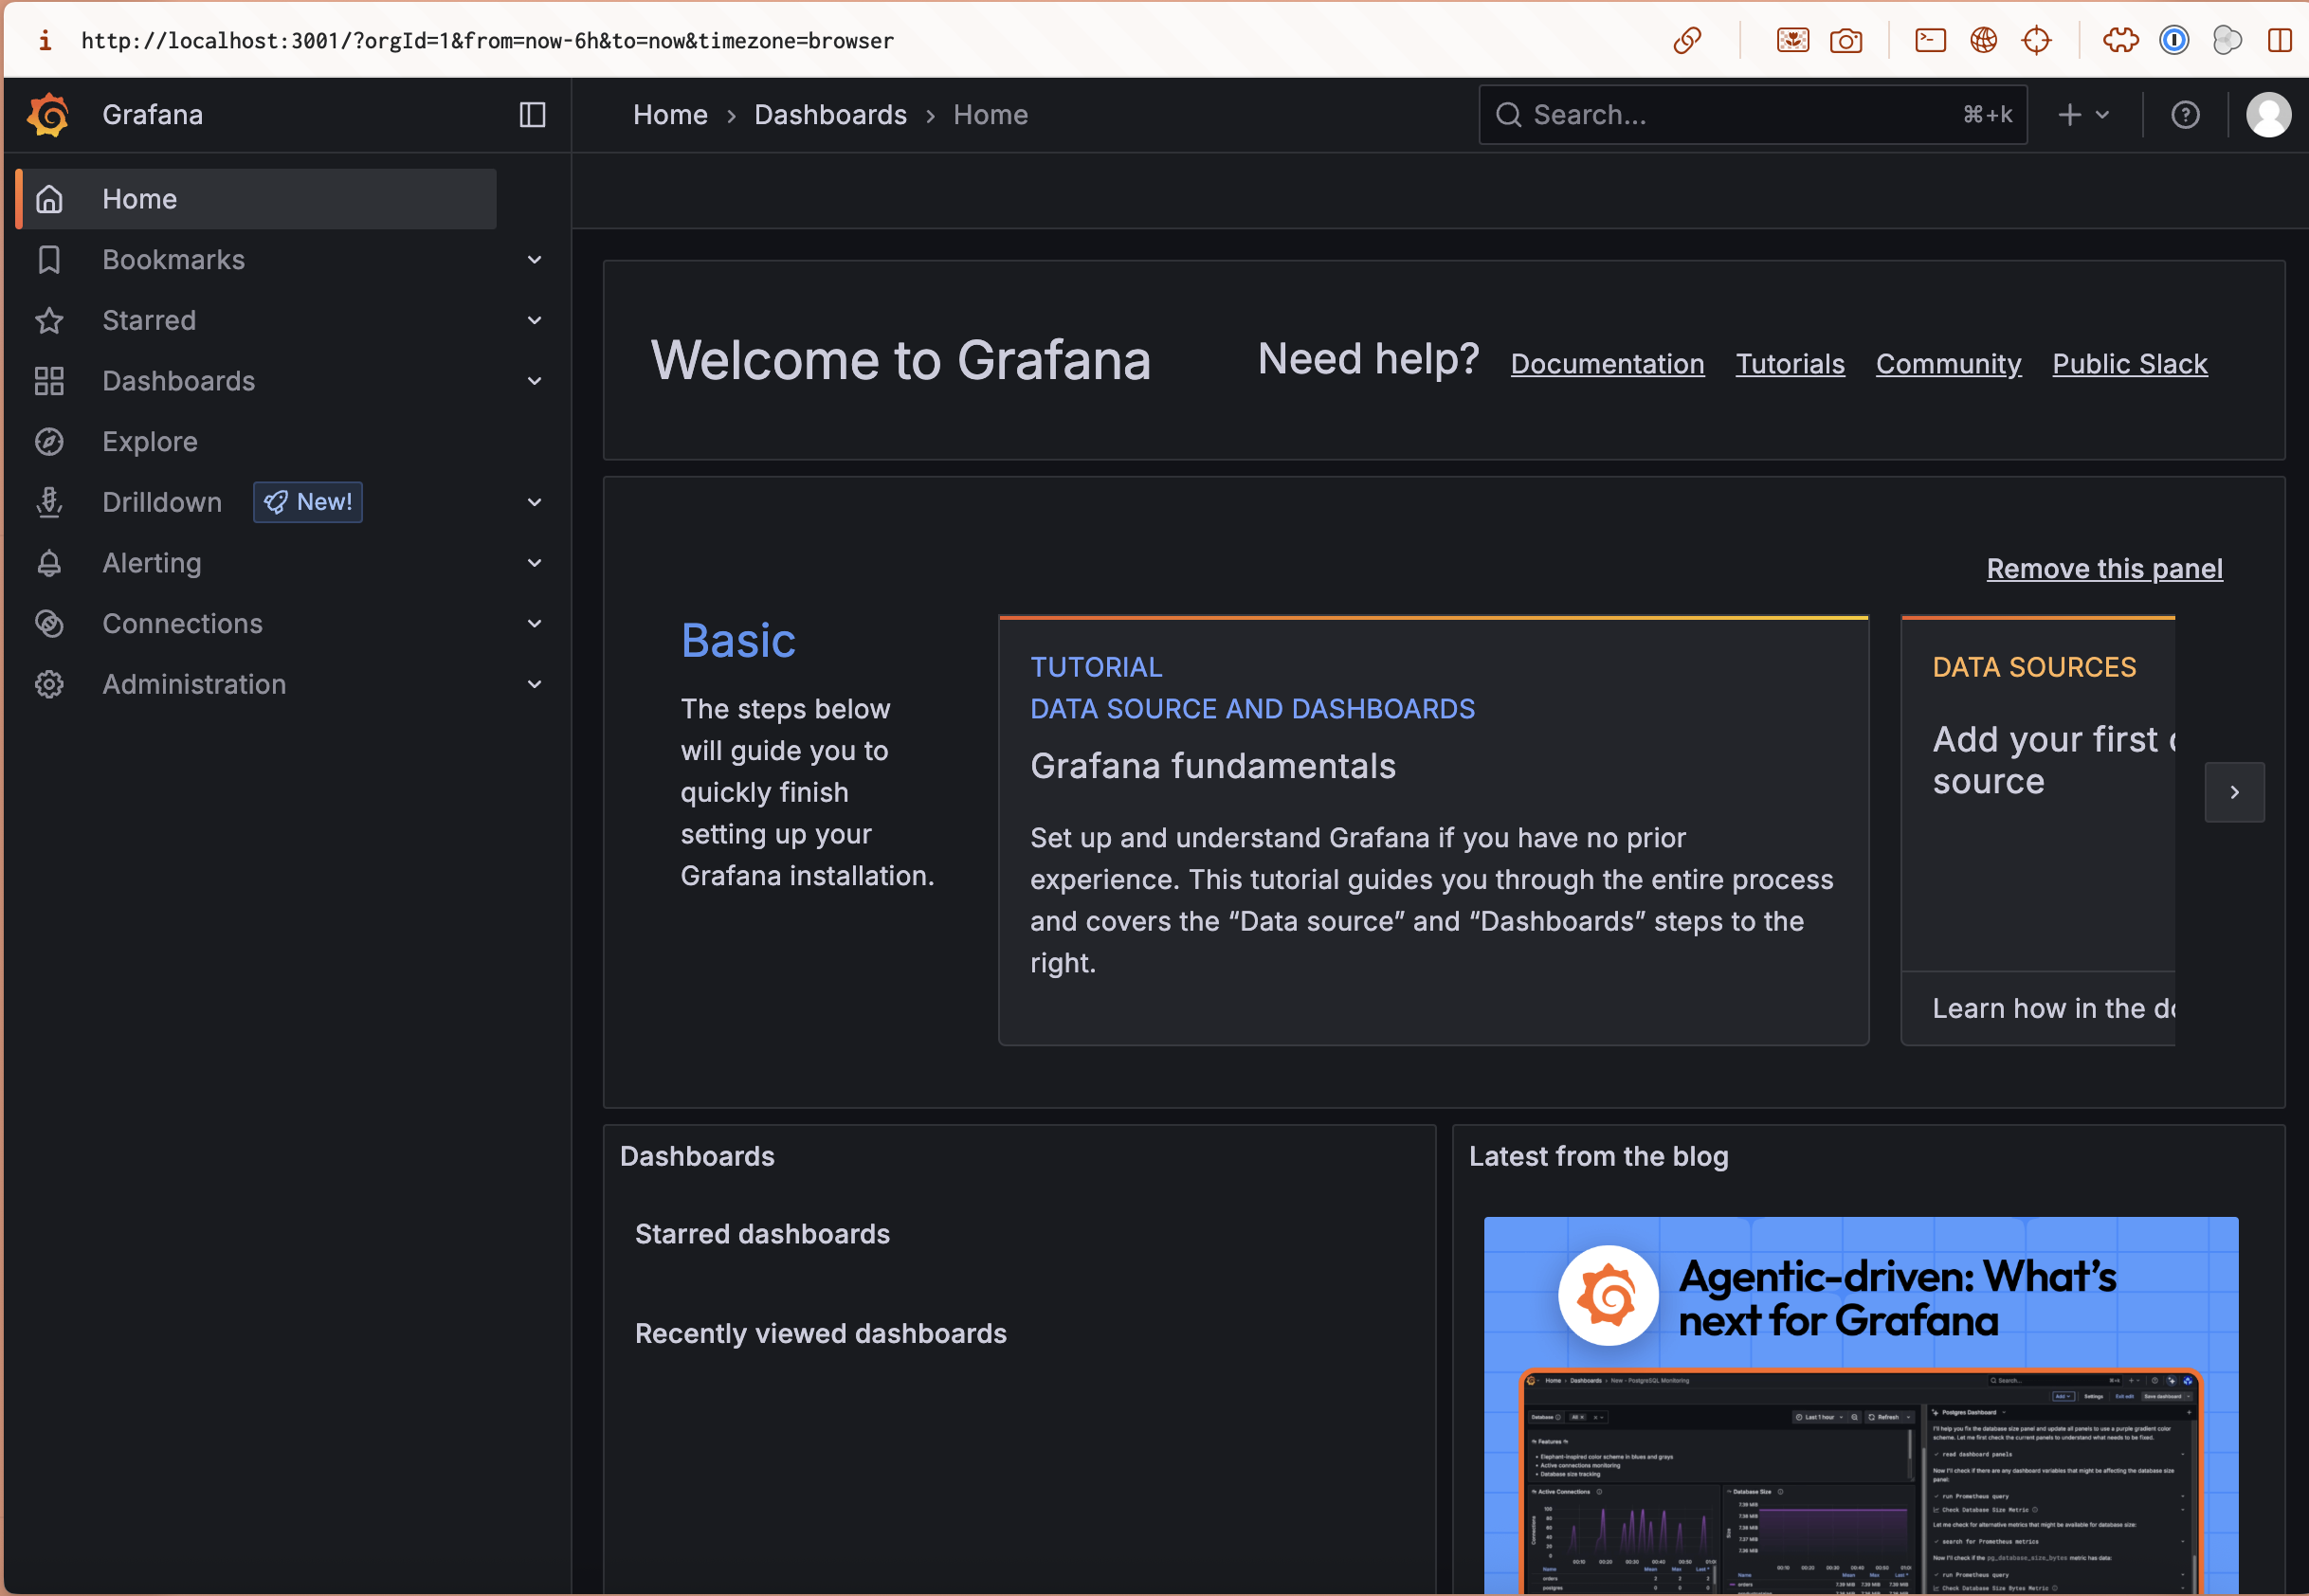
Access Grafana Dashboard:
1
2
# Create SSH tunnel for Grafana
ssh -L 3001:10.0.0.8:3001 hetzner-bastion
by running the above command, you will create a tunnel from your local machine to the Grafana server running on the monitoring server.
To access the Grafana dashboard, visit http://localhost:3001 and log in with:
- Username:
admin - Password: The password you set in
docker-compose.yml(strong_admin_password_here)
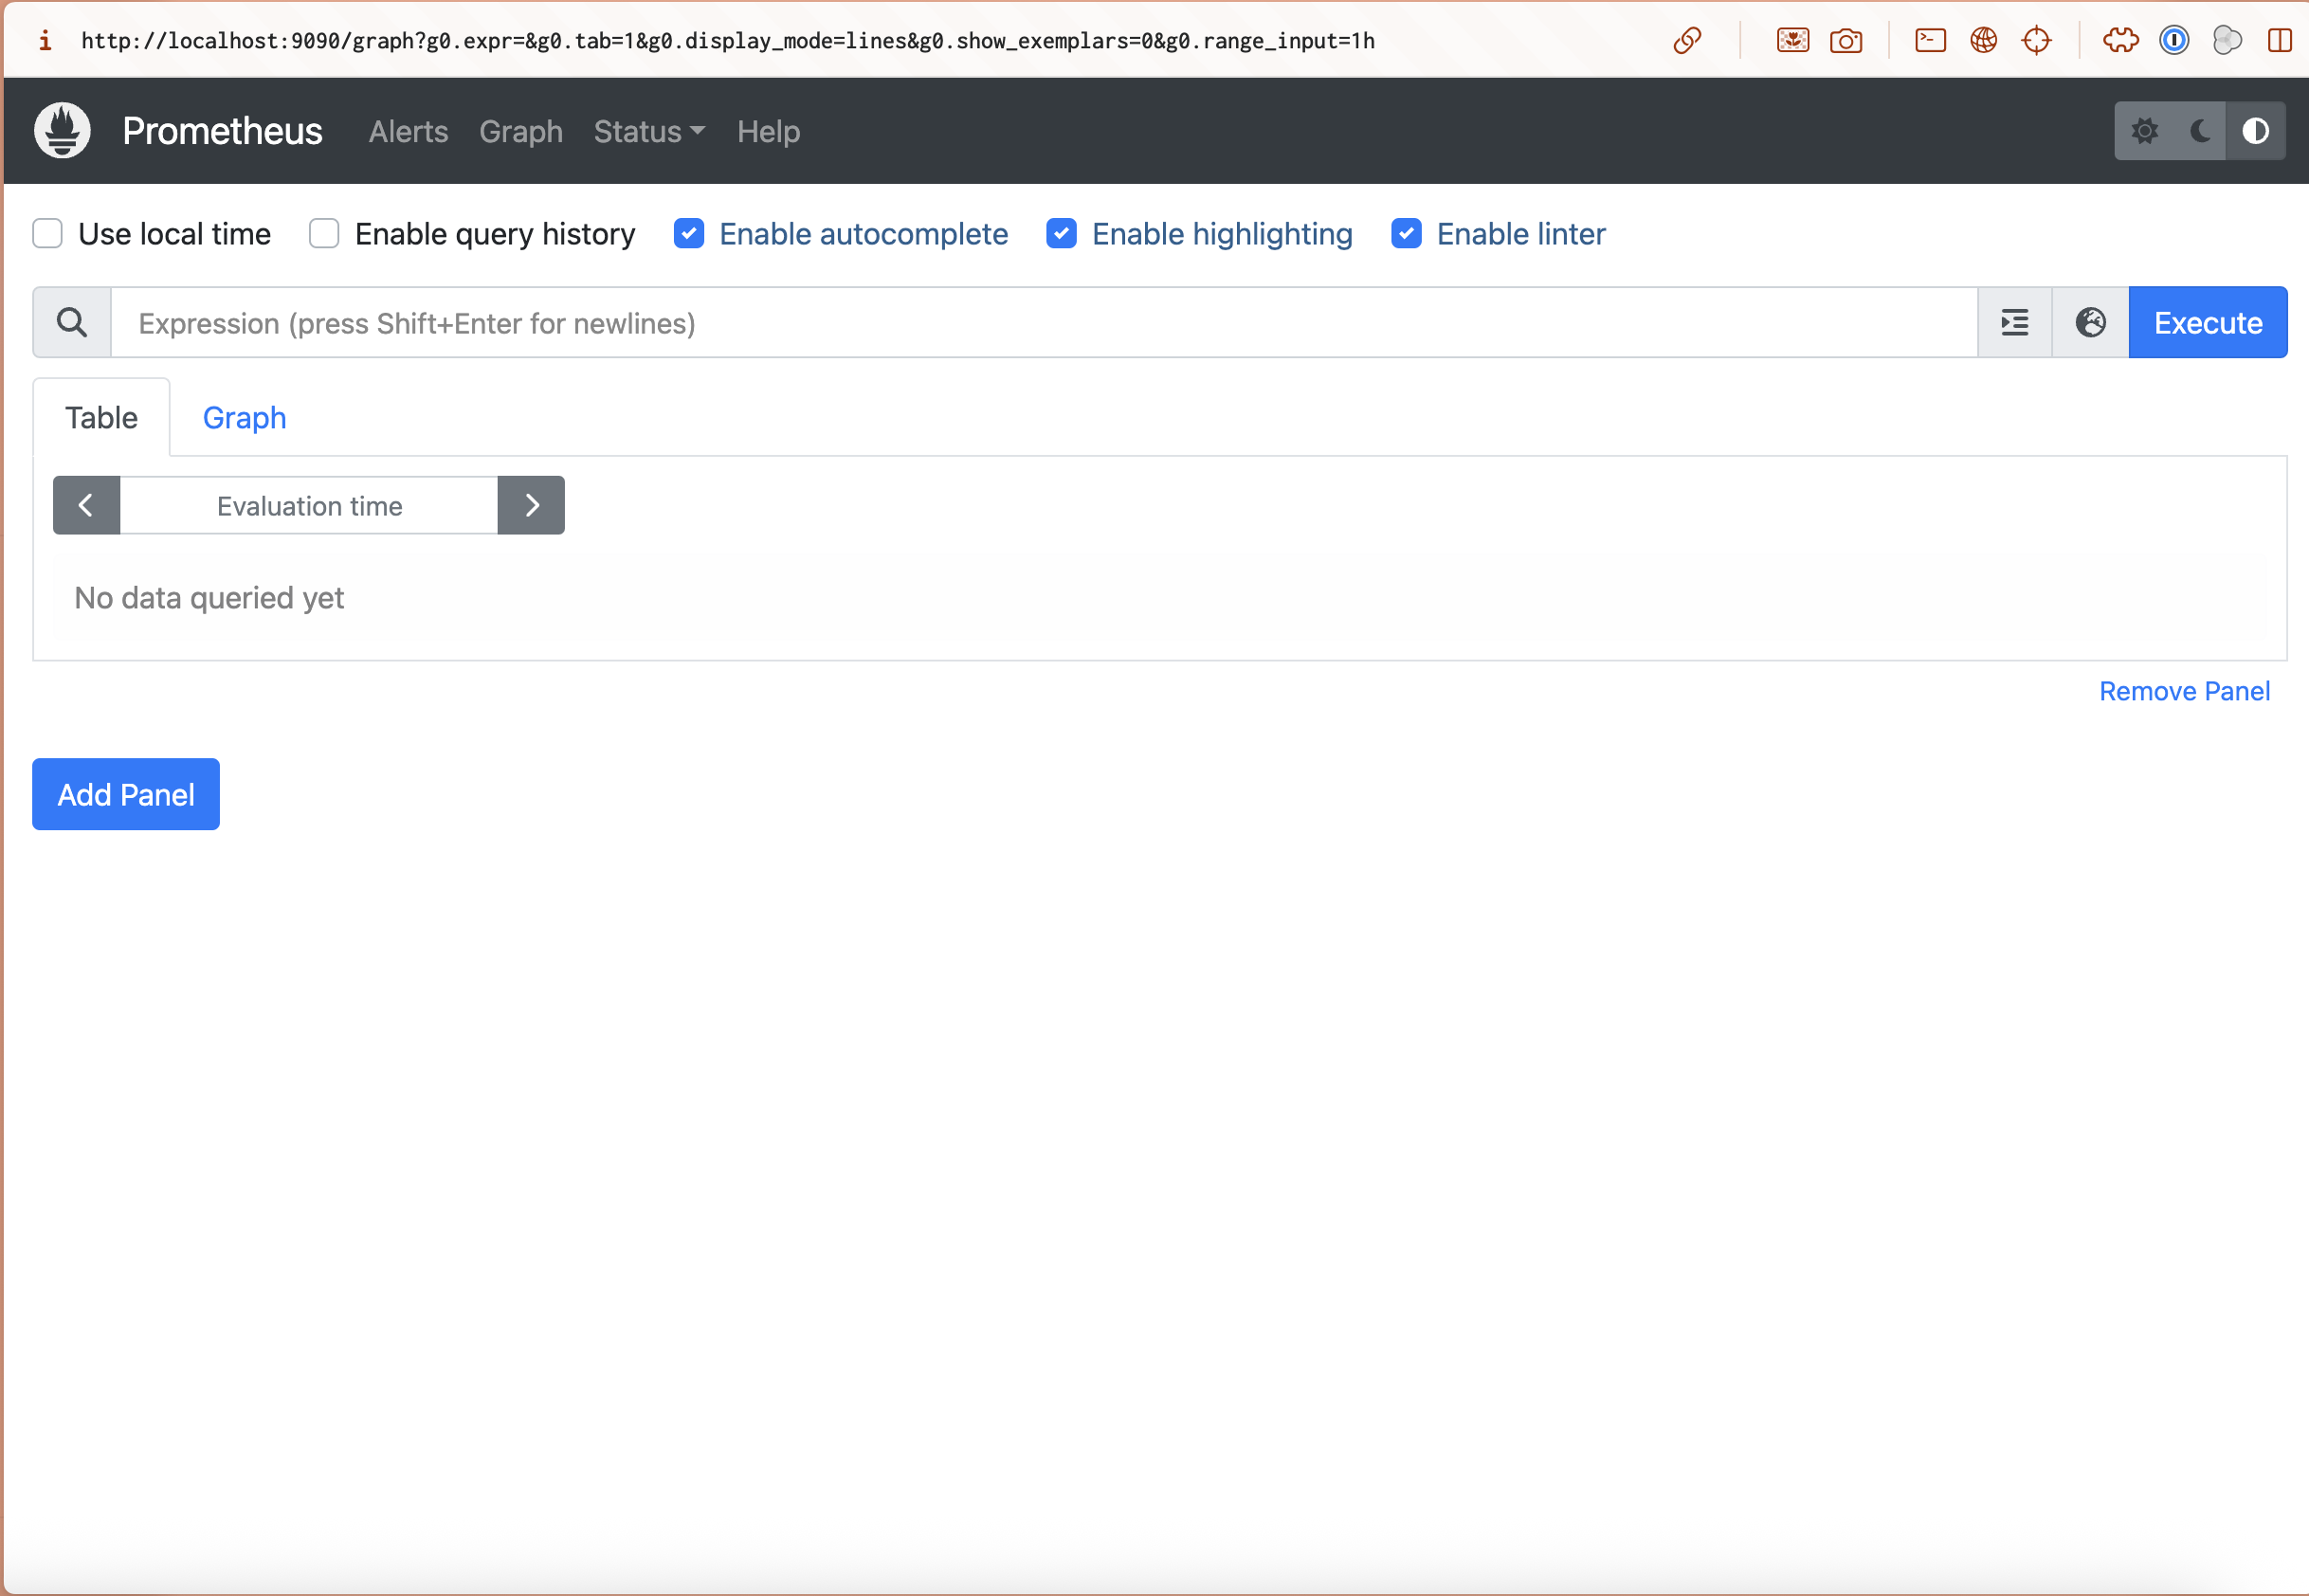
Access Prometheus Interface:
To access the Prometheus metrics, go back to your terminal, and run the following command to create the tunnel again:
1
2
# Create SSH tunnel for Prometheus (open new terminal)
ssh -L 9090:10.0.0.8:9090 hetzner-bastion
Visit http://localhost:9090 to access Prometheus metrics and targets.
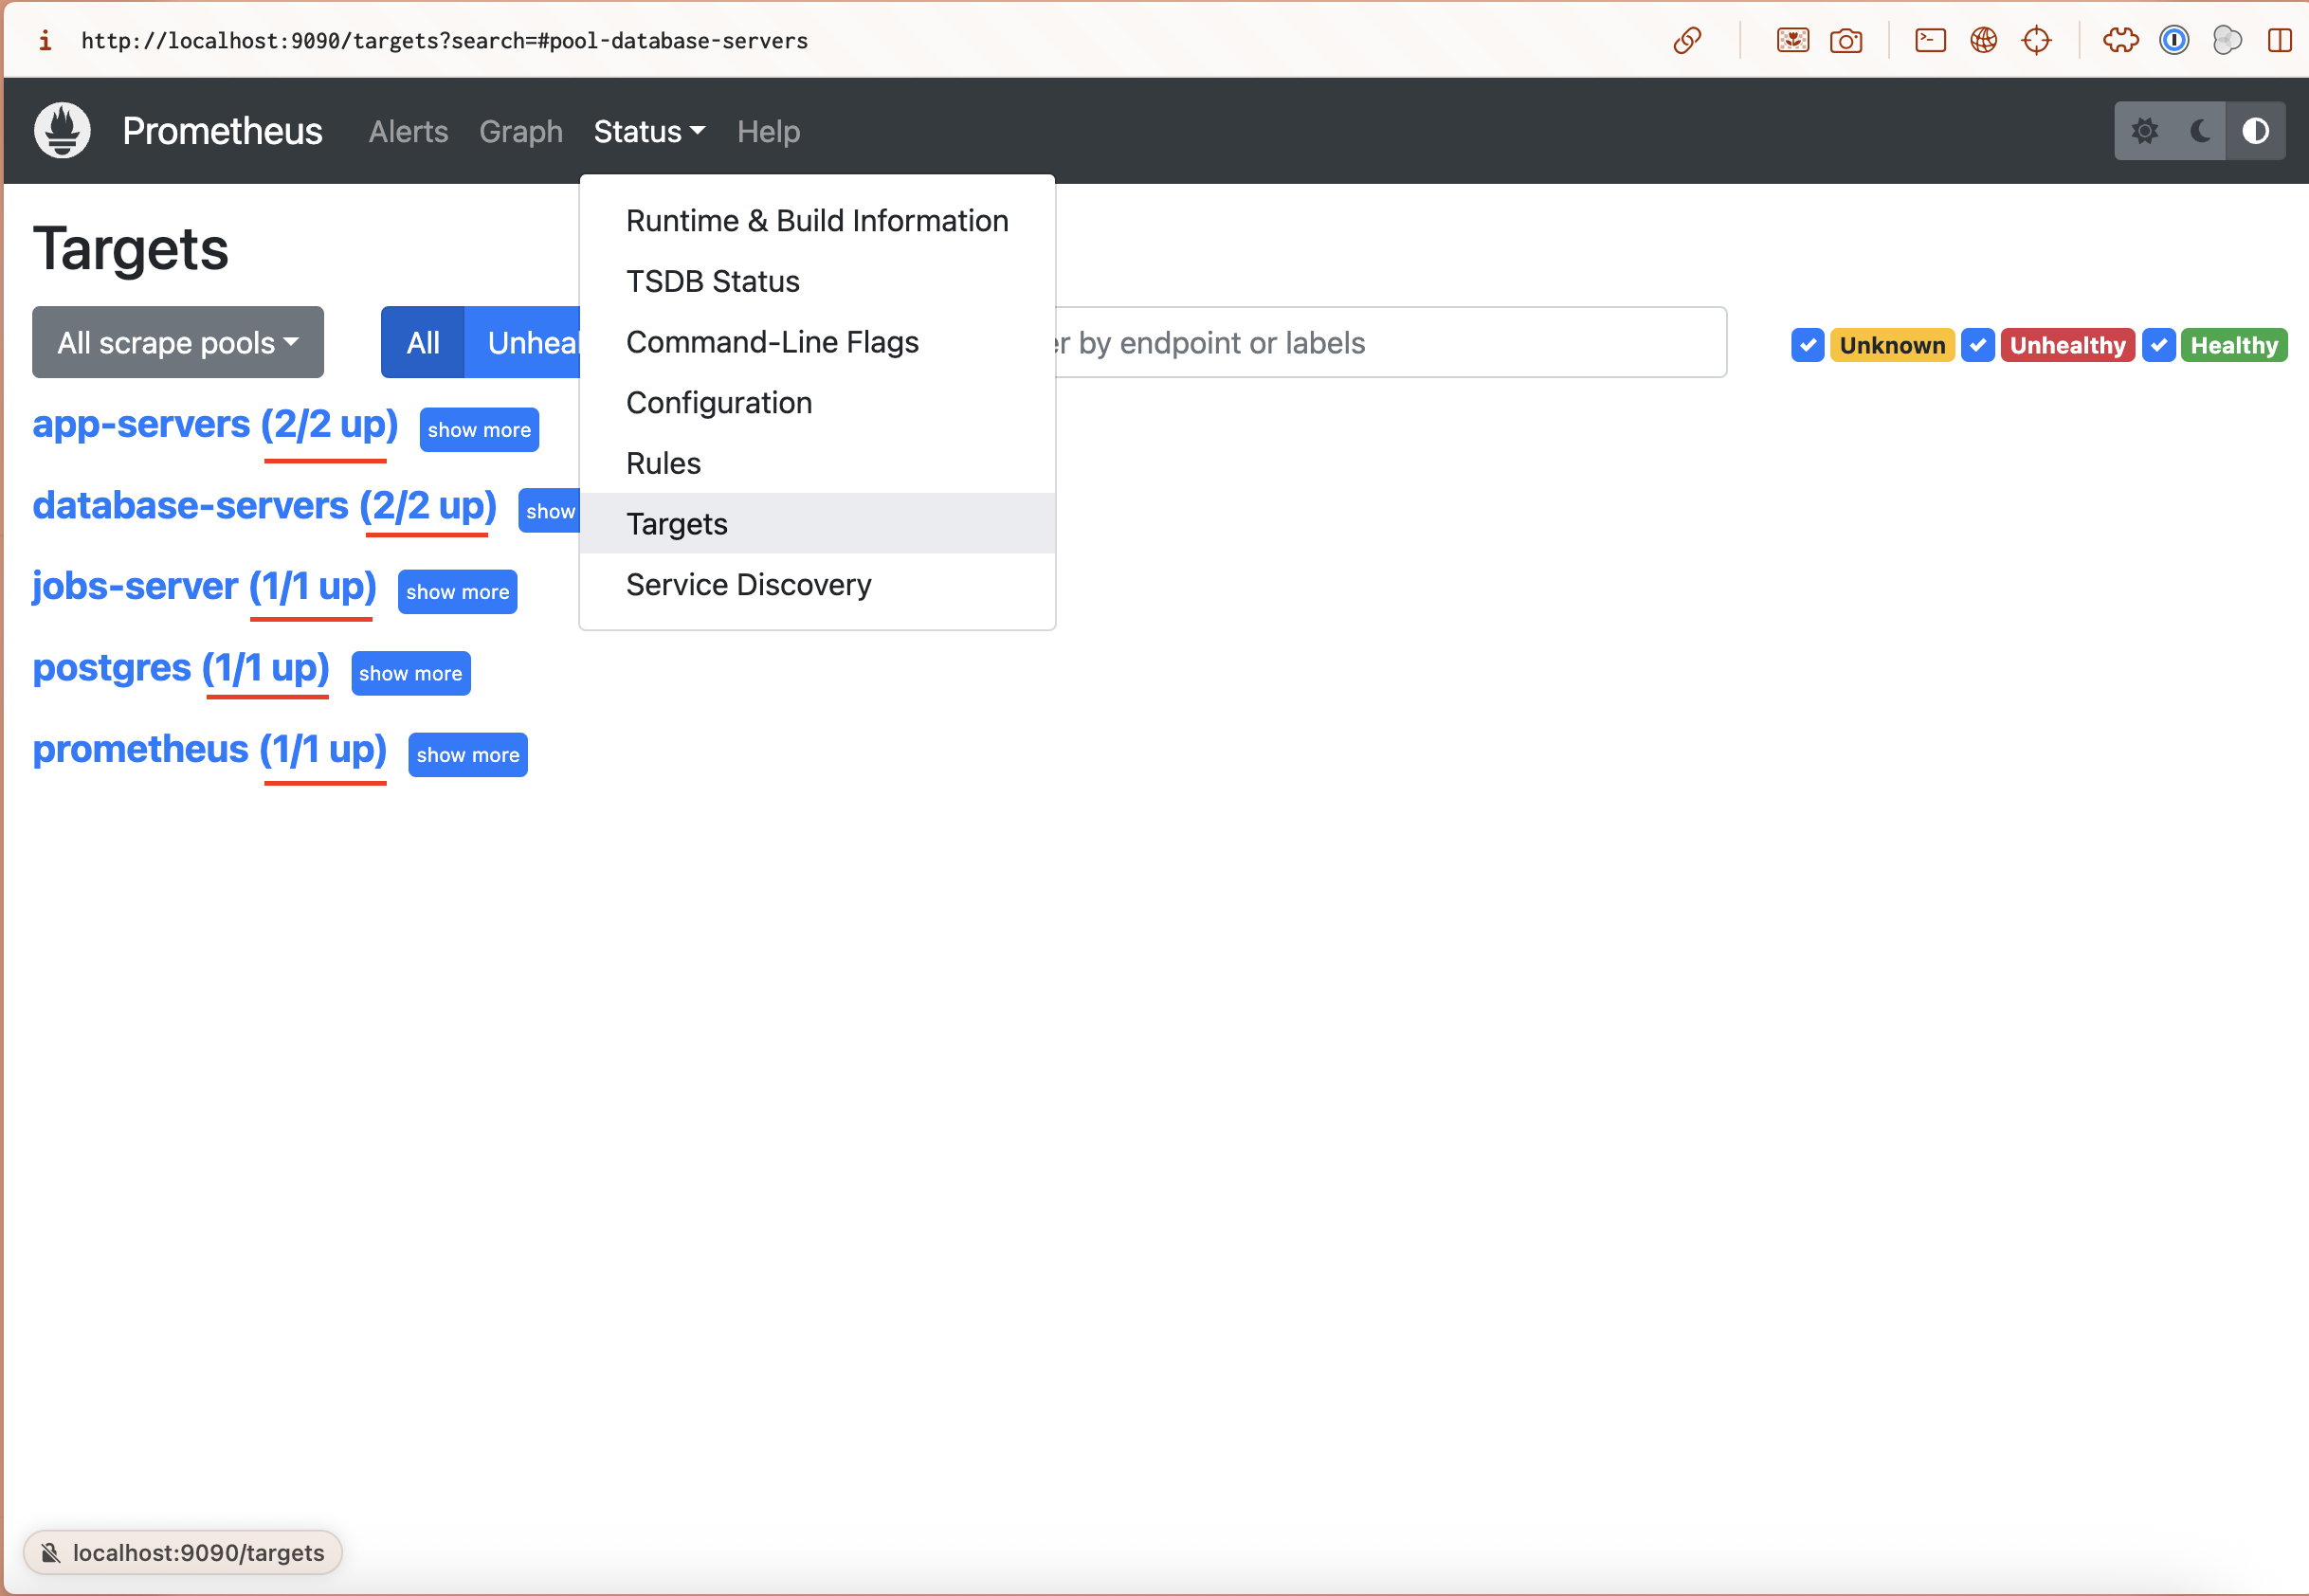
Verify All Targets Are Up
In Prometheus web interface (http://localhost:9090), go to Status → Targets. You should see:
- ✅ prometheus (1/1 up)
- ✅ postgres (1/1 up)
- ✅ app-servers (2/2 up)
- ✅ jobs-server (1/1 up)
- ✅ database-servers (2/2 up)
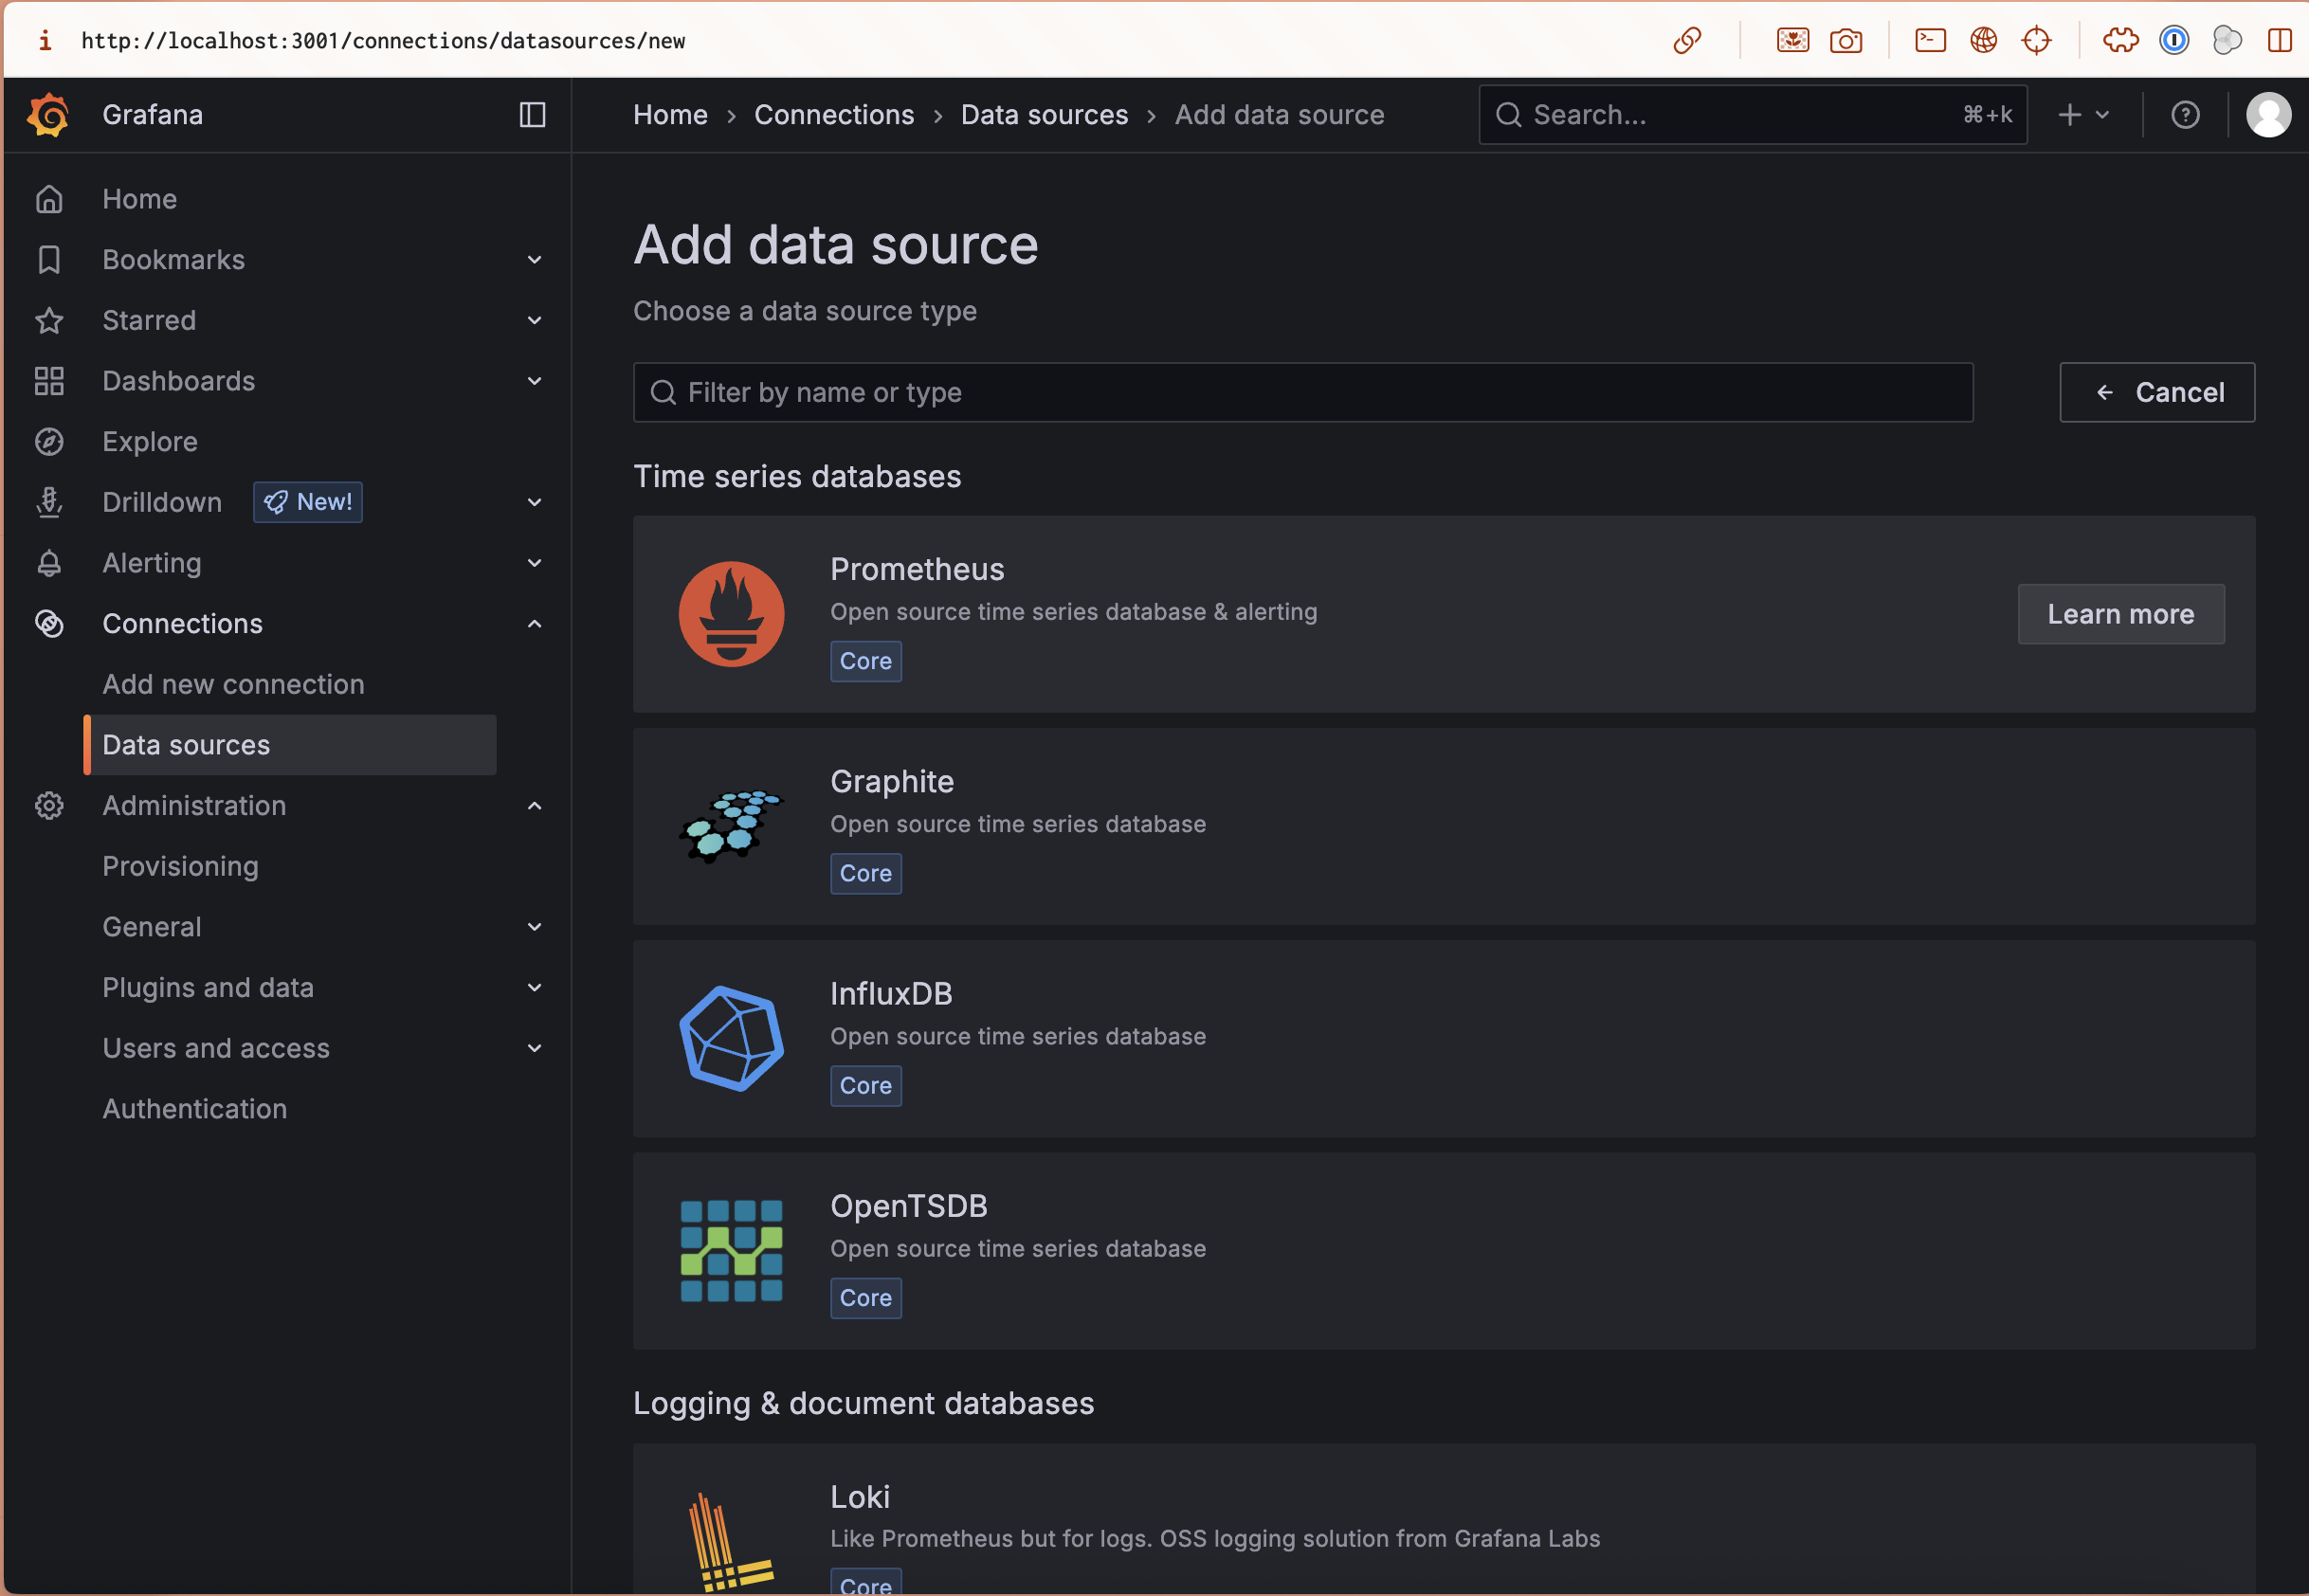
Configure Grafana Data Sources
- In Grafana, add Prometheus data source:
- At the left menu, go to Connections → Data Sources → Add data source
- Select Prometheus
- URL:
http://prometheus:9090 - No need to change other settings(leave defaults)
- Click “Save & Test”
- Add Loki data source (for logs):
- Add new data source → Loki
- URL:
http://loki:3100 - Click “Save & Test”
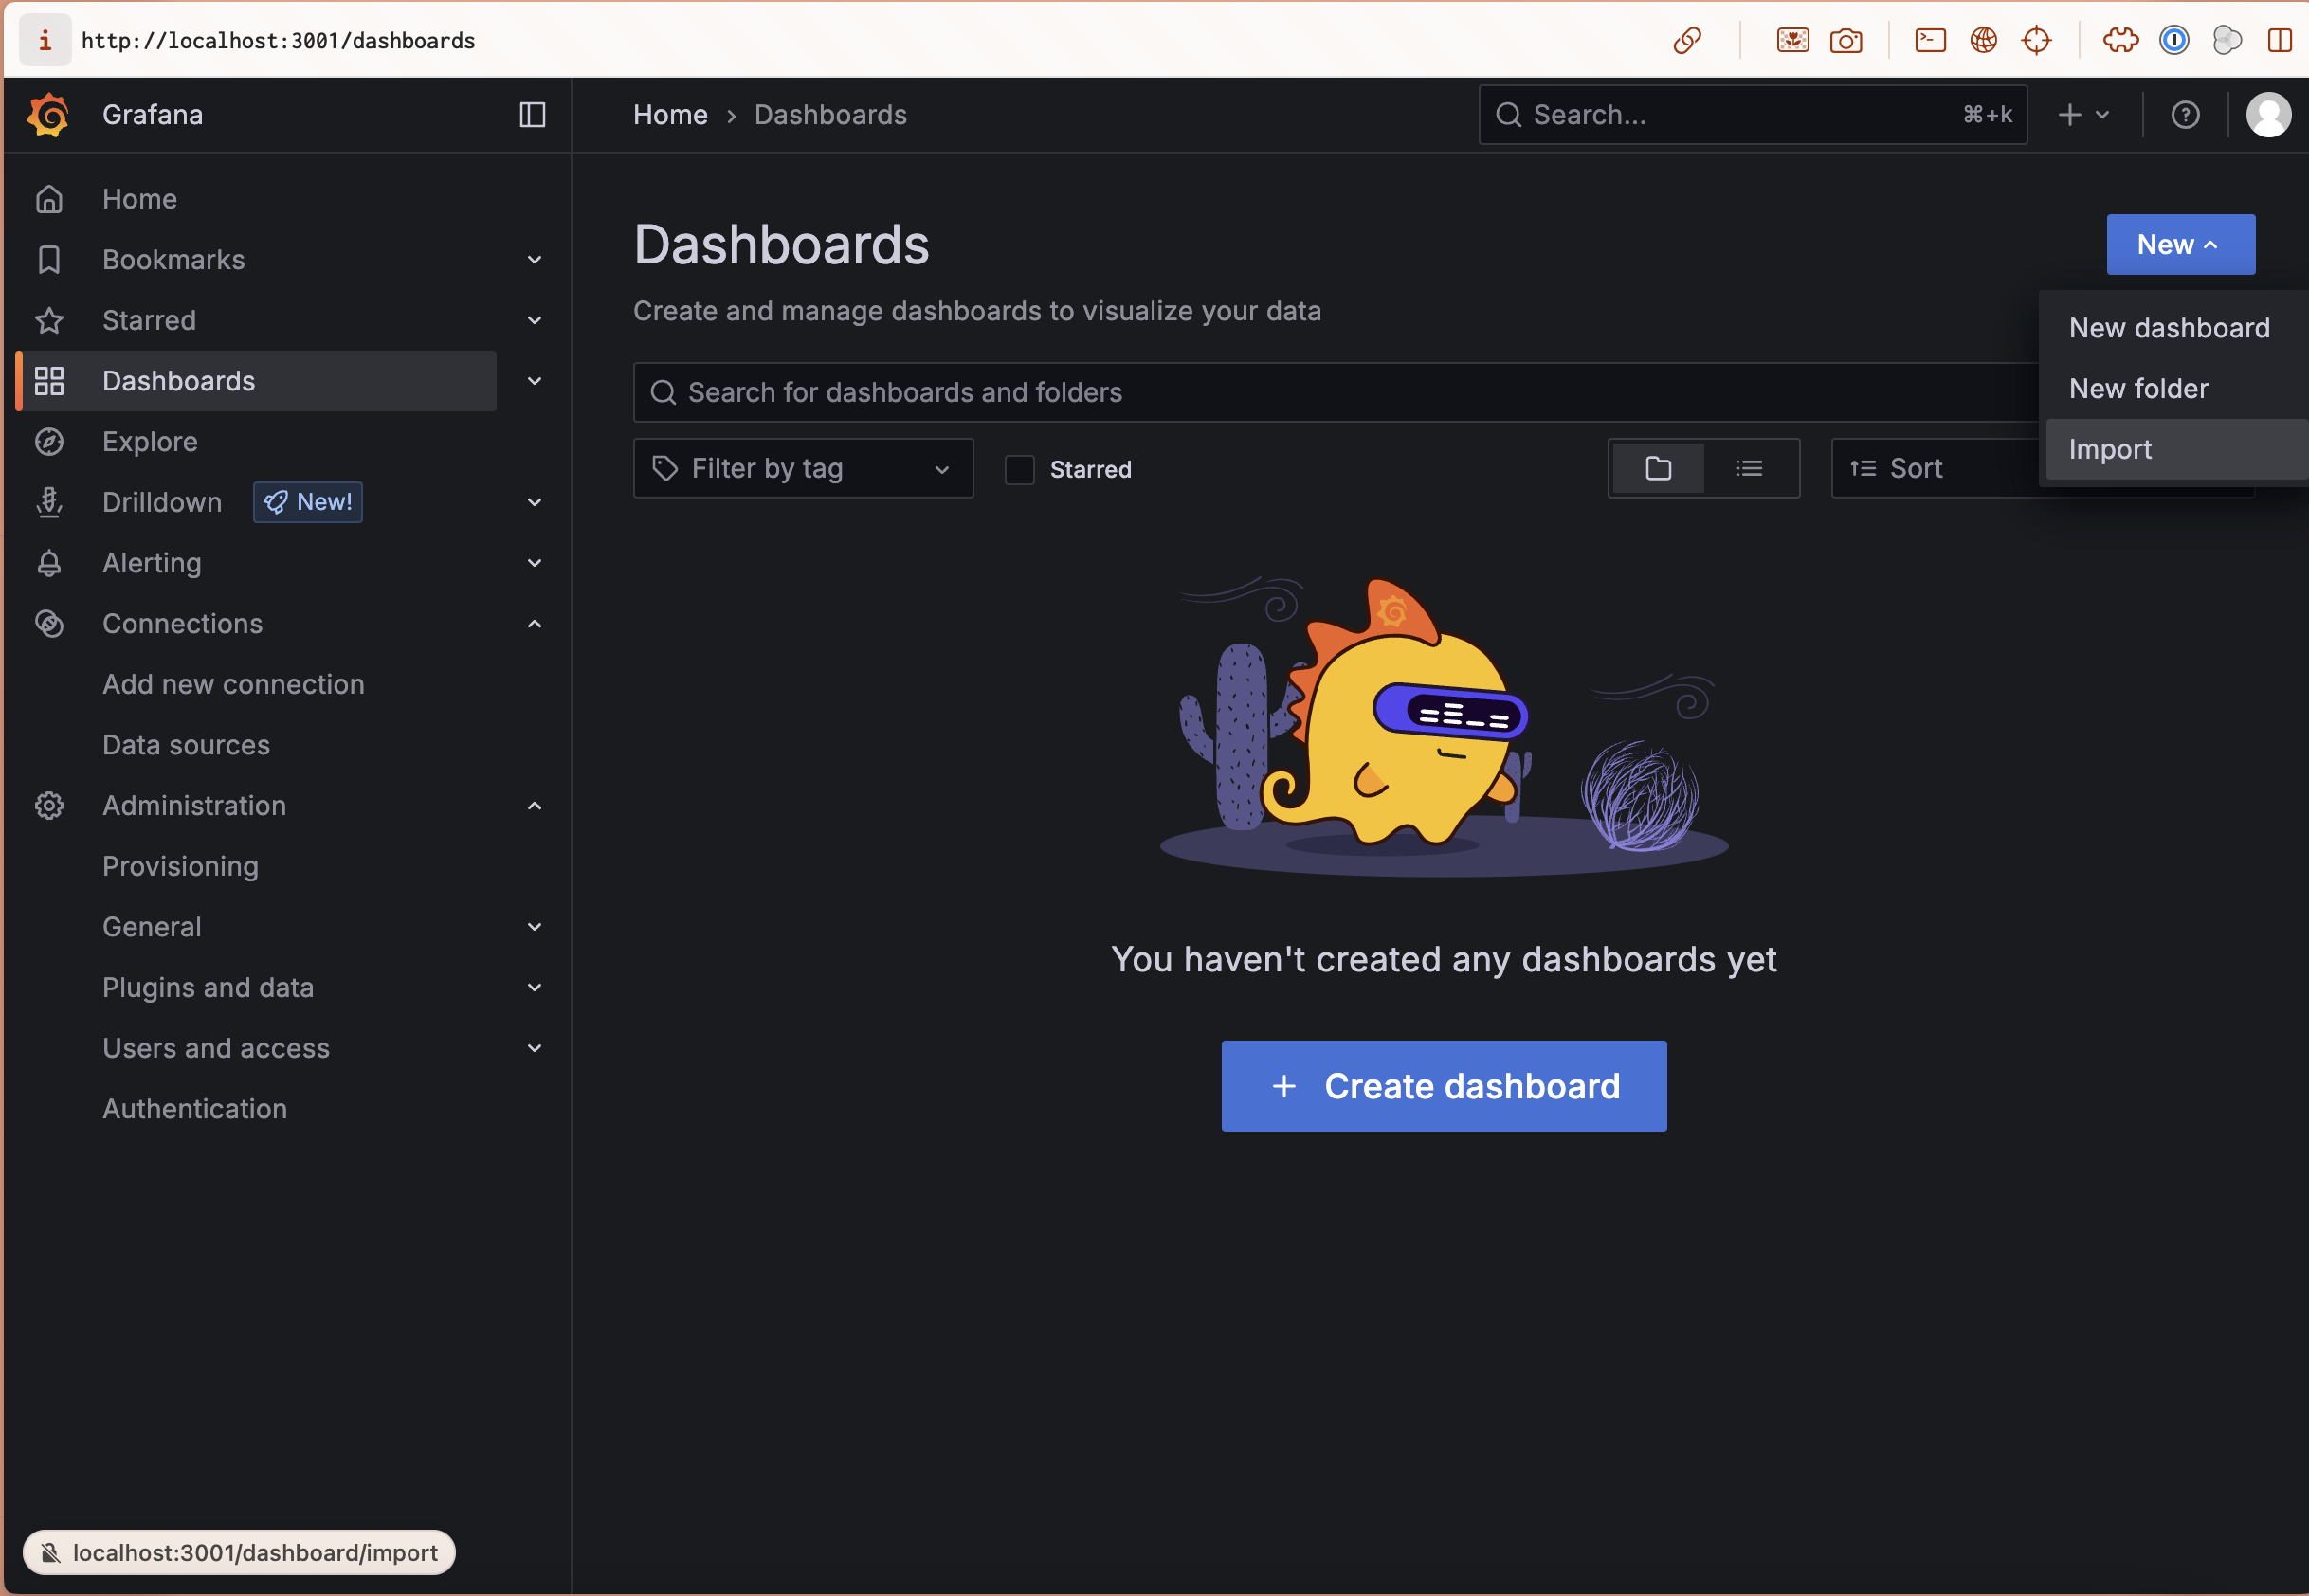
Import Dashboard Templates
Import these community dashboards for instant visibility.
In the left menu, go to Dashboards, then in the right side click on New -> Import.
Enter the dashboard ID and click Load.
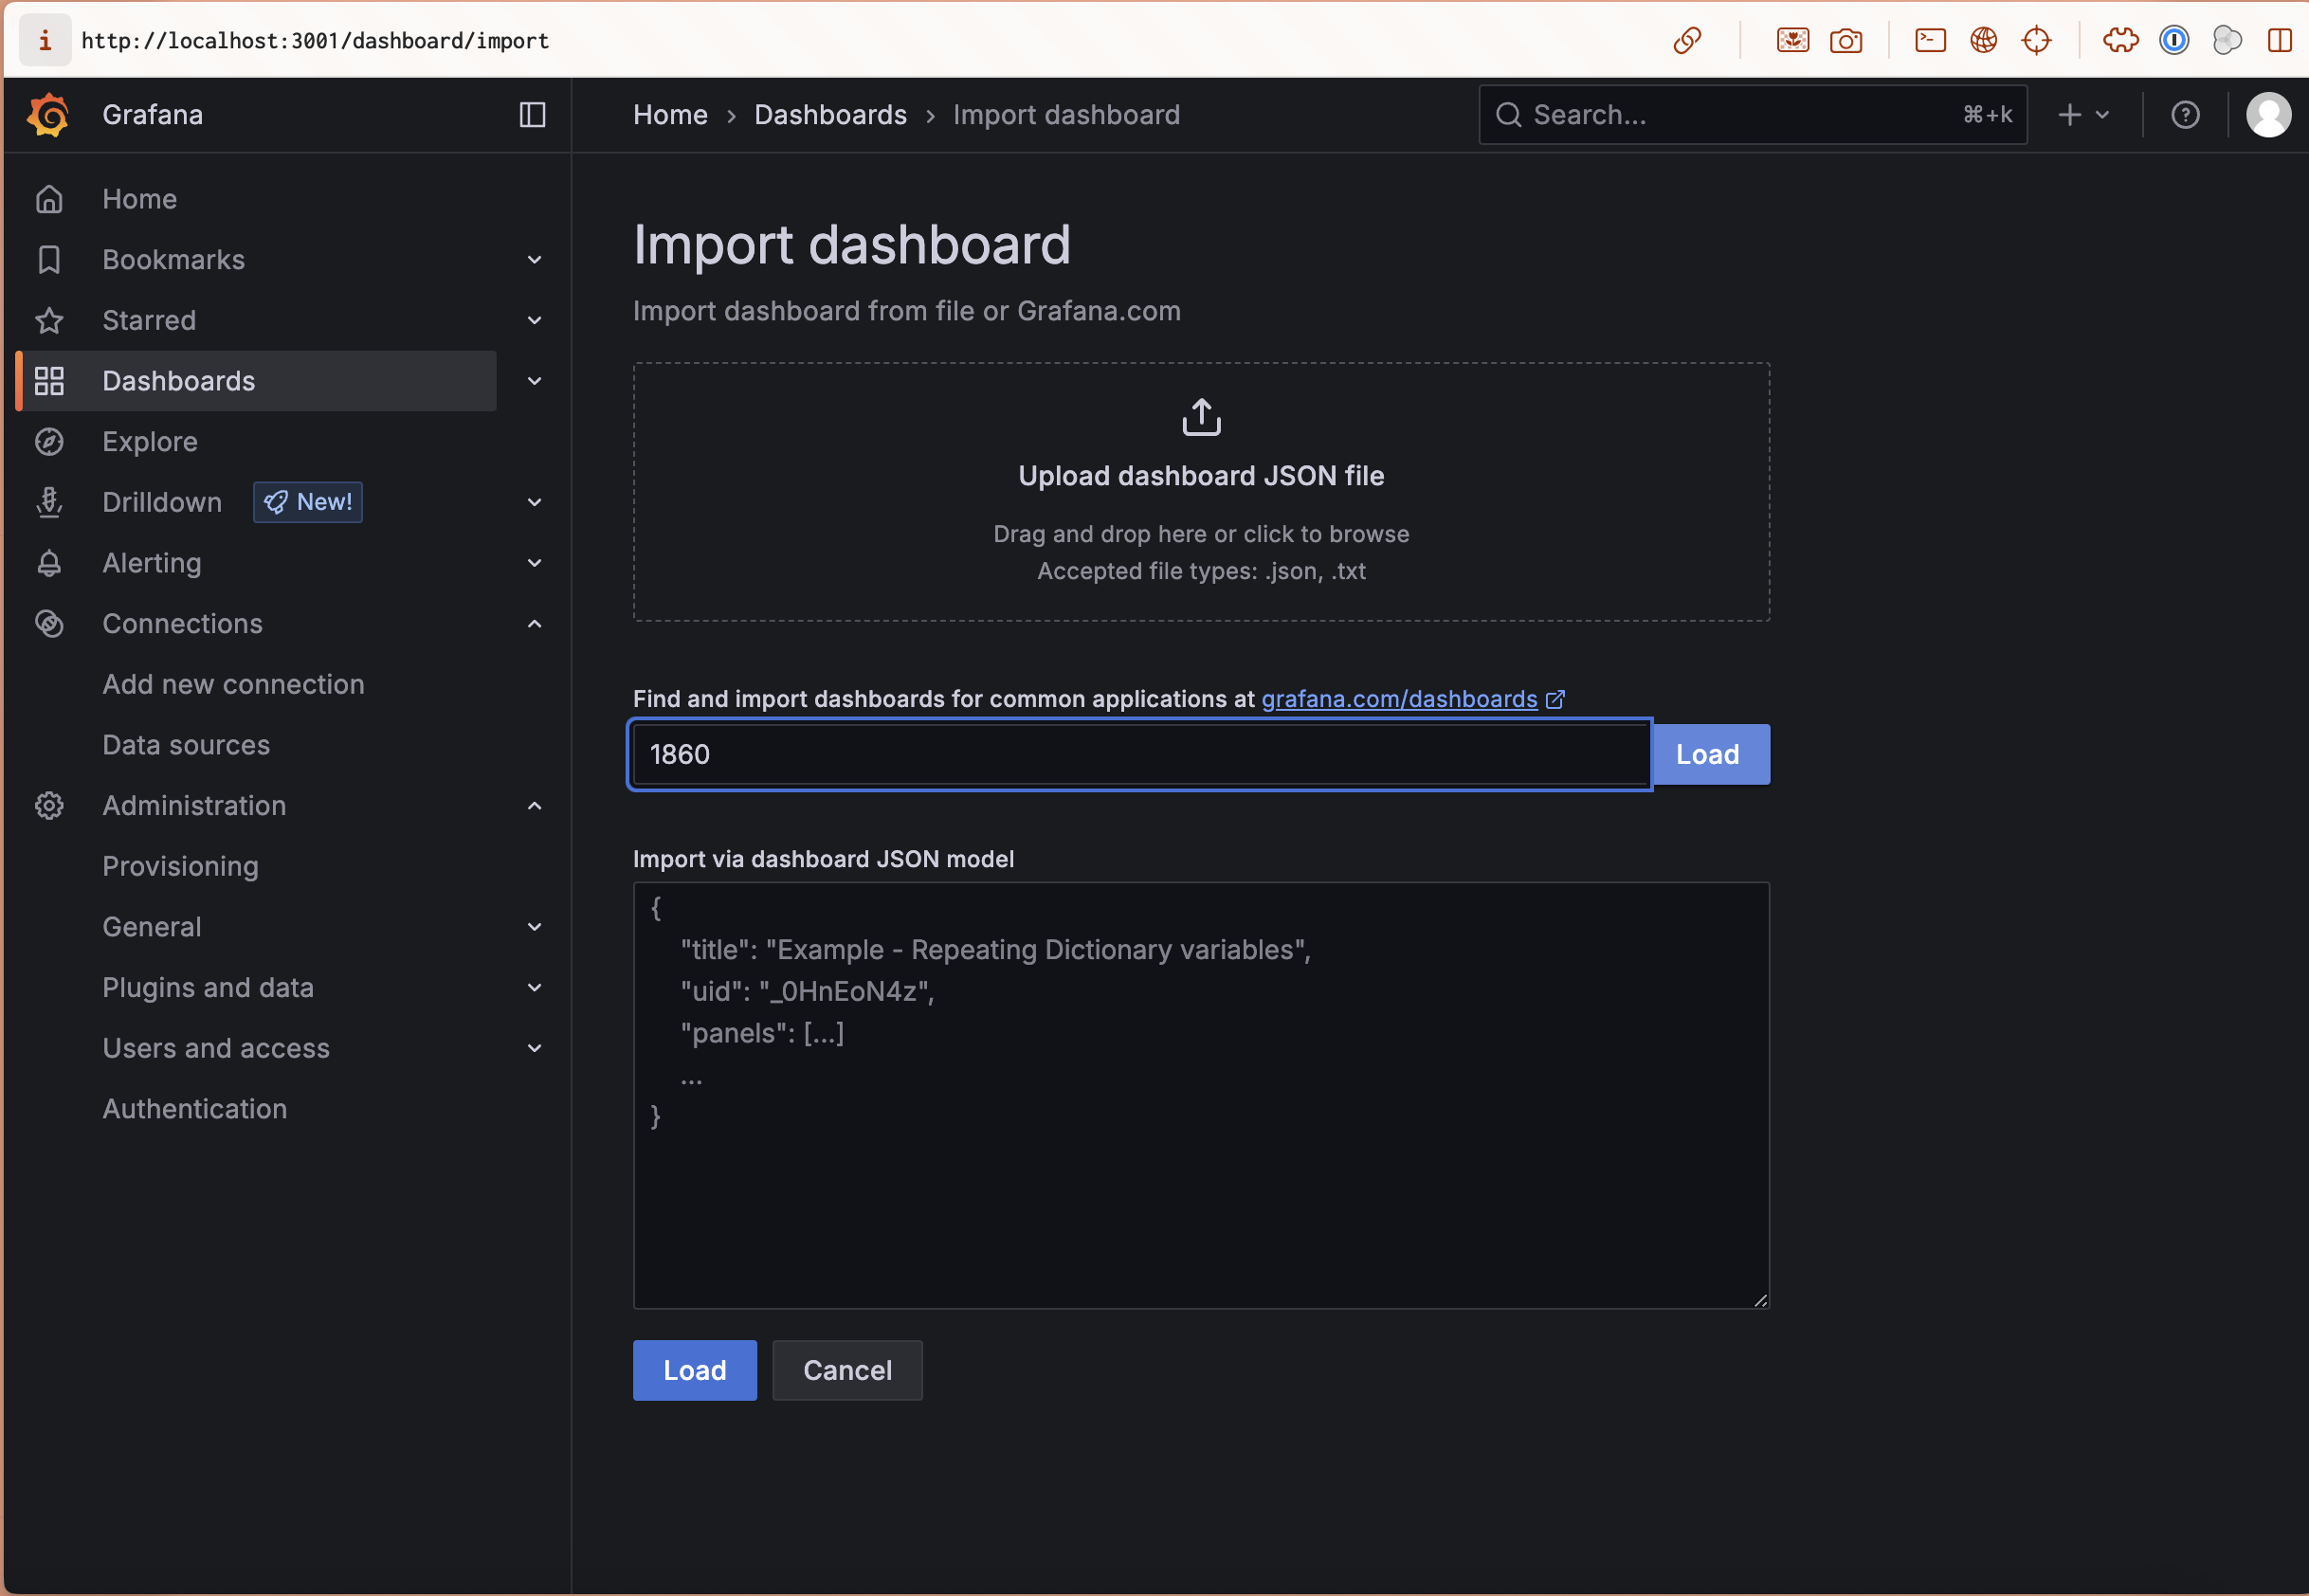
Then in the next page you must select your Prometheus data source.
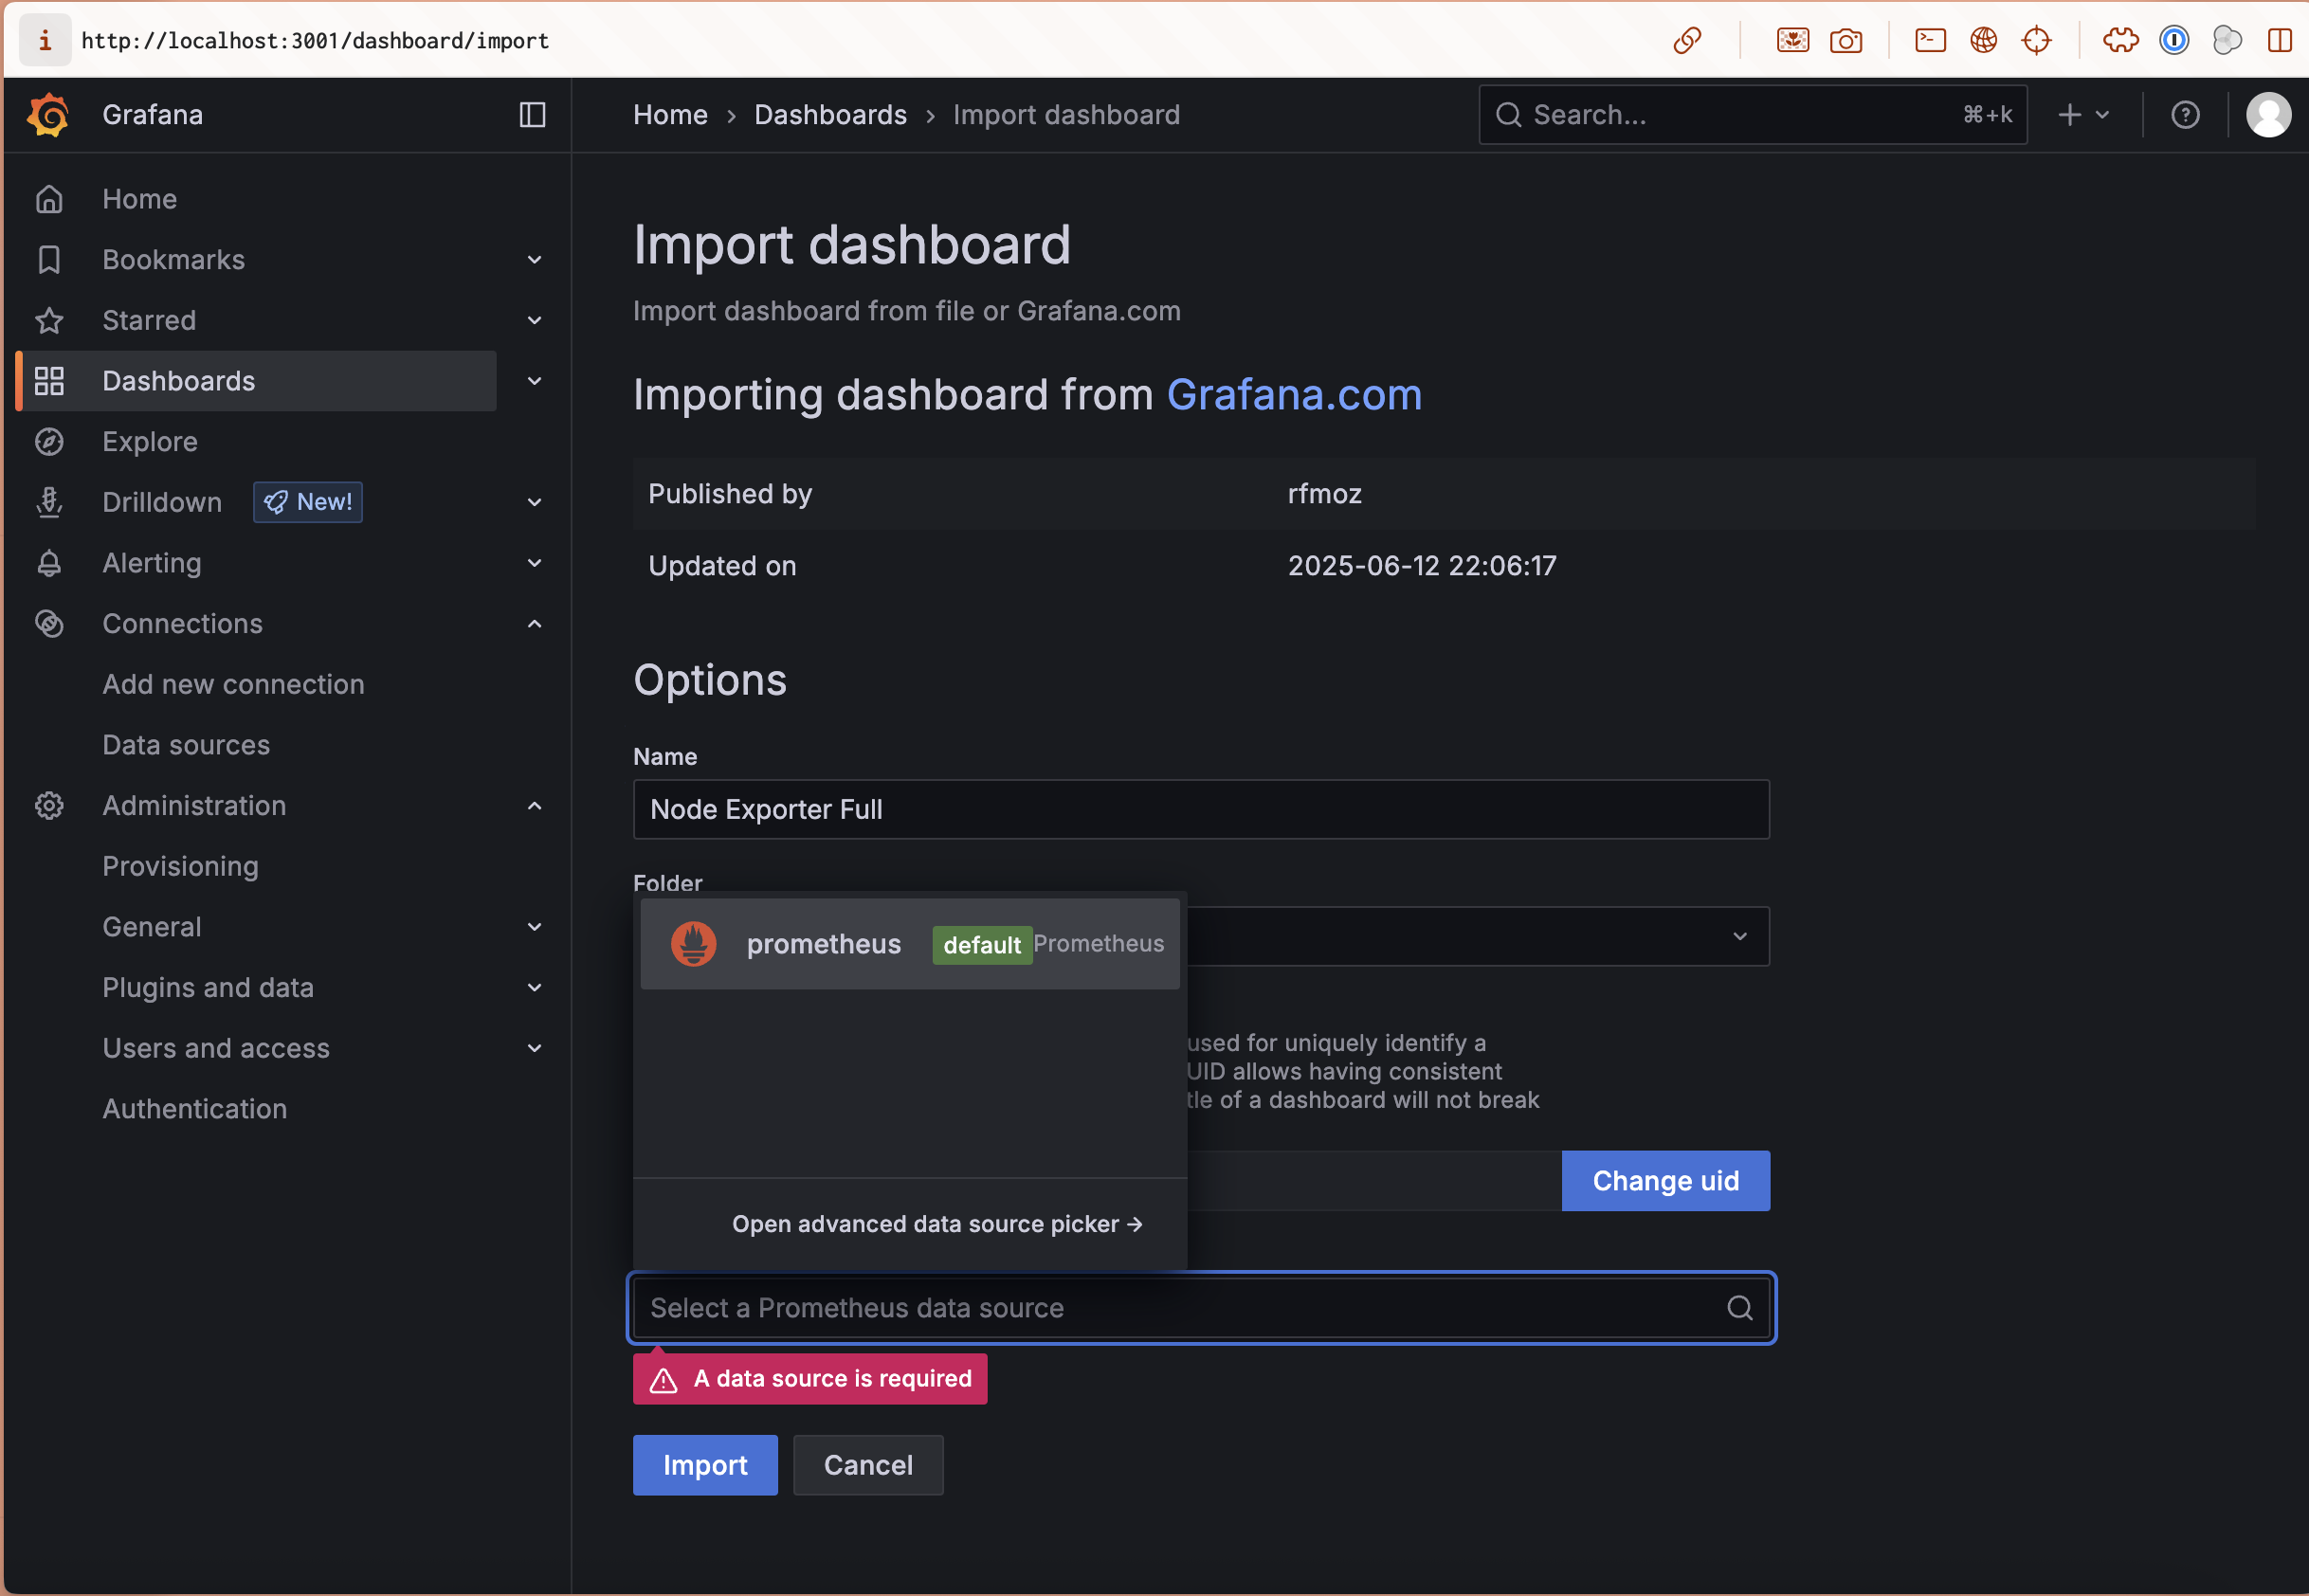
and then click on Import button.
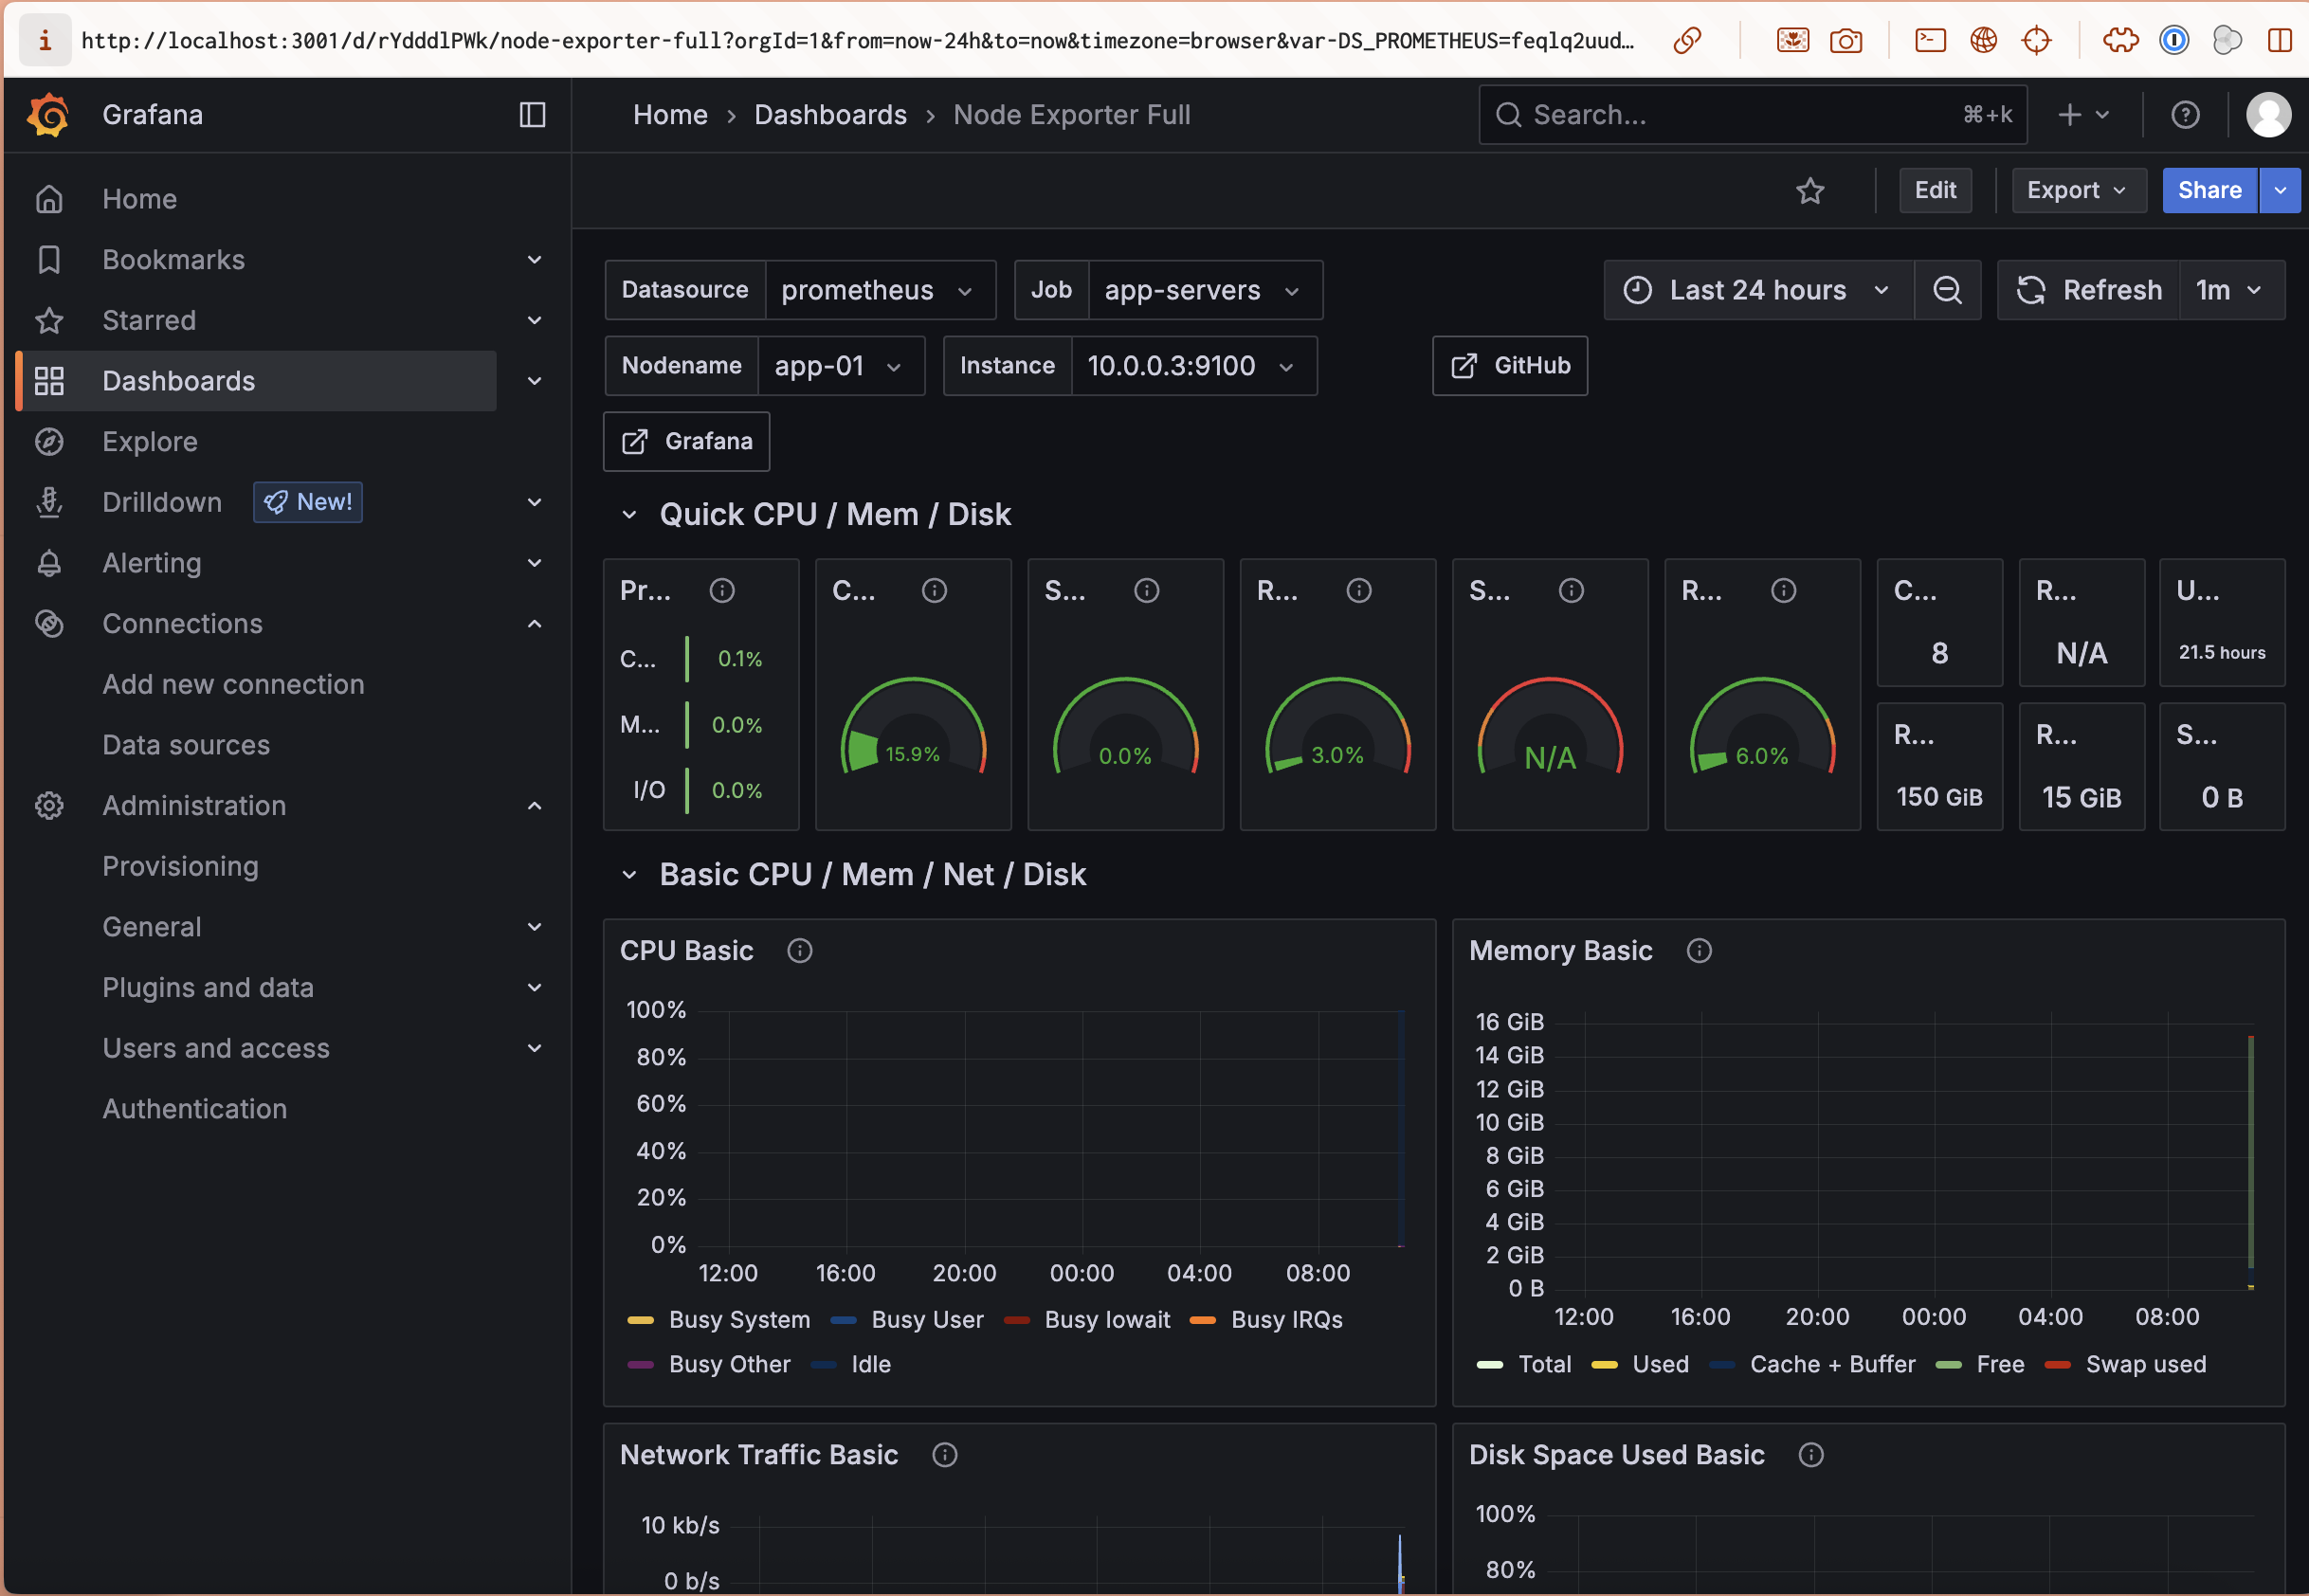
- Node Exporter Dashboard: ID
1860- Shows CPU, Memory, Disk, Network for all servers
Again in the left menu, click on Dashboards, then in the right side click on New -> Import.
- PostgreSQL Dashboard: ID
9628- Database performance, connections, queries
- Prometheus Dashboard: ID
3662- Monitoring system health
What You Can Monitor Now
| Metric Category | What You Can Track | Sample Metrics |
|---|---|---|
| System Resources | CPU, Memory, Disk, Network usage | node_cpu_seconds_total, node_memory_MemAvailable_bytes |
| Database Performance | Connections, queries, replication lag | pg_stat_database_tup_returned, pg_stat_replication_replay_lag |
| Disk Health | Storage capacity, I/O performance | node_filesystem_avail_bytes, node_disk_io_time_seconds_total |
| Network Traffic | Bandwidth usage, error rates | node_network_receive_bytes_total, node_network_transmit_errors_total |
| System Load | Load averages, process counts | node_load1, node_procs_running |
You now have comprehensive infrastructure monitoring that provides visibility into system health, database performance, and resource utilization across your entire Rails infrastructure.
I’ll update the documentation to show you how to set a domain for those and open normally without tunneling later.
Step 14: Rails Application Configuration
Will be added soon.
Step 15: Deployment and Operations
Will be added soon.
Step 16: Backup and Maintenance
Will be added soon.
Conclusion
You now have a production-ready Rails infrastructure that provides:
🔒 Enterprise Security:
- Private network isolation
- Multi-layered firewalls
- Single bastion entry point
- End-to-end encryption
🚀 High Availability:
- Load-balanced application servers
- PostgreSQL replication
- Health monitoring and failover
- Zero-downtime deployments
📊 Modern Rails Stack:
- Solid Queue for background jobs
- Solid Cache for distributed caching
- Solid Cable for WebSocket connections
- Comprehensive monitoring
💰 Cost Efficiency:
- ~80/month total cost
- 50-70% cheaper than AWS/GCP
- No vendor lock-in
- Simple operational model
📈 Observability:
- Application performance monitoring
- Infrastructure health tracking
- Centralized logging
- Custom business metrics
This architecture scales horizontally by adding more application servers to the load balancer, provides automatic failover for critical components, and maintains operational simplicity through Kamal’s container orchestration.
Your Rails application is now running on enterprise-grade infrastructure that can handle serious production workloads while maintaining the development velocity that Rails is known for.
- 🏰 Private Zone: All application and database servers (no public access)
- 📦 Storage Zone: Object storage (API access only)
Deployment Strategy
- Kamal: Modern container deployment tool from Rails team
- Zero-Downtime: Rolling deployments with health checks
- Multi-Environment: Separate production and staging configurations
- Infrastructure as Code: All configuration version-controlled